Vernier LabQuest™ Reference Guide Version 1.
LabQuest Reference 1
LabQuest Reference Welcome to Vernier LabQuest LabQuest Reference Guide This is the LabQuest Reference Guide. It is an extended guide to using the Vernier LabQuest. Also available is the shorter LabQuest Quick-Start Guide, included in print in the LabQuest box. An updated version of this Reference Guide may be available at http://www.vernier.com/labquest/updates This guide is written for the second release of the LabQuest software, version 1.1, released in April 2008.
LabQuest Reference Collect Data with LabQuest Here’s how to quickly collect some data with your new LabQuest. 1. Wake up your LabQuest by pressing the silver power button on the upper left corner. If your LabQuest does not wake, your battery may be discharged. Connect the LabQuest to its power adapter, and continue. 2. Connect an analog sensor (auto-ID capable) to one of the ports on the top edge of LabQuest. Something simple like a temperature, light or force sensor is best.
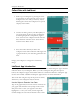
LabQuest Reference point. You can make fine adjustments to the cursor location by using the left and right cursor keys below the screen. The Analyze menu enables additional ways to inspect your data. Tap Analyze, and then tap Tangent. Now tap near an interesting place on your graph; a tangent line is drawn in addition to the examine cursors. On the right side of the graph the numerical value of the slope is shown. To turn off the Tangent function, choose it again from the Analyze menu.
LabQuest Reference the right of the graph. You can tell that LabQuest is in the Interpolation mode by the square cursor shown at the Examine point. To remove the fit, choose Curve Fit again from the Analyze menu. Multiple Runs You can collect several runs for comparison. Tap the file cabinet icon ; the run will be stored, and the graph cleared. Collect another run by pressing the Collect button. Your new run is displayed on the graph.
LabQuest Reference Collect some data on LabQuest so you can try this. Then, connect the LabQuest to your computer and launch Logger Lite or Logger Pro. The computer application will detect the LabQuest and its data, and display a dialog indicating that remote data are available. Follow instructions in that and subsequent dialogs to download data to the computer.
LabQuest Reference Choose Save As… from the LabQuest Browser (found in the File menu), and enter a descriptive file name. Any data, and the sensor configuration, will be stored on the LabQuest as a LabQuest file. Any features in the computer file not existing on LabQuest (such as embedded images, video analysis, graph annotations or most calculated columns) will be ignored on LabQuest. Delete Data on LabQuest The LabQuest Browser includes a Delete function.
LabQuest Reference on the LabQuest, or for download to a computer. If you only want to download the current LabQuest session to computer, it is not necessary to save a file. Connect LabQuest to a computer, and launch Logger Pro or Logger Lite. New New will reset data collection mode and calibrations to defaults, and will clear any existing data. You will be prompted to save any unsaved data. Open Open displays a list of the files available on your LabQuest. Initially this list is empty.
LabQuest Reference experiments, or a smaller number for cart-based experiments. Both settings return to the default on choosing New from the File menu, or after turning on the LabQuest. Quit Quit will exit the LabQuest App. Only advanced users need this feature, as other applications can be run simultaneously with LabQuest App.
LabQuest Reference Meter Screen The Meter screen displays a digital meter for each sensor, the current mode, and the data collection parameters. Several shortcuts are available on the Meter screen. Tap on a meter to zero, calibrate, reverse, or change units on its sensor. Tap the Mode field to adjust data collection details. Sensors Menu The Sensors menu gives access to detailed setup controls.
LabQuest Reference • The Number of samples exceeds 2000 at rates faster than 80 kHz. The number of samples always includes the pre-trigger samples. Mode: Triggering Triggering is only available in Time Based mode. When enabled, LabQuest will wait for a trigger condition to be met before beginning data collection. For example, you might wait to collect data until a force sensor is rising over 2 N. The sensor name, the level, and the direction of change (increasing or decreasing) can all be set here.
LabQuest Reference Various photogate modes are available to set what LabQuest calculates from the raw block and unblock times. The mode labeled None will generate a table of only the raw block and unblock times. Mode: Motion Timing Motion Timing is used for picket fences and ultra pulley experiments, and yields position, velocity and acceleration data. The distance between block events can be set; default values for common objects are already defined for you.
LabQuest Reference calibration for that sensor is read from the sensor when LabQuest identifies it. However, some sensors require calibration. Calibration requires that you have two reference conditions available for a sensor. For example, for a pH sensor you might have buffers of pH 4 and 10. We will use that as an example here. Choose calibrate, selecting the particular sensor as necessary. You will see the calibration dialog. Tap the Calibrate Now button to begin.
LabQuest Reference There are several important shortcuts on the Graph screen. After collecting data, tap on the graph itself to read values from the examine cursors. Read values in the readouts to the right. Tap the file cabinet icon to store a run; choose between stored runs with the menu to the left of the cabinet icon.
LabQuest Reference Strike Through Data/Restore Data The Strike Through Data option allows you to ignore selected data. Struck data are ignored for analysis and graphing. Select a region on the graph, then choose Strike Through Data. The data are ignored. To reverse this action, choose Restore Data. Autoscale Once Autoscale Once will set the graph ranges so that all points are plotted. Zoom In/Zoom Out You can view a smaller region of the graph by dragging across it to select, and choosing Zoom In.
LabQuest Reference Curve Fit Curve Fit allows you to automatically fit a chosen function to your data. If a region of the graph is selected, only that region is used for fitting. If there is no selection, the entire width of the graph is used. Choose the desired fit equation from Proportional, Linear, Quadratic, Power, and Natural Exponent. On choosing the fit equation, LabQuest will perform the fit and display the coefficients and Root Mean Square Error (RMSE). Tap OK to return to the main Graph screen.
LabQuest Reference Motion Match The Motion Match menu item is only available if a Motion Detector is connected. You have a choice of a new Position or Velocity match. In each case LabQuest generates a random target graph for matching exercises. Only the selected graph, Position or Velocity, is shown in match mode. You may collect data over the target graph as many times as you like. To see a new target graph, choose New Position Match or New Velocity Match again. Remove Match removes the target graph.
LabQuest Reference The Edit item allows you to copy and paste values from one place to another. In particular you might copy a range of values and paste them into notes on the next screen, called the Notes screen. Tip: To make a graph of data from other sources, enter values in two manual columns, and then plot them in a LabQuest graph. Notes Screen The Notes screen is a place to enter and view text and images.
LabQuest Reference • • • • Vernier Spectrometer (V-SPEC) Ocean Optics Red Tide (SPRT-VIS, SPRT-UV-VIS, ESRT-VIS) Ocean Optics USB2000 Ocean Optics USB4000 (SP-VIS, SP-UV-VIS) LabQuest may require the user of a powered USB hub with some SP-VIS units. All spectrometers are auto-ID; connect a device, and select New from the File menu of LabQuest App if the spectrometer is not immediately found. Spectrometers have their own specialized data collection modes and units.
LabQuest Reference modes. View Full Spectrum Once a spectrometer is calibrated, place a sample in the cuvette holder. Tap Collect. Absorbance, Transmission or Intensity will be displayed as a function of wavelength. The spectrum will be updated as quickly as possible, with the previous spectrum replaced by the current one. When you tap Stop, the latest spectrum will be retained.
LabQuest Reference Sample Time The Sample Time adjusts how long the spectrometer collects light for each sample. This value is set by the calibration routine, so changing it subsequently will ruin the calibration. Altering this value is useful for intensity measurements to keep peaks in range. Wavelength Smoothing Wavelength Smoothing adjusts the number of adjacent readings on either side of a given value that are used to calculate an average value.
LabQuest Reference Hint: The battery icon updates every few minutes. As a result it might appear that a LabQuest, left charging while off, has not successfully charged. You can force the display to update by connecting and disconnecting the AC power supply while LabQuest App is running—or just by waiting a few minutes. Set the time and date by tapping the time display at lower right. Usually this is not necessary as LabQuest time is synced to the computer’s clock on connecting to Logger Lite or Logger Pro.
LabQuest Reference Tip: If the screen calibration has been changed so that you cannot tap on menus, use the hardware keys to display the home menu, cursor keys to highlight Control Panel, press right arrow to display the submenu, then cursor keys to highlight Calibrate Screen. Select that item by pressing OK. This will start the calibration routine without relying on the touch screen. Light & Power Light & Power controls screen brightness and the time to dim screen.
LabQuest Reference Hardware Keys on LabQuest The front panel of LabQuest contains keys that allow you to perform many tasks without a stylus. The Collect button duplicates the on-screen collect button. The remaining buttons are: • Escape. Dismisses a menu or dialog and takes no action. • Screens. Cycles through the screens of LabQuest App. • Menu. Pulls down the first menu available; to see additional menus use the right arrow key. • Home. Displays the Home menu. • OK.
LabQuest Reference Use only the supplied AC adapter to charge the LabQuest battery. The LabQuest uses a high-quality lithium ion battery. This is the same chemistry used in premium laptop and cell phone batteries, and you can expect similar performance. There is never a need to condition the battery by regular full discharge/charge cycles. To optimize battery day-to-day battery life, set the screen brightness to the minimum acceptable level, and turn off the LabQuest when it is not in use.
LabQuest Reference The LQM is computer software that can be used to demonstrate the functions of a LabQuest on a computer. Tip: Use LQM to project the LabQuest for a group presentation. The emulator performs almost all functions of the LabQuest itself, including collecting data from a LabQuest unit connected to the computer. Tip: Use LQM to make screen shots for written documentation. Most of the screen shots in this guide were made using LQM. LQM is currently available for Windows XP and Vista only.
LabQuest Reference Specifications LabQuest device 7 cm × 5.3 cm (8.
LabQuest Reference The original release of LabQuest App (1.0, released fall 2007), did not support spectrometers, radiation monitors, blood pressure sensors, or rotary motion sensors. The internal microphone was not available for data collection. LabQuest does not support any kind of wireless networking at this time. LabQuest does work with most older Vernier sensors. An adapter, DIN-BTA, is required for sensors with a round, 5-pin DIN connector.
LabQuest Reference License Information This product contains certain open source software originated by third parties that is subject to the GNU General Public License as published by the Free Software Foundation, GNU Library/Lesser General Public License (LGPL) and different and/or additional copyright licenses, disclaimers or notices. These licenses give you the right to redistribute and/or modify the software.