
Installation & Assembly_Exterior Entry Systems
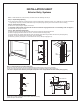

Door And Sidelite Installation
Step 8: Align Unit
, :8;70?0&?0;>,9/
- $7@8-,7429>348,9/>0.@=0?30@94?>4847,=
?:&?0;>,9/0249B4?3?30>4/074?05,8-
90,=0>??30/::=349205,8-&?0;?309>0.@=0
=08,49492>4/05,8-&?0;":?0&348,-:A0
-:?3/::=5,8->,??3030,/5,8-;=4:=?:>0.@=
492?30@94?
. :77:B&?0;>,9/
Double Door Installation
Step 9: Shim & Secure Inactive Hinge Jamb
, :8;70?0&?0;>,9/
- //>348>,-:A0?3030,/5,8-1=:8?3049>4/0
?:8,49?,49;=:;0=.70,=,9.0>,9/,7429809?
. $7@8-,9/9,47?30-=4.68:7/1=:8?30:@?>4/0
:9?3049,.?4A0/::=>4/0:97D
Step 10: Shim & Secure Active Hinge Jamb
, :&?0;>./,9/0
- ",47?3030,/49;7,.0,??30>3487:.,?4:9>
. ",47?3030,/,9/349205,8--=4.68:7/
/ :77:B&?0;,9/
Finishing Steel Doors
. &,9/09?4=0>@=1,.0:1?30/::=B4?3,2=4?>,9/;,;0=,9/B4;0.70,9B4?3,>:1?.7:?3
/ 70,9/::=B4?3,847//0?0=209?>:7@?4:9=49>0,9/70?/=D
0 (>0:97D,90C?0=4:=,.=D74.7,?0C;,49?:9?300C?0=4:=>4/0:1?30/::='3049?0=4:=>4/0.,9,..0;?04?30=,90C?0=4:=:=49?0=4:=,.=D74.7,?0C
;,49?;;7D;0=?30;,49?8,9@1,.?@=0=>49>?=@.?4:9>
1 :9:?;,49??30B0,?30=>?=4;:=34920>:9:?.7:>0?30/::=@9?47?30;,49?4>.:8;70?07D/=D
g)
All 6 sides of the door should be painted or sealed to prevent damage or warping. Fiberglass composite doors are to be sealed and or painted
inside and out. Do Not Leave the Inside Unfinished. Failure to finished all sides of the door will void all warranties.
Note: For Fiberglass Grained doors, see staining instruction sheet for finishing doors. For the best finish, use the MMI Artist Oil Stain
Kit. Leave protective sill cover or protective tape on the sill riser until construction is complete, where applicable.
Policy
a. 77@91494>30//::=>,=0>@-50.??:;:>>4-7070,6,20,=:@9/?3027,>>,9/,=:@9/;,907>,9/:=,=:@9/7:.6:;09492>@9?47>@.3?480,>
?30D,=0;=:;0=7D1494>30/49,..:=/,9.0B4?3?308,9@1,.?@=0=F>/4=0.?4:9>,47@=0?:.:8;7DB477A:4/,9DB,==,9?D0C;=0>>0/:=48;740/
,2,49>?>@.370,6,20,9/B4779:?-0.:9>4/0=0/,;=:/@.?1,47@=0
b. $=:;0=49>?,77,?4:94>0>>09?4,7?:;=0A09?B,?0=70,6,20@9/0=9:=8,7.:9/4?4:9>,47@=0?:;=:;0=7D.,@76under and around ,9D@94?,>
;0=?3049>?,77,?4:949>?=@.?4:9>.,9.,@>0B,?0=70,6,20,9/:=1=,80=:?9>?,77,?4:9"#'49,..:=/,9.0B4?3?308,9@1,.?@=0=F>/4=0.?4:9>
B477void any warranty 0C;=0>>0/:=48;740/,2,49>?>@.370,6,20,9/B4779:?-0.:9>4/0=0/,;=:/@.?1,47@=0
c. 77=0>4/09?4,7;=:/@.?>,=0/0>4290/?:-0@>0/@9/0=9:=8,7.:9/4?4:9>9D,;;74.,?4:9B34.3=0>@7?>49>0A0=00C;:>@=0>3:@7/-0.:9
>4/0=0/,>;0.4,7.4=.@8>?,9.0,9/,;;=:;=4,?0;=0.,@?4:9>>3:@7/-0?,609-01:=0/0?0=849492B3,?;=:/@.?4>-0>?>@4?0/1:=,;,=?4.@7,=
,;;74.,?4:9*30949/:@-?.,771:=8:=0491:=8,?4:9-01:=0;=:.00/492
d.
!,9@1,.?@=0=4>?=4-@?:==0>0=A0?30=423??:=01@9/?30:=4249,7;@=.3,>0;=4.0:=?:=0;,4==0;7,.0,?:@=:;?4:9,9D;=:/@.?B34.34?/008>
?:3,A01,470/!,9@1,.?@=0=4>?=4-@?:=B4779:?-0=0>;:9>4-701:=49.4/09?,7:=.:9>0<@09?4,7/,8,20=,80=:?.,9-0.:9>4/0=0/:90
1:=8:149.4/09?,7:=.:9>0<@09?4,7/,8,20=0>@7?4921=:8B,?0=70,6,20B30?30=A4>4-70:=9:?:9>@80=>,=0,/A4>0/?:=0;:=?,9D
>429>:170,6,204880/4,?07D?:?3049>?,770=:=?:?300,70=B30=0>,4/;=:/@.?B,>;@=.3,>0/
e. &?,49,-70::=>,=070>>1:=24A492?3,9;,49?0//::=>9:A0=3,92?3,?849484E0>?300C;:>@=0?:-:?34>=0.:8809/0/1?3,?4>9:?
;:>>4-70@9/0=>?,9/?3,?8:>?.70,=1494>30>,;;740/:A0=>?,49B4770=:/049>@97423?=0<@09?=0.:,?492B477-0=0<@4=0/?:600;1=:8
/,8,2492?301494>3?:;.:,?,9/:=>?,49$007492.,9-0,=0>@7?:1>@.30C;:>@=0
f. Door and frame must be finished within 30 days of installation. Failure to comply will void any warranty expressed or implied against peeling
and or warping.
&00*,==,9?D1:=/0?,47>
Step 7: Install Hardware
, 9>?,777:.6,9/>?=460;7,?0;0=8,9@1,.?@=0=>49>?=@.?4:9>
- 1/0,/-:7?4>/0>4=0/=08:A00/2014770=;7,?08:>?>?007/::=>,9//=477/::=0/20,9/1,.01:=/0,/-:7?;0=8,9@1,.?@=0=>?08;7,?0
::=&4/074?0(94?
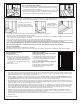
Step 5: Threshold Cap Adjustment
,
190.0>>,=D?30?3=0>3:7/.,;.,9-0,/5@>?0//5@>?809?4>,..:8;74>30/
-D>74/492,;:.60?69410-7,/0:=?3@8-9,47@9/0=?3017,920:1?30>.=0B
.:A0=?:741?4?:11,>>3:B94942@=0
- %08:A492?30>.=0B.:A0=B477=0A0,7?30,/5@>?809?>.=0B(>492,>.=0B
/=4A0=,>>3:B94942@=0?305,.6>.=0B>8,D-0?@=90/?:,/5@>??30
?3=0>3:7/.,;?:?30/0>4=0/30423?%0;7,.0?30>.=0B.:A0=>
(%
(%
,@76,??30.:=90=B30=0?30
,7@849@8:1?30>477800?>?30
1=,80.:8;:909?>:9:?.,@76
:9?:;:1?30,/5@>?,-70?3=0>3:7/
.,;
1?30>4770C?09/0=4>
49>?,770/,;;7D,-0,/
:1.,@76B30=0?30
0C?09/0=800?>?30>477
Step 6: Caulk And Finish Unit
, ,@76,=:@9/?30-=4.68:7/,9/?305:49?-0?B009?30>4775,8-,9/8@77;:>?(>0,3423<@,74?D>474.:90:=9:93,=/09492.,@76
- ",47>0?,9/;@??D,779,4730,/>9>@=0.:=90=>0,7>,=0>0.@=07D49;7,.049-:?37:B0=.:=90=>:1?30@94?