
Installation Instructions

ATTENTION:
IT IS IMPORTANT THAT YOU READ THE FOLLOWING NOTE
BEFORE STARTING THE ASSEMBLY OF YOUR BUILDING
NOTE:
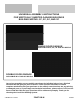
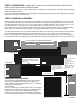
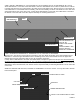
If during the installation process you have difficulty fitting frame components together, use an
adjustable wrench to open end of receiving tube as shown below, left. Close wrench down around bent por-
tion of tube and bend wall outward.
It may also be helpful to hit the center of the swaged at the end of the tube to create more of a lead
.
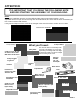
What you’ll need:
Work Gloves
Hammer
PAGE 3
Chalk Line and
Mason Line or
Nylon String
STRIKE WITH HAMMER
Pencil/Marker and
Felt Marker
Cordless (14 or 18 volt)
Or Electric Screw Gun
With 5/16" Socket Drive
Torque Setting
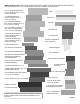
One must be able to comfortably reach
the peak of the building 10’ to 16' high
Depending on building width and height.
An Extension ladder can also be helpful
when installing sheet metal.
2 Step Ladders
Level
Utility Knife
Wrench, 3/4” & 1/2”
Motor Cycle or
Ratchet Straps
(May be required to pull
frame plumb.)
Vise grip or other
quick clamp
Adjustable wrench
Tin Snips
Aviation Snips
Hammer
Drill
Masonry
Drill Bit
1/2” x 8”
Drill depth
Tape Measure
Safety Goggles
Or glasses
Hack Saw or
Circular saw with
Abrasive disk