
Installation Instructions
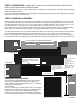

STEP 3: ROOF/WALL FRAME ASSEMBLY
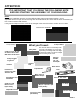
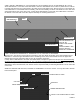
On the ground, assemble (1) peak, (2) rafters, (2) side posts, and (2) height extensions if required. (10’ or 12’ side height
buildings require 2’ or 4’ height extensions.)
Before you fasten the joints with screws take a measurement across the top and bottom of the assembly as shown. This
outside measurement is the outside size of your building. (12’, 20’, 24’, or 30’) Try to keep the joint spacing on both sides
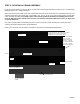
of the assembly equal. It is very helpful to drive stakes into the ground at the width of the building and use them
to set the dimension at the bottom of the assembly. You should set the bottom dimension before you adjust and
set the top dimension.
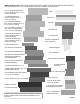
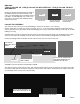
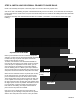
Now, fasten the joints with #12 self-drilling screws. 4 screws in the peak to rafter and side post to rafter joints and 2
screws in the height extension joints. See details below.
NOTE: You can use the first assembly as a template to assemble the remaining Roof/Wall Frames.
PAGE 6
12’, 20’, 24’, OR 30’
12’, 20’, 24’, OR 30’
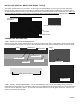
SIDE POST
HEIGHT EXTENSION JOINT
SIDE POST TO RAFTER JOINT
PEAK TO RAFTER JOINT
PEAK
RAFTER
HEIGHT EXTENSION
(NOT ON 8’ SIDE
HEIGHT BUILDINGS)
(2’) 28 3/4”, 1 SWAGE
ON 10’ HIGH BUILDING.
(4’) 52 3/4”, 1 SWAGE
ON 12’ HIGH BUILDING
2’, OR 4’
#12 SELF-DRILLING
SCREW
DRIVE STAKES INTO THE GROUND TO CREATE
A FIXTURE FOR SETTING THE BOTTOM
DIMENSION AT YOUR BUILDING WIDTH.