
Installation Instructions

BRACING:
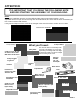
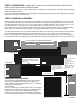
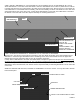
TYPE (1) COLLAR TIE, TYPE (2) COLLAR TIE WITH VERTICAL, TYPE (3) COLLAR TIE WITH
WEB BRACES
Bracing on buildings is determined by the width of
the building and the wind and snow load in your
county. 12’ wide buildings do not normally require a
truss brace. 20’ wide buildings may or may not re-
quire a brace. 24’ and 30’ wide buildings always
require a truss brace.
COLLAR TIE ASSEMBLY:
The Collar Tie (Type 1 brace) for a 12’ wide building, if required, is one piece 2” x 2” x 96” long.
All other Collar Ties are made up of 3 parts: (1) Center Tie 2” x 2” x 111” long swaged (reduced) on both ends and (2)
end ties. End Ties are 2” square tube. On 20’ wide buildings 50 1/2” long. On 24’ wide buildings 74 1/2” long. On 30’ wide
buildings 111” long.
Assembly: Place an End Tie on both ends of the Center tie and fasten each joint with (6) #12 self-drilling screws. Place
screws on one side of the assembly as shown. Note: make sure the assembly is straight when you install screws.
Install a left and right Collar Tie Bracket on both ends as shown. Use one screw in each hole.
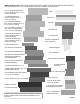
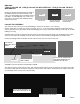
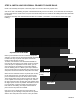
ASSEMBLY OF COLLAR TIE TO ROOF/WALL FRAME:
The collar tie must be centered in the frame. Take a measurement from the end of the side post to the edge of the collar
tie bracket on both ends of the collar tie. Adjust the collar tie side to side until the measurements are equal. Fasten with
(6) self-drilling screws on each side of the assembly.
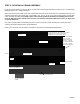
SCREW PATTERN
(BOTH SIDES)
CENTER TIE
END TIE
END TIE
COLLAR TIE
BRACKET LEFT &
RIGHT
LEFT COLLAR TIE BRACKET.
THE RIGHT BRACKET IS A
MIRROR OF THE LEFT.
#12 SELF-DRILLING SCREW
TYPE 1 TYPE 2 TYPE 3
COLLAR TIE COLLAR TIE WITH
VERTICAL BRACE
COLLAR TIE WITH
WEB BRACING
PAGE 7
EQUAL MEASUREMENT ON
BOTH ENDS OF COLLAR TIE