
Product Manual

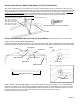
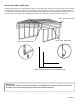

INSTALLING VERTICAL BRACE FOR BRACE TYPE (2) TRUSS BRACE
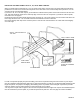
The Center Vertical Brace is 1 1/2” square x 19 1/2” long on 16’ wide carport, 22 1/4” on 18’ wide, 25 1/4” long on 20’
wide, 31 1/4” wide on 24’ wide and 40 1/4” long on 30’ wide. Fasten the brace to the Collar Tie and the Frame Peak with
Single Purlin Brackets. Use two screws in the bracket tongue and one screw in each side flange as shown. Fasten the
brackets to the vertical brace first. Place the assembly together and adjust the parts to fit before installing any screws.
Make sure that the Collar Tie assembly is straight before you fasten the brace to the Collar Tie and Peak.
#12 HEX HEAD, SELF-DRILLING SCREW
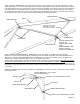
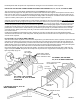
INSTALLING WEB BRACING FOR TYPE (3) TRUSS BRACE: WEB BRACING ON 20’, 24’ AND 30’ ONLY.
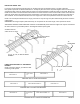
STEP 1: INSTALLING THE PEAK WEB BRACKET.
Measure up from both ends of the peak to find the center and make a mark. Place a Web Bracket centered at your mark
and pressed against the bottom of the peak. Fasten the Bracket to the peak with 3 self-drilling screws as shown in detail.
BRACKET PART # BK-30
PEAK
WEB BRACE 1 WEB BRACE 2
WEB BRACE 3
BRACKET 1
BRACKET 1
PEAK
PEAK
BRACKET 2
BRACKET 3
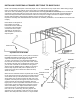
STEP 2: INSTALL TWO OF WEB BRACE 1: On 18’ wide carports 30” long (part #76-3000), On 20’ wide building 36”
long (part # 76-3600), On 24’ wide building 46” long (part #76-4600) and on 30’ wide building 60” long (part # 76-6000).
Place one of the brace ends on top of the Web Bracket tab and the other brace end on the bottom of the tab. Join the
parts with a 3/8” x 1 1/4” hex bolt, lock washer and hex nut. Do not tighten at this time. It may be
necessary to lift the frame to insert bolt.
WEB BRACE LENGTH
WEB BRACE 1
PAGE 11
CENTER BRACE PART NUMBERS:
16W: PART # 7500-01950
18W : PART #7500-02225
20W: PART #7500-02525
24W: PART #7500-03125
30W: PART #7500-04025