
Use and Care Manual


INSTALLING THE 2ND PANEL, 2ND COURSE AND ADDITIONAL PANELS 2ND COURSE
12’, 18’, 24’, AND 30’ WIDE CARPORTS:
See the chart on the bottom of page 17 for panel sizes required for the on center frame spacing of your carport.
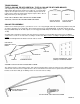
The additional panel/panels in the second course must be positioned with the underlap edge to the upper side of the
panel. The upper underlap edge of the panel will lap under the panel above and the end of the panel will lap under the
panel you just installed. Run a bead of butyl caulk on the end to be lapped under the previous panel 1” from the end and
remove the protective paper. Now, lift the panels above and the previous panel in the course you are installing and slide
the upper edge of the panel under the panel above and the end 2” under the previous panel. Press the panels together
well at the caulked end to get a good seal. For longer carports, continue installing panels in the same manner to the end
of the carport. Both ends of the carport should have the same overhang.
Additional Courses of Sheet metal: Start all additional courses of metal on the carport at the same end as you started
the second course (the high end of the carport). Install them in the same manner. Place underlap edges under overlap
edges.
14’ AND 20’ WIDE CARPORTS:
See the chart on the bottom of page 17 for panel sizes required for the on center frame spacing of your carport.
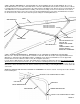
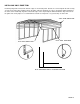
The additional panel/panels in the second course must be positioned like the first panel in the second course with the
underlap edge over the peak of the carport and onto the second rib of the first course. Remove the protective paper on
the butyl caulk and place the end of the second panel 2” over the end of the previous panel. With the ribs lined up and the
panel pressed down to the frame, install the screws as shown below. Install the screws first on the side of the roof that
you installed the first course of panels. For longer carports, continue installing panels in the same manner to the end of
the carport. Both ends of the carport should have the same overhang.
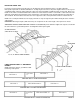
2ND PANEL, 2ND COURSE
12’, 18’, 24’ & 30’ WIDE CARPORTS
2ND PANEL, 2ND COURSE
14’ & 20’ WIDE CARPORTS
2ND PANEL
2ND COURSE
2ND PANEL
2ND COURSE
LIFT END OF PREVIOUS
PANEL AND PANELS
ABOVE. INSERT PANEL
BUTYL CAULK
1”
BUTYL CAULK
1”
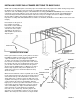
1ST PANEL
3RD COURSE
2ND PANEL
3RD COURSE
LIFT END OF PREVIOUS
PANEL AND PANELS
ABOVE. INSERT PANEL
WITH CAULK
LOW END OF
CARPORT
LOW END OF
CARPORT
LOW END OF
CARPORT
INSTALLING ADDITIONAL PANELS:
All additional panels on 10’, 12’, 18’, 24’ and
30’ wide carports should start on the high end
of the carport (same as second course) and
be installed in the same manner.
All additional panels on 14’ and 20’ wide car-
ports should start at the high side of the car-
port (the opposite end that you started the 1st
and 2nd course) and be installed like the 3rd
course shown at right.
NUMBER OF COURSES: 10’ & 12’ wide (5),
14’ wide (6), 18’ wide (7), 20’ wide (8),
24’ wide (9), and 30’ wide (11).
PAGE 18