
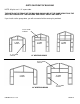
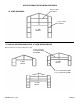
Instructions / Assembly

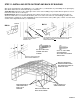


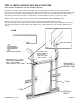
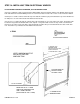


STEP 13: INSTALLATION OF SIDE WALK DOOR TRIM
If door J-Trim is not built in to your door install it at this time.
Cut two pieces of Side J-Trim to fit from the bottom of the sheeting ledge on the slab to the top of the door frame.
Cut one piece of Top J-Trim 2” longer than the door frame. (Note that this piece of J-Trim will extend out beyond the door
frame to the ends of the Side J-Trim front flange on both sides of the door. You may want to place the Side J-Trim on
both sides of the door frame and take a measurement to check that distance before you cut the Top J-Trim.)
Attach the Side J-Trim on both sides of the door to the hat channel with Pan Head Self-Drilling Screws.
Clip two 1” long slits in the ends of the Top J-Trim as shown below. (Both ends of the Top J-Trim)
Now, Place the Top J-Trim on top of the Side J-Trim over the door and fold the tabs that you created at the ends of the
Top J-Trim down into the top of the Side J-Trim. Attach the Top J-Trim at both ends to the top nailer with Pan Head
Screws.
MAKE TWO CUTS 1” LONG
AND FOLD TAB DOWN INTO
SIDE J-TRIM CHANNEL
(BOTH ENDS OF TOP J-TRIM)
J-TRIM
J-TRIM
SHEETING
LEDGE
J-TRIM
DOOR MUST
BE INSTALLED
BEFORE TRIM
PAGE 27
2” LONGER THAN
DOOR FRAME OR
OUT TO FRONT
EDGES OF J-TRIM
FRONT FLANGE
1”
CLIP
FOLD TAB DOWN
© MSMP INC. 8-17-04
#10 PAN HEAD SCREW