
Instructions / Assembly


PAGE 35 © MSMP INC. 8-17-04
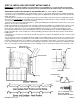
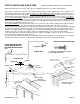
STEP 19: INSTALLING ROOF SHEET METAL PANELS
LENGTH OF ROOF PANELS: 12’ WIDE BUILDING 6’5” LONG, 20’ WIDE BUILDING 10’-7” LONG,
24’ WIDE BUILDING 12’-7” LONG, 30’ WIDE BUILDING 15’-9” LONG.
YOU WILL NEED AT LEAST TWO PEOPLE TO INSTALL ROOF SHEET METAL PANELS
One person will be on a tall step ladder, extension ladder, or scaffold inside the building at the building peak and the
other on the outside of the building at the eave. An additional person on the inside of the building on a step ladder close
to the side wall can be helpful in lifting the panels onto the roof.
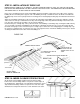
The roof metal is sized to allow a 2” overhang at the eave. We recommend that you measure up the gable end wall frame
from the outside edge of the eave trim and put a mark on the outside of the peak portion of the frame. The distance
should be the length of your roof sheet metal minus 2” (example: on a 20’ wide building the roof panels are 127” long.
The measurement that you would use is 125”.) See illustration on next page.
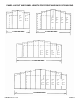
Now, about 1/2” down from the top surface of the peak drive a #12 self-drilling screw into the front of the frame about half
way in at your mark. This screw will be an anchor for a mason line (or string) to be stretched from the front of the building
to the back. This string will be used to locate the top of the roof sheet metal and keep it straight down the length of the
building.
Measure and drive another screw into the outside of the frame at the back of the building. Tie and stretch a mason line or
nylon string between the two screws.
Place the first sheet of roof sheet metal at the front or back edge of the roof flush with the outside of the building frame.
You should start on the same end of the building that you started the side metal. Place the Overlap edge
of the panel
flush with the end of the building frame.
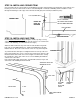
The person at the upper end of the panel must line the panel edge up with the edge of the building and set the upper
edge of the panel even with the string. The person at the lower end of the panel should line the edge of the panel with the
edge of the building frame and attach the edge of the panel to the lower roof purlin with a 1” painted, self-drilling screw
with rubber washer.
The person at the top should then attach the edge of the panel flush with the end of the building. The person at the bot-
tom should then measure the distance from the center of the first rib to the center of the last rib. Set the distance at 36”
and attach that edge of the panel to the lower purlin. Then take a measurement from the under lap edge of the panel to
the next Roof/Wall Frame Section and the person at the top must set the top edge at the same distance and attach the
top edge of the panel to the top roof purlin. This will assure you that the panels at the top and bottom will come out even
with the other end of the building. Now, Install remaining screws into top and bottom roof purlins. Use the same straight
edge or string method that you used on the sides of the building to keep the screws straight and make sure that you hit
the purlins with the screws. At the eave or lower end of the roof panel place one screw on both sides of each major rib.
We recommend that you install one screw next to the under lap rib of the panel at each roof purlin at this time. This will
make the roof more secure when you have to walk on it, and give you location points for installing the remaining screws
later when the purlins are not visible. (A third person will save time and energy with this step.)
Place the overlap edge of the next roof panel over the under lap edge of the previous panel. Line the panel up with the
string at the top and attach that edge at the top and bottom of the panel. Now, take the same measurements that you did
on the first panel. 36” between the center of the first and last rib. Attach at the bottom, measure to the next frame section,
set the top edge at the same dimension and attach the top of the panel. Place one screw in remaining roof purlins at the
edge of the panel.
Repeat this installation method down the length of the building.
When you install the panels on the other side of the roof, you will have to work the top side of the panels from one side or
from the roof on the other side.
When all roof panels have been installed you must get up onto the roof and use the straight edge or string method to in-
stall the remaining screws. When walking on the roof step on the flats only (not on major ribs) . Step on or very
near the purlins or frame members. The screws should be a guide to purlin and frame locations.
(See illustrations on next page)