
Instructions / Assembly


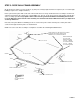


STEP 4: INSTALLING ROOF/WALL FRAMES TO BASE RAILS
NOTE: This assembly will require at least two people. 24’ and 30’ frames may require more.
Start at one end of the building and place a Roof/Wall assembly, with no truss brace, on the first base rail vertical pins.
Fasten joints with two screws each. Keep the screw heads away from the outside of the building where sheet metal will
be installed.
Repeat this assembly until all Roof/Wall assemblies are installed. ( Remember, no Truss Braces at the ends of the
building)
#12 SELF-DRILLING SCREW
PAGE 10
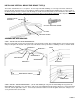
Before you install back and front enclosures and purlins
and girts, you may want to check the Roof/Wall assemblies
to make sure they are plumb and square and that the
height of each side post is equal.
To do this, first check the front and back Roof/Wall sec-
tions to make sure that they are plumb. Check the outside
of the side post. If adjustments must be made, you can
drive a wooden or metal stake into the ground about 8’
from the building and use a Motor Cycle strap or Ratchet
strap to pull the side post into plumb. Place a clamp on the
side post as shown and attach the strap above the clamp.
When the front and back sections are plumb (side to side)
tie two strings from the front side post to the back side
post at the bottom and top of the bend radius as shown.
These strings will let you see which sections are high, low
or out of plumb. If the side posts are high or low, remove
the joint screws and raise the low posts and hammer down
the higher posts as much as possible. Reinstall the screws
in a new location. Check the height of the side posts on
both sides of the building. The straps should remain in
place until the roof purlins are installed.
Note: this is not a critical step, but it may improve the
appearance of your building. If side posts are out of plane
with the other side posts more than 1/4” it may be visible.
SQUARING UP YOUR FRAME
CLAMP
MOTOR CYCLE
STRAP
HAMMER
STRING
SIDE POST