
Instructions / Assembly
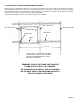
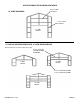
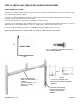

STEP 11: INSTALLING GIRTS ON FRONT AND BACK OF BUILDING
Girts on the front and back of the building are 1 1/2” square tubes. (see illustrations of your building size for girt lengths.)
Girts will be attached to the frame with two types of brackets:
Single Brackets, which are used to attach girts at the corners of the building or any location when the girt does not con-
tinue on the other side of a vertical post.
Double Brackets, which are used to attach girts that continue on both sides of a 2” wide frame member. If girts are
attached on both sides of a 3” wide frame member, (this occurs on the front enclosure of the building) you will use two
Single Brackets overlapped. Use #12 Self-Drilling Screws to fasten brackets to the purlins, girts, or frame. Use Pan Head
Screws on the Single Bracket Tab (see detail below).
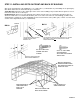
3”
OVERLAP SINGLE BRACKETS
WHEN FRAME MEMBER IS 3”
GIRTS ON FRONT AND
BACK OF BUILDING
HAT CHANNEL ON
SIDES AND ROOF
SINGLE BRACKETS
USED WHEN GIRT
STOPS AT A
VERTICAL
DOUBLE BRACKETS
ON BACK WHEN GIRTS
ARE ON BOTH SIDES OF
VERTICAL POST
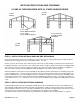
#12 SELF-DRILLING
SCREW. ONE PER
FLANGE.
#10 X 7/8” PAN HEAD,
SQUARE DRIVE
SELF-DRILLING SCREW.
TWO IN TAB.
PAGE 22
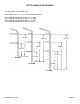
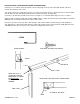
BK-30
FLANGE
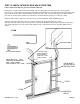
USE PAN HEAD, SELF-DRILLING
SCREWS ON THE SINGLE
BRACKET TAB
USE HEX HEAD, SELF-DRILLING SCREWS IN ALL OTHER
LOCATIONS. PLACE ONE
SCREW IN EACH FLANGE.
CHOSE EITHER HOLE.
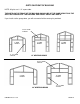
BK-31
FLANGE