Installation Manual V2.0 © 2019 VERT.design IMPORTANT: The installation of pre-hung interior doors must be performed by a professional. If you have any problems or questions regarding the installation process, please email us at: info@vert.design We appreciate your comments and feedback regarding our products and this manual. Thank you, VERT.
Installation Manual V2.0 Installation manual summary: 1. Check rough openings: 3 2. Check Swing Direction (Left or Right) 4 3. Unpack the product 5 4. Follow instructions for the EZ-Hang system 6 5. Install casings 11 6. Install knobs following manufacturer's instructions 14 Product content: ✓ Pre-hung door (Jambs and Slabs). The slab is already installed in the jambs, using chrome hinges.
Installation Manual V2.0 1. Check rough openings: Common size (in) 2. Actual slab size (in) Actual kit size (in) Rough Opening (in) Tolerance (in) W H W H W H W H W H 36 80 35.4 79.1 37.8 80.6 38.5 81 0.37 0.41 32 80 31.5 79.1 33.8 80.6 34.5 81 0.34 0.41 30 80 29.1 79.1 31.5 80.6 32.5 81 0.52 0.41 Check Swing Direction (Left or Right) Left-hand door swing Open the door and stand with your back to the swinging door hinges.
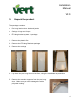
Installation Manual V2.0 3. Unpack the product The package contains: • Pre-hung interior door: slab and jambs • Casings: 4 legs and 2 tops • EZ-Hang bracket system: 1 package 1. Remove the plastic film 2. Remove the EZ-Hang Brackets package 3. Remove the casings 4. Lay down the pre-hung door on the floor, using the cardboard as protection 5. Remove the wooden supports from the pre-hung door. Make sure you don’t damage the white polyester coating.
Installation Manual V2.0 4. Follow instructions for the EZ-Hang system EZ-Hang is the quickest and easiest method available for interior door installation. https://ezhangdoor.com https://ezhangdoor.com/interior-door-installation-instructions/ Installation Video With EZ-Hang, there’s no need for shims, which dramatically reduces the time needed for interior door installation, while simultaneously increasing accuracy, ensuring a perfect fit every time.
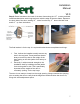
Installation Manual V2.0 Step 1: Using a level, draw a vertical plumb line on the drywall 1/2″ in from the rough opening. This line must be on the hinge side and in the room the door swings in to. • The line does not have to be exactly 1/2″ from the rough opening, but it’s important that it’s plumb. This line, if drawn properly, will allow you to only have to use your level once, instead of constantly having to check the door for plumb and level.
Installation Manual V2.0 Step 2: Screw brackets to the back of the door frame using the 1/2″ screws provided. Install brackets below each hinge and even with the edge of the door frame. Repeat on the knob side of the door, starting 12″ down from the top, 2″ above the latch hole and 6-8″ up from the bottom. The final bracket is for the top. It is a pivotal bracket that accomplishes two things: 1. 2. First, it allows the installer to easily remove any bow in the top jamb.
Installation Manual V2.0 Carpet or unfinished floor Add 3/8″ or 1/2″ blocks under the door if you will be installing carpeting on the floor. This will allow space for the carpet to be tucked under the jambs. It will also provide some adjustment room if the floor is not perfectly level. Step 3: Starting at the top hinge, match one of the lines of the bracket with the level line drawn in step one. Screw the door to the wall using the drywall screws provided.
Installation Manual V2.0 Next, check the clearance between the frame and the door on the top and knob side. Take care to make sure they are equal. • Starting at the top again, continue working your way down the door. Be sure to look at both upper corners where the door meets the jambs. These should be equal. If not, and you are sure the door is perfectly plumb, you may need to raise or lower one side of the jambs to adjust for the discrepancy.
Installation Manual V2.0 5. Install casings VERT Pre-hung interior doors consist of the slab, jambs and casings. The slab comes installed in the jambs with chrome hinges. The casings should be installed on site and require a precise measurement and cut. This should be performed by a professional. The casings should be installed using a 90 degree angle, as shown in the picture. The kits contain four (4) legs (long) and two (2) tops (short).
Installation Manual 1. Start with the hinge side, using the standard L-casings. V2.0 Measure the legs: lean the leg on the floor, vertically (where the casing will be installed). Two marks should be made, as shown in the picture. You can use the top width to make a precise measurement. Temporarily place the top casing in the frame to help you measure it. 2. Make two marks: one at the top end of the casing, and one below the slab. 3.
Installation Manual 4. Measure the Tops: V2.0 After installing the legs, measure the distance between both legs. This is the measure to which the tops should be cut. Mark and cut it. 5. Install the casings by inserting the tenon of the top casing in the mortise of the jamb. 6. Install knobs following manufacturer’s instructions Knobs are not provided. Please follow manufacturer’s instructions. IMPORTANT: please note that the slabs have a plastic edge, and casings have a polyester coating.
Installation Manual V2.
Installation Manual VERT – technical info ● ● ● ● ● ● V2.0 VERT pre-hung KITS are finished products, ready to install (the customer can optionally request a PRIMED version, to be finished on site). They can be installed in minutes, instead of hours as with traditional methods. A trained team can install VERT doors 10 times faster than traditional doors. Not only does this save labor costs, it shortens the total time of door installation.
Installation Manual - Sides: PVC sheet. - Bottom: water-resistant Hot Melt Seal. - Frame and Jambs: Coated in white polyester. V2.0 Color finish: Tanganica / Freijo / Ipê - Surface: UV paint. - Sides: PVC sheet. - Bottom: Water-resistant Hot Melt Seal. - Frame and Jambs: Coated in wood-colored polyester.