EVX-5300 EVX-5400 Operating Manual EVX-5300 EVX-5400 Programmable Functions/Features Available Programmable Function Keys 2-Tone Encode/Decodeø1 5-Tone Encode/Decodeø1 MDC-1200® Encode/Decodeø1 Horn Alert PA (Public Address) Scan Group Scanø3 Dual Watch FM-Scan (Follow-Me Scan) TA Scan Encryptionø1 Privacy (Basic/Enhanced)ø2 VOX Talk Around Emergency Lone Worker TX Save Disable Direct Channel Entryø3, 4 Code Up/Downø1, 3 Code Setø1, 3 Speed Dialø1 DTMF
Congratulations! You now have at your fingertips a valuable communications tool: a Vertex Standard two-way radio! Rugged, reliable and easy to use, your Vertex Standard radio will keep you in constant touch with your colleagues for years to come, with negligible maintenance downtime. Please take a few minutes to read this manual carefully. The information presented here will allow you to derive maximum performance from your radio. We’re glad you joined the Vertex Standard team.
Introduction EVX-5300 EVX-5400 The EVX-5300/-5400 series are a full-featured Digital/Analog transceiver designed for flexible mobile and base station business communications in the VHF/ UHF Land Mobile bands. These transceivers are designed for reliable business communications in a wide variety of applications for a wide range of operating capabilities. The EVX-5300/-5400 series operate using the TDMA protocol for spectrum and power efficiency resulting in lower total equipment cost compared to FDMA.
Warning! FCC RF Exposure Requirements THIS DEVICE COMPLIES WITH PART 15 OF THE FCC RULES. OPERATION IS SUBJECT TO THE FOLLOWING TWO CONDITIONS: (1) THIS DEVICE MAY NOT CAUSE HARMFUL INTERFERENCE, AND (2) THIS DEVICE MUST ACCEPT ANY INTERFERENCE RECEIVED, INCLUDING INTERFERENCE THAT MAY CAUSE UNDESIRED OPERATION. THE GRANTEE IS NOT RESPONSIBLE FOR ANY CHANGES OR MODIFICATIONS NOT EXPRESSLY APPROVED BY THE PARTY RESPONSIBLE FOR COMPLIANCE.
Warning! IC RSS General Requirements English r This device complies with Industry Canada license-exempt RSS standard(s). Operation is subject to the following two conditions: (1) this device may not cause interference, and (2) this device must accept any interference, including interference that may cause undesired operation of the device.
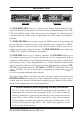
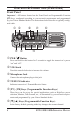
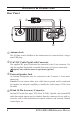
Controls & Connectors (EVX-5300) Front Panel Important! - All buttons located on the Front Panel are Programmable Function (PF) keys, configured according to your network requirements and programmed by your Vertex Standard dealer. The instructions below describe a typically-configured radio. PWR ( ) Button Press and hold in this button for 2 seconds to toggle the transceiver’s power “on” and “off”. VOL Knob Turn this control clockwise to increase the volume.
Controls & Connectors (EVX-5300) Channel Number Indicator Indicates the operating channel. Transceiver Status Indicator The “A”, “B”, and “C” indicators show current transceiver status, which can be customized via programming by your Vertex Standard dealer to meet your communications/network requirements. The possible indicators are explained below.
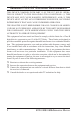
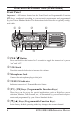
Controls & Connectors (EVX-5400) Front Panel Important! - All buttons located on the Front Panel are Programmable Function (PF) keys, configured according to your network requirements and programmed by your Vertex Standard dealer. The instructions below describe a typically-configured radio. PWR ( ) Button Press and hold in this button for 2 seconds to toggle the transceiver’s power “on” and “off”. VOL Knob Turn this control clockwise to increase the volume.
Controls & Connectors (EVX-5400) LCD (Liquid Crystal Display) The display includes a 8-character alpha-numeric section showing Channel nametags/identity information and error messages, and an upper icon row displaying feature status (see below).
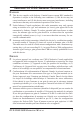
Controls & Connectors Rear Panel Antenna Jack The 50-Ohm coaxial feedline to the antenna must be connected here, using a mini-UHF plug. 13.6V DC Cable Pigtail with Connector The supplied DC power cable must be connected to this 2-pin connector. Use only the supplied fused cable, extended if necessary, for power connection. Replace only with the same or equivalent type fuse. External Speaker Jack An external loudspeaker may be connected to this 2-contact, 3.5-mm miniphone jack.
Basic Operation Important! - Before turning on the radio the first time, confirm that the power connections have been made correctly and that a proper antenna is connected to the antenna jack. Switching Power ON/OFF Press and hold in the PWR( ) button for 2 seconds to turn the radio on. The channel number indicator will indicate the operating channel. Press the []/[] key to choose the desired operating channel. The display indicates a channel number (EVX-5300) or channel name (EVX-5400).
Basic Operation Transmit Time-Out Timer If the selected channel has been programmed for automatic time-out, you must limit the length of each transmission. While transmitting, a beep will sound 10 seconds before time-out. Another beep will sound just before the deadline; the red “TX” indicator will disappear and transmission will cease soon thereafter.
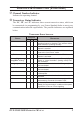
Advanced Operation Programmable Function (PF) Keys The EVX-5300/-5400 series includes six Programmable Function (PF) keys. These PF keys can be customized, via programming by your Vertex Standard dealer, to meet your communications/network requirements. The possible PF key programming features are illustrated on the next page, and these functions are explained beginning after page 14. For further details, contact your Vertex Standard dealer.
Advanced Operation Function None Monitor Monitor -MomentarilyDimmerø1 Low Power Privacy/Encryption Privacy Setø1 SETø1 SQL OFF SQL OFF -MomentarilySQL Setø1 Beep OFF AF Minimum Volume CH Announcement Whisper VOX VOX Setø1 VOX Anti-Trip Horn Alert PA (Public Address) EXT ACC 1 EXT ACC 2 Emergency Lone Worker Group Upø1 Group Downø1 Channel Up Channel Down Speed CH Upø1 Speed CH Downø1 PRI-1 PRI-2 PRI-2 Set PRI-2 Disable Direct CH 1 Direct CH 2 Direct CH 3 Direct CH 4 Direct CH Entryø1, 2 Scan Group Scanø1 Du
Advanced Operation Function Programmable Key (Press Key/Press & Hold Key) Microphone Key (Press Key/Press & Hold Key) Ü A B C D # / / / / / / / / / / / / / / / / / / / / / / / / / / / / / / / / / / / / / / / / / / / / / / / / P1 / / / / / / / / P2 / / / / / / / / P3 / / / / / / / / P4 / / / / / / / / p / / / / / / / / q / / / / / / / / / / / / / / / / / / / / / / / --/-/ / / / / / / / --/-/ / / / / / / / --/-/ / / / / / / / --/-/ / / / / / / / --/-/ / / / / / / / --/-/ / / / / / /
Advanced Operation Description of Operating Functions Monitor Press, (or press and hold), the assigned PF key to cancel any signaling features. In the EVX-5400, when the Monitor function is activated, the “ ” icon will be indicated on the display. Monitor -Momentarily- Cancel any signaling features while pressing the assigned PF key. In the EVX-5400, the “ ” icon will be indicated on the display while canceling any signaling features.
Advanced Operation Privacy Set (This function is only available in the EVX-5400) You can change a Privacy Key Code to maintain the best security using this function: Press, (or press and hold), the assigned PF key. A tone will sound, and the current Privacy Key Number and its tag name will appear on the display. Press the []/[] key to select the desired Privacy Key Code. Press the [P4] key to store the new setting.
Advanced Operation SQL Set (This function is only available in the EVX-5400) You can manually adjust the squelch level using this function: Press, (or press and hold), the assigned PF key. A tone will sound, and the current squelch level will appear on the display. Press the []/[] key to select the desired squelch level. Available selections are “SQLLV OP (Open)”, “SQLLV TH (Threshold)”, “SQLLV NM (Normal)” and “SQLLV TI (Tight)”. Press the [P4] key to store the new setting.
Advanced Operation Whisper Press, (or press and hold), the assigned PF key to increase the microphone gain; allowing you to speak in a low voice (whisper) temporarily. Press again, (or press and hold again), the assigned PF key to resume normal microphone gain. In the EVX-5400, when the Whisper function is “on” and “off”, the display indicates briefly “WHISP ON” and “WHISP OF”.
Advanced Operation VOX Anti-Trip Press, (or press and hold), the assigned PF key to toggle the VOX Anti-Trip feature “On” and “Off”. When the VOX Anti-Trip feature is set to “On”, the transceiver does not activate the transmitter section from the receiver audio or own beep sound. Press again, (or press and hold again), the assigned PF key, the VOX Anti-Trip feature is disabled. In the EVX-5400, when the VOX Anti-Trip feature is “on” and “off”, the display indicates briefly “ATRP ON” and “ATRP OFF”.
Advanced Operation EXT ACC 2 Press, (or press and hold), the assigned PF key to toggle the output port “2” of the D-Sub 15-pin Accessory Connector “On” and “Off”. Emergency The EVX-5300/-5400 series include an “Emergency” feature in either analog or digital modes, which may be useful for alerting another party assistance may be required, when monitoring the same frequency as the pre-defined emergency channel.
Advanced Operation Speed CH Up/Down (These functions are only available in the EVX-5400) Press and hold the assigned PF key causes the radio to begin stepping (repeatedly) upward or downward through the channels. PRI-1 (This function is only available in the EVX-5400) Press, (or press and hold), the assigned PF key to recall the pre-programmed Priority Channel (Priority-1) by your Vertex Standard dealer directly.
Advanced Operation from the microphone’s numeric ([0] - [9]) key. Press the microphone’s [D] key to call the designated channel. You may cancel this function by pressing the microphone’s [C] key. In this case, the display indicates “- CANCEL -” briefly. Note: You may recall and cancel the setting by the [P3] (cancel) and [P4] (recall) key. Scan The Scanning feature is used to monitor multiple channels programmed into the transceiver.
Advanced Operation Dual Watch The Dual Watch feature is similar to the SCAN feature, except that only two channels are monitored: o The current operating channel; and o The Priority-2 channel. To activate Dual Watch: Press, (or press and hold), the assigned PF key to activate the Dual Watch feature. The scanner will search the two channels and pause each time it finds a channel on which someone is speaking.
Advanced Operation When the scanner is paused, you may remove the channel from the scan list temporarily by pressing, (or press and holding), the same key. In the EVX-5400, 1) when store a particular channel to your scanning list, the display indicates “SCN SET” briefly and “ ” icon will appear on the display, and 2) when delete a channel from your scanning list, the display indicates “SCN SKIP” briefly and the “ ” icon will disappear from the display.
Advanced Operation In the EVX-5400, when the Talk Around feature is activated, the “ ” icon will be indicated on the display. Note that your Vertex Standard dealer may have made provision for “Talk Around” channels by programming “repeater” and “Talk Around” frequencies on two adjacent channels. If so, the key may be used for one of the other Pre-Programmed Functions. Note: The Talk Around feature does not activate on a Simplex Channel.
Advanced Operation PTT switch to send a pre-defined DTMF tone. The DTMF tones sent during the dialing sequence will be heard in the speaker. In the EVX-5400, Press, (or press and hold), the assigned PF key, then press the []/ [] keys to select the Auto-Dial memory number which is pre-programmed by your Vertex Standard dealer. Press the PTT switch to send a pre-defined DTMF tone. The DTMF tones sent during the dialing sequence will be heard in the speaker.
Advanced Operation MDC1200® code. Available codes are “CALL ALT”, “SEL CALL”, “RADIO CH”, “STUN” and “REVIVE”. Press, (or press and hold), the assigned PF key to enter the “Call Menu” mode. Press the []/[] keys (or [P1]/[P2] keys) to select the desired Call mode, then press the [P4] key to accept the selection. (You may cancel the selection by pressing the [P3] key). Press the []/[] (or [P1]/[P2] keys) to select the station to be called.
Advanced Operation If the designated radio is active, the designated radio transmits the ACK command and displays your ID number on the display. If not, your radio’s display indicates “NO ACK”. VIEW ID: You may confirm the Call ID of the Contact Alias. Press the [P4] key to confirm the “Call ID”. Press the [P3] key to return the display to the “Tag Name” indication. EDIT TAG: You may edit the “Tag Name” of the selected Contact Alias.
Advanced Operation RADIO CK: You may check the radio status of the selected Contact Alias. Press the [P4] key to transmit the radio status command to the designated radio. If the designated radio is alive, the designated radio transmits the ACK command, and then your radio’s display indicates “ACK RECV”. If not, your radio’s display indicates “NO ACK”. RADIOMON: You may monitor the situation around the designated radio by remote control. Press the [P4] key to remote-control the designated radio.
Advanced Operation r Press the [P4] key again to store the new setting into the contact list as the Private Call. You may cancel the new setting by pressing the [P3] key. IV) Manual: This category allows you to perform the “CALL ALT”, “RADIO CK”, “RADIOMON”, “REVIVE” and “STUN” function for the desired Contact Alias manually by the following operation. Important Note: This function require the optional MH-75A8J 16-Keypad Microphone.
Advanced Operation Duty Press, (or press and hold), the assigned PF key to toggle the Duty function of the 2-tone, 5-tone or MDC1200® decoder “On” and “Off”. When the Duty function is set to “On”, the user will always hear (depending on the sub-audio signaling) all traffic on the paging channel. The radio will sound the paging alert when it receives the programmed 2-tone, 5-tone or MDC1200®. When the Duty function is set to “Off”, the user will NOT hear normal radio traffic on the paging channel.
Advanced Operation Text Message (This function is only available in the EVX-5400) You may receive/send the message from/to other radio. Press, (or press and hold), the assigned PF key to enter the “Text Message” mode. Press the [P1]/[P2] keys (or []/[] keys) to select the function you wish to. Available functions are “IN BOX”, “WRITEø”, and “SEL MSG”. Press the [P4] key to accept the selected function. Refer to follows for detailed operation of each function.
Advanced Operation deleting the all messages by pressing the [P3] key. WRITE: You may create a sending message and send/save it in this function if you use with the optional MH-75A8J 16-Keypad Microphone. The EVX-5400 can memorize up to 24 messages include pre-programmed message which determined by the CE142 Programming Software. Create the message ¦ Create the message using the [0] - [9] key (for select the character) and [A]/[B] keys (for select the digit). The EVX-5400 can create up to 32 characters.
Advanced Operation Edit the message Important Note: This menu appears only when the optional MH-75A8J 16-Keypad Microphone is connected, and you can not edit the message which determined by the CE142 Programming Software. ¦ Press the [P1]/[P2] keys to select message you wish to edit. ¦ Press the [P4] key, then press the [P1]/[P2] keys to select the “EDIT” menu. ¦ Press the [P4] key again, then edit the message using the [0] - [9] key (for select the character) and [A]/[B] key (for select the digit).
Advanced Operation Lock Press, (or press and hold), the assigned PF key to lock the functionality of the front panel’s keys. You may change the lockout configuration by the “User Set (Menu)” mode. See page 36 for more information.
ARTS™ (Auto Range Transpond System) This system is designed to inform you when you and another ARTS™-equipped station are within communication range. During ARTS™ operation, when the radio receives an incoming ARTS™ signal, a short beep will sound. If you move out of range for more than two minutes, your radio senses that no signal has been received; a short triple-beep will sound. If you subsequently move back into communication range, as soon as the other station transmits, a short beep will sound.
User Set Mode The EVX-5400 includes a “User Set” (Menu) Mode which allows the user to define or configure various settings, such as Squelch, Display contrast, etc. To activate the “User Set” (Menu) Mode: Press the PF key assigned to the “SET” function to enter the “User Set” (Menu) Mode. Select the Set Mode item you wish to change using the [P1]/[P2] keys, then use the []/[] keys to adjust the setting of the selected item. Repeat the previous step to adjust other Set Mode item, if desired.
Optional Accessories MH-67A8J MH-75A8J MD-12A8J MLS-100 LF-6 CE142 CT-4 FIF-12 CT-104A CT-171 FRB-6 CT-159 Standard Microphone 16-Keypad Microphone Desktop Microphone External Speaker (12 W Peak Power) Line Filter PC Programming Software Programming Cable (Radio to Radio Clone Cable) USB Programming Interface Connection Cable for FIF-12 (8-pin DIN 8-pin Modular) Connection Cable for FIF-12 (8-pin DIN 8-pin Modular) Tuning Interface Box Connection Cable for FRB-6 (D-Sub 15-pin 8-pin Modul
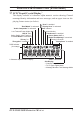
Warning This transceiver’s body is designed as the heat sink. Therefore, the bottom and back sides of the transceiver (show in Gray Color at the illustration below) become very hot during transmission. When install the transceiver, take the setting method that does not touch these areas during usage.
Warranty Policy Vertex Standard warrants, to the original purchaser only, its Vertex Standard manufactured communications products against defects in materials and workmanship under normal use and service for a given period of time from the date of purchase. Limited Warranty Details: North America customers (USA and Canada): http://www.vertexstandard.com/lmr/warranty-terms.aspx Customers outside of North America: contact the authorized dealer in your country.
Note 40 EVX-5300/-5400 Operating Manual
The AMBE+2TM voice coding Technology embodied in this product is protected by intellectual property rights including patent rights, copyrights and trade secrets of Digital Voice Systems, Inc. This voice coding Technology is licensed solely for use within this Communications Equipment. The user of this Technology is explicitly prohibited from attempting to decompile, reverse engineer, or disassemble the Object Code, or in any other way convert the Object Code into a human-readable form. U.S. Pat. Nos.
Vertex Standard LMR, Inc. Copyright 2013 Vertex Standard LMR, Inc. All rights reserved. No portion of this manual may be reproduced without the permission of Vertex Standard LMR, Inc.