
Service manual
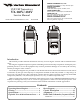


3
Operating Manual Reprint
Preliminary Steps
U Install a charged battery pack onto the transceiver, as
described previously.
U Screw the supplied antenna onto the Antenna jack.
Never attempt to operate this transceiver without an
antenna connected.
U If you have a Speaker/Microphone, we recommend that
it not be connected until you are familiar with the ba-
sic operation of the VX-160/-180.
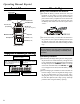
Operation Quick Start
U Turn the top panel’s VOL/
PWR knob clockwise to turn
on the radio on.
U Turn the top panel’s CH selec-
tor knob to choose the desired
operating channel.
U Rotate the VOL/PWR knob to
set the volume level. If no sig-
nal is present, press and hold
in the MONITOR key (the
lower button on the left side)
for more than 1 seconds; back-
ground noise will now be heard, and you may use this
to set the VOL/PWR knob for the desired audio level.
U Press and hold in the MONI-
TOR key for more than 1 sec-
onds (or press the MONITOR
key twice) to quiet the noise
and resume normal (quiet)
monitoring.
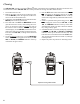
U To transmit, press and hold in
the PTT switch. Speak into the
microphone area of the front
panel grille (lower left-hand
corner) in a normal voice level.
To return to the Receive mode,
release the PTT switch.
U If a Speaker/Microphone is available, remove the plas-
tic cap and its two mounting screws from the right side
of the transceiver, then insert the plug from the Speaker/
Microphone into the MIC/SP jack; secure the plug us-
ing the screws supplied with the Speaker/Microphone.
Hold the speaker grille up next to your ear while re-
ceiving. To transmit, press the PTT switch on the
Speaker/Microphone, just as you would on the main
transceiver’s body.
Note: Save the original plastic cap and its mounting
screws. They should be re-installed when not us-
ing the Speaker/Microphone.
OperationOperation
OperationOperation
Operation
Key FunctionsKey Functions
Key FunctionsKey Functions
Key Functions
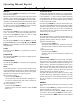
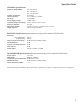
The VX-180 provides programmable [A], [B], and [C]
function keys, and both the VX-160 and VX-180 provide
programmable MONITOR keys. These “Soft” keys func-
tions can be customized (set to other functions), via pro-
gramming by your VERTEX STANDARD dealer, to meet
your communications/network requirements. Some fea-
tures may require the purchase and installation of optional
internal accessories. The possible Soft key programming
features are illustrated at the right, and their functions are
explained in the next chapter. For further details, contact
your VERTEX STANDARD dealer.
For future reference, check the box next to each function
that has been assigned to the Soft key on your particular
radio, and keep it handy.
Function
Soft Key
[A] [B] [C]
MONITOR key
None
Monitor
Low Power
Lock*
Lamp*
Channel Up*
Channel Down*
Scan
Follow-me Scan
Dual Watch
Talk Around
Add/Del*
Call/Reset
Speed Dial
TX Save Off