
Service manual


4
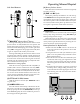
Preliminary Steps
Before operating the transceiver for the first time:
Charge the battery pack and connect the supplied
helical rubber flex antenna to the antenna jack on
the top of the transceiver. Never operate the trans-
ceiver without an antenna connected.
If you have a Speaker/Mic, we suggest you do not
connect it until you are familiar with basic opera-
tion.
Before proceeding, please review the “Top & Side
Panel Controls” outline, if you have not already,
to familiarize yourself with the functions of the con-
trols.
Basic Operation
Switch on the transceiver by rotating the VOL con-
trol clockwise out of the click-stop (a momentary
beep will sound). For now, adjust the control to
about mid-position (12-o’clock), later you can ad-
just the level to suit the operating environment.
Switch the A/B toggle switch to select the channel
group "A" or "B" for operation, then rotate the CH
knob to select a channel for operation, the LCD will
show the currently selected channel. If “-- -- -- --” is
displayed, along with a rapid (2 beeps/sec.) beep-
ing tone, the selected channel position is not avail-
able for operation.
To transmit, wait until the channel is clear (“BUSY/
TX” LED off), then press in the PTT switch on the
side of the transceiver while speaking across the
face of the radio. A clear normal voice will provide
the best quality transmission. For maximum bat-
tery life, select low power output (covered later)
whenever possible. During transmission the
“BUSY/TX” indicator glows red. Release the PTT
switch to receive.
To receive weak stations better, try positioning the
radio as high and far away from your body as pos-
sible, or disable the squelch momentarily by hold-
ing the MON RES button on the side of the radio
for > 4 sec. (until the second low/high beep sounds).
With the squelch disabled, the “BUSY/TX” indica-
tor will blinks green and channel noise and weak
stations can be heard. To quiet the radio again, press
the MON RES button again momentarily.
When you are done operating, be certain to turn
the VOL control to the off position to conserve bat-
tery life.
An important note about your radio !
Some of the radio/button functions discussed next
will only operate in your radio if so programmed by
your dealer, or after the installation of certain inter-
nal optional units. In this way, the radio’s operation
can be simplified and customized specifically for the
user according to network requirements. If pressing
a button on your radio does not result in the same
function described in this manual, or if you are un-
certain of the functions your particular radio is con-
figured with, contact your dealer. See “PRE-PRO-
GRAMMED FUNCTIONS” on page 6.
Scanning
Scanning allows you to sequentially check for calls on
all or only those channels you select. To start scanning,
pressing annd holding the S/DW button more than 2 sec-
onds (but less than 4 seconds). A beep then sounds and
the display will clear and show “SCAN”. Scanning will
pause when a signal is received, at which time the chan-
nel number (or alphanumeric tag) will be displayed. A
small “S” will be displayed above the channel, indicating
the scanner is still active, but paused.
During this pause, you can press the PTT switch and
talk to the station. Otherwise, scanning will resume a few
seconds after the signal is no longer present. While scan-
ning, if you momentarily press the PTT switch, operation
automatically shifts to a default channel. This default chan-
nel can be set to the priority channel (both “P” and “S/
DW” are displayed), last-busy channel, or home channel,
depending on how your radio was programmed.
To stop scanning, simply press S/DW momentarily
again. Operation will return to the channel that was last
selected when scanning was activated.
If enabled by dealer programming, you may select only
the channels you want to scan, and have others skipped-
over by performing the following routine.
Turn the radio OFF, then depress the S/DW button
while turning the radio back ON again. “PROG” will mo-
mentarily appear on the display, after which it will revert
to the currently selected channel (this indicates you are in
the programming mode). If user-access is disabled “INH”
will appear briefly.
Use the CH knob to select a channel, then press the S/
DW button to enable the channel for scanning (“E” will
appear in the upper left corner of the LCD). Repeat this
process for each channel you want the scanner to check.
To remove a channel from those to be scanned, press
S/DW again, so that “E” no longer appears in the display.
After you have enabled all the channels you want to
scan, turn the radio off, then on again to return to normal
operation.
Operating Manual Reprint