
User`s guide


AutoTune™ for VX-P820/P920 Rev. C
4
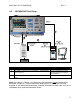
4. Radio Alignment Test Setup
In order to perform the alignment procedures, the VX-P820/P920 must be connected to
both the PC and the communications analyzer as shown in the figure(s) below.
Please make certain that the radio under test is configured as described in
Figure 4-1 before attempting to perform the indicated alignment or test. Failure
to do so may result in poor radio performance and/or damage to the
communications analyzer or radio equipment under test.
4.1. Setup Recommendations
In the absence of a battery eliminator, it is highly recommended to use a fully charged
battery when performing radio alignments or tests, and to perform alignments or tests
with the radio under test out of the battery charger. Failure to do so may result in poor
alignment performance and/or random radio resets, especially during high power tests
or alignments such as TX Power.
As electronic parts generally exhibit their best typical performance at normal operating
temperatures, it is recommended that the radio under test be allowed to warm-up for 60
seconds after power-on and before beginning an alignment or test. This waiting period
allows the radio’s internal electrical components to achieve proper operating
temperature, resulting in more accurate test results.
Analyzer Setup: Adjust the SQUELCH knob on the analyzer fully clockwise until
rotation stops and then adjust it counter-clockwise until the squelch indicator light
comes on before beginning any tests or alignments. Some radio tests or alignments
may not perform accurately without this analyzer adjustment.