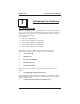
R DSU and DSU II Series Digital Telephone Systems ● Non-LCD Station User’s Guide R 1 ABC 2 DEF 3 GHI 4 JKL 5 MNO 6 PRS 7 TUV 8 WXY 9 * 0 # MESSAGE TAP TRNS/CONF SPEAKER MUTE HOLD R R 1 QZ 2 ABC 3 DEF 4 GHI 5 JKL 6 MNO 1 QZ 7 PRS 8 TUV 9 WXY 4 GHI 5 JKL 6 MNO 0 OPER # 2 ABC 3 DEF 7 PRS 8 TUV 9 WXY 0 OPER # TRNS/CNF SHIFT MUTE TRNS/CNF HOLD TAP INTERCOM SPEAKER SHIFT SPEAKER MUTE HOLD TAP INTERCOM
This user’s guide applies to the following system and telephone models: System Models: • DSU systems with software 20A and later. • DSU II systems with software 4A and later. Telephone Models: • Impact SCS 8212S-** Rev. A and later. • Impact SCS 8212N-** Rev. A and later. • Impact 8124S-** Rev. A and later. • Impact 8112S-** Rev. A and later. • Impact 8112N-** Rev. A and later. If you need more information, consult the Speakerphone Reference Manual.
GCA70–248 Contents Contents 1 Introducing The Telephone . . . . . . . . . . . . . . . . . . . . . . . . . . . 1–1 1.1 Using This Guide . . . . . . . . . . . . . . . . . . . . . . . . . . . . . . . 1–1 1.2 Overview . . . . . . . . . . . . . . . . . . . . . . . . . . . . . . . . . . . . . . 1–3 1.3 Using Your Speakerphone . . . . . . . . . . . . . . . . . . . . . . . . . 1–4 1.4 Knowing Your Telephone’s Functions . . . . . . . . . . . . . . . 1–8 1.5 Understanding What The Lights Mean. . . . . . . . . . .
Contents 7 GCA70–248 Using The Other Telephone Features . . . . . . . . . . . . . . . . . . . 7.1 Using The Recall/Flash Feature . . . . . . . . . . . . . . . . . . . . 7.2 Making A Paging Announcement . . . . . . . . . . . . . . . . . . . 7.3 Switching Between Pulse And Tone . . . . . . . . . . . . . . . . . 7.4 Forwarding Calls . . . . . . . . . . . . . . . . . . . . . . . . . . . . . . . . 7.5 Activating The Call Forward Outside System (CFOS) Feature . . . . . . . . . . . . . . . . . . . . . . . . . .
GCA70–248 1 Introducing The Telephone Introducing The Telephone 1.1 Using This Guide This user’s guide describes your Comdial Impact telephone and tells you how to use it. The sections in this introductory chapter help you become familiar with your telephone’s controls and indicators. The remaining sections are titled as follows: 1.2 Overview 1.3 Using Your Speakerphone 1.4 Knowing Your Telephone’s Functions 1.5 Understanding What The Lights Mean 1.6 Understanding What The Rings Mean 1.
Introducing The Telephone GCA70–248 You can program many of the buttons on your telephone to enhance the unit’s versatility and usability. These programming instructions are found in the following chapter: 9 Programming Your Telephone Two DSS/BLF consoles are available for expanding a station’s memory button capacity—a 24-button and a 48-button model. The operation of these consoles is covered in the following chapter: 10.
GCA70–248 Introducing The Telephone 1.2 Overview This user’s guide covers five different telephone models. There are several differences as noted below. • The 8112N and 8212N do not have speakerphone capability. Therefore, you must lift the handset to perform any telephone functions: making calls, answering calls, programming your telephone, etc. • The 8112N and 8212N cannot receive voice announce calls. • The 8112N and 8212N cannot use the Group Listen feature.
Introducing The Telephone GCA70–248 1.3 Using Your Speakerphone On the speakerphone-equipped models (8124S-**, 8112S-**, and 8212S-**) the microphone and loudspeaker are farther away from you than when you use a handset. Both the signal from the loudspeaker and the signal to the microphone must be strengthened.
GCA70–248 Introducing The Telephone Speakerphone User Guidelines • Both parties cannot talk at the same time. You must wait for silence out of your loudspeaker before talking. You must stop talking to hear the other party. • Background noise may prevent the sound-activated switches from operating properly. Avoid placing the speakerphone where it will detect sounds from typewriters, keyboards, printers, paging systems, and other equipment.
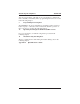
Introducing The Telephone GCA70–248 Line Buttons, DSS/BLF Buttons Programmable Buttons SCS001A Handset Intercom Button* R Telephone Speaker 1 ABC 2 DEF 3 GHI 4 JKL 5 MNO 6 PRS 7 TUV 8 WXY 9 * 0 Dialpad Message Button # TAP Button Transfer/Conference Button MESSAGE TAP TRNS/CONF SPEAKER *NOTE: The INTERCOM button can be reprogrammed..
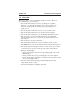
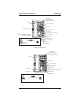
GCA70–248 Introducing The Telephone INL001 Handset Speaker Line Buttons, DSS/BLF Buttons, Programmable Buttons Dialpad R Transfer/ Conference Button 1 QZ 2 ABC 3 DEF 4 GHI 5 JKL 6 MNO Volume Down 7 PRS 8 TUV 9 WXY 0 Message Waiting Light OPER Volume Up # TRNS/CNF HOLD Mute Button INTERCOM TAP SPEAKER SHIFT MUTE Shift Button Hold Button Intercom Microphone Button Opening TAP Button Speaker Button Connectors On Bottom Of Telephone Handset Line Cord ! Impact 8124S Speakerphone Hands
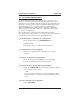
Introducing The Telephone GCA70–248 Line Buttons, DSS Buttons, Programmable Buttons Handset 1 QZ Message Waiting Light 2 ABC 3 DEF 4 GHI 5 JKL 6 MNO Dialpad 7 PRS 8 TUV 9 WXY Transfer/ Conference Button 0 OPER # R TRNS/CNF TAP HOLD INTERCOM TAP Button Hold Button Intercom Button IMP002A Connectors On Bottom Of Telephone Off Line Cord ! Handset Loud Ringer Volume Impact 8112N Telephone 1.
GCA70–248 Introducing The Telephone Microphone Opening • Allows hands-free operation of speakerphone (not available on 8112N and 8212N). Mute Button • Keeps the person on the line from hearing your conversation (not available on 8112N). Programmable Buttons • Allow you to store numbers for automatic dialing functions. • Allow you to store telephone extension numbers for Direct Station Selection (DSS). • Indicate which lines are either in use, ringing, or on hold.
Introducing The Telephone GCA70–248 1.5 Understanding What the Lights Mean The lights on your telephone indicate the status of lines, features, and intercom. Next to a Direct Station Select (DSS)/ Busy Lamp Field (BLF) button: Steady red = station is in use, or in Do Not Disturb. Flashing red = station is receiving a call or station is calling you. Fluttering red = station-to-station messaging has been set. Next to a line button: Steady green = line is in use at your station.
GCA70–248 Introducing The Telephone Next to the MESSAGE button (8212S and 8212N only): Flashing red = message awaits pickup. Next to the SPEAKER button: On steady (with telephone on hook and busy) = speakerphone mode active. On steady (with telephone on hook and idle) = background music turned on. On steady (with telephone off hook and busy) = group listen is active. Next to the MUTE button: On steady = called party cannot hear your conversation.
Introducing The Telephone GCA70–248 1.7 Adusting Your Telephone’s Pedestal (Models 8212S and 8212N only) An adjustable pedestal is provided on your telephone to allow you to select the most comfortable viewing angle. When you receive your telephone, it will be in its lowest position — down flush against the pedestal. You can raise your telephone to one of three higher positions as follows: 1.
GCA70–248 2 Answering Calls Answering Calls 2.1 Answering Calls • To answer a call that is ringing at your telephone, 1. If the light is flashing orange, lift handset. —OR— If the light is red, press the flashing line and lift handset. • To answer a call using the speakerphone, 1. Press flashing line or INTERCOM button after hearing ringing. If you hear the caller’s voice, you can answer in the hands-free mode by speaking toward the telephone.
Answering Calls GCA70–248 2.2 Answering Subdued-Off Hook Voice Announcements (SOHVA) Calls NOTE:Your telephone may be arranged to receive a subdued off-hook voice announcement (SOHVA). If it is, an intercom caller may break into your outside call and deliver a message to your telephone receiver for you to hear. • To answer a SOHVA 1. While off-hook on an outside call, hear several quick tone bursts followed by an announcement delivered to your ear through the handset. • To respond verbally, 1.
GCA70–248 3 3.1 Making Calls Making Calls Making Calls NOTE: If the installer has enabled your system with Specialized Route Access (SRA), the system returns a special intercom tone when you dial out (using INTERCOM 9, or a preprogrammed line group button). After this SRA tone, you have ten seconds to dial digits; otherwise, the telephone automatically returns to its idle state. Furthermore, you only have three seconds pause time between digits before the system automatically dials your call.
Making Calls GCA70–248 If you select a line, press HOLD then dial code. 2. When called party answers, lift handset. • To redial the last number that you dialed at your telephone, 1. Dial #. If you select a line, press HOLD then dial #. 2. When called party answers, lift handset. • To access outside line using line group feature, 1. Press INTERCOM, then dial line group access code: 9 = group 1, 81 = group 2, 82 = group 3, 83 = group 4. 2. Listen for outside dial tone. 3. Dial number. 4.
GCA70–248 Making Calls • If you are required to enter an account code when making outside calls, 1. Select line. 2. Press INTERCOM and dial ✳ 04. 3. Dial your account, hear outside dial tone, and dial outside number. 4. When called party answers, lift handset. • To use Toll Restriction Override at a station, 1. Press INTERCOM. 2. Dial ✳✳6. 3. Dial your station extension number. 4. Dial your TRO code number. 5. Within 15 second timeout period, dial desired outgoing line number. 6.
Making Calls 3.2 GCA70–248 Using Automatic Call-Back • To arrange for the system to call back when a busy station becomes idle or rings with no answer, 1. Make intercom call and hear busy signal or ring-back tone. 2. Dial ✳ 6. 3. Hang up. (When called station becomes idle or is operated by its user, your station will ring. Call-back is canceled if you do not lift your handset when you hear this ringing). • To answer call-back ring, 1.
GCA70–248 4 4.1 Placing Calls On Hold Placing Calls On Hold Placing Calls On Hold • To place a call on hold, 1. Press HOLD. 2. Hang up handset. • To return to call that is on hold, 1. Lift handset and press line button with flashing green light. • To place a call on exclusive hold, 1. Press HOLD twice and hang up handset. • To place a call on hold at another telephone, 1. While on line, press INTERCOM (system places call on hold). 2.
Placing Calls On Hold GCA70–248 • To park a call, 1. When on a line, press INTERCOM. 2. Dial ✳, then dial park orbit access code (91 - 99) (if chosen orbit is busy, dial alternative orbit number). 3. Hang up handset. 4. Use paging feature to announce call and park orbit access code if necessary. NOTE: If call is not retrieved within a programmable time limit, it reverts to the parking station as a standard held call, and only one call can be placed in an orbit at a time. • To retrieve a parked call, 1.
GCA70–248 5 5.1 Transferring Calls Transferring Calls Transferring Outside Calls • To announce a call before transferring it, 1. Answer outside call. 2. Press TRANSFER/CONFERENCE (call is placed on hold). 3. Dial station number. 4. Upon answer, announce the call. 5. Hang up the handset (call is transferred). • To transfer a call without first announcing it, 1. Answer outside call. 2. Press TRANSFER/CONFERENCE (call is placed on hold). 3. Dial station number. 4. Hang up handset.
This page remains blank intentionally.
GCA70–248 6 6.1 Conferencing Calls Conferencing Calls Conferencing Stations Together • To conference any combination of inside stations and outside lines, 1. Make first call. 2. Press TRANSFER/CONFERENCE. 3. Make next call and press TRANSFER/CONFERENCE to establish conference. 4. Repeat the last two steps to add up to two more parties. NOTE: When setting up a conference call with outside lines and inside stations, you must call the outside lines first.
This page remains blank intentionally.
GCA70–248 7 7.1 Using The Other Telephone Features Using The Other Telephone Features Using the Recall/Flash Feature • If your system has been configured for flash, 1. Press TAP to generate a timed flash signal while on line. • If your system has been configured for recall, 1. Press TAP to disconnect as if you had hung up. 7.2 Making a Paging Announcement • To page through an external paging amplifier (if your system provides this feature), 1. Lift handset. 2.
Using The Other Telephone Features GCA70–248 • To answer telephone paging from any station, 1. Lift handset. 2. Press INTERCOM, dial 88, and meet paging party on line. • To enable or disable the Tracker pager at your station, 1. Press INTERCOM. 2. Dial ✳ 06 to enable, or #06 to disable. • To send a call back message to someone’s Tracker Pager after receiving a ring-no-answer, 1. Make an intercom call to someone and receive no answer. 2. Dial #01. 3.
GCA70–248 7.3 Using The Other Telephone Features Switching Between Pulse and Tone • To convert to tone while dialing—if the local telephone service is pulse (rotary), 1. Press # at point in dialing sequence where conversion to tone is required. NOTE: Pulse/Tone switching can be programmed into memory keys by pressing # during number storage. 7.4 Forwarding Calls • To forward personal calls to another telephone, 1. Press INTERCOM and dial ✳ 05, 2.
Using The Other Telephone Features 7.5 GCA70–248 Activating The Call Forward Outside System (CFOS) Feature The Call Forward Outside System (CFOS) feature gives DSU II station users the ability to forward line calls to a remote location outside the system. CFOS remains in effect in the event of a loss of power or a system reset. • To activate the CFOS feature, 1. Press INTERCOM ✳07. 2.
GCA70–248 7.6 Using The Other Telephone Features Engaging Automatic Set Relocation NOTE: If this feature has been enabled by your system programmer, the message-waiting light will flash for several seconds when you connect your telephone to another location. This means that the system is waiting to automatically relocate your extension number and other programmed features to the new location. If you do not want your telephone to have its old programming after relocation, reject the automatic relocation.
Using The Other Telephone Features 7.7 GCA70–248 Understanding The DATA Button Light The optional Data Interface Unit (DIU) provides connections for your standard multiline digital telephone and an Industry Standard Telephone (IST) device. The DIU enables you to switch between your multiline telephone and an IST device (an industry standard telephone, FAX machine, modem, cordless telephone, or answering machine).
GCA70–248 7.8 Using The Other Telephone Features Using The IMIST Module Impact SCS 8212S-** and 8212N-** speakerphones equipped with the optional IMIST module can support an IST device (modem, FAX machine, industry-standard telephone, etc.) in addition to the speakerphone. Depending on system programming, the IST device may be used to make outgoing calls and receive incoming calls. The functionality of the IMIST module is similar to the optional Data Interface Unit (see Section 7.7).
Using The Other Telephone Features 7.9 GCA70–248 Background Music If supplied by your main system, music can be set to play through your telephone speaker. • To turn music ON, 1. Press INTERCOM ✳ 1 (speaker light will turn on). 2. Adjust loudness of music with speaker volume control. • To turn music OFF, 1. Press INTERCOM # 1 (speaker light will turn off). NOTE: Background music automatically turns off during calls and returns after a call is completed. 7.
GCA70–248 8 8.1 Programming Your Telephone Sending And Receiving Non-Verbal Messages Lighting The Message Light If the system installer designates your speakerphone as a central message desk or programs it to have message-wait originate ability, you can turn on the message-waiting light of any other telephone. This light lets that telephone user know that you have a message for him or her. The message-waiting light is located in different places on the various model telephones.
Programming Your Telephone GCA70–248 • To receive a message at an alerted station, 1. Observe flashing HOLD or MESSAGE light. 2. Press INTERCOM, then HOLD; or MESSAGE (connection to station that left message is automatic). • To turn on the message waiting light at another station, 1. Press INTERCOM ✳ 3, or MESSAGE. 2. Dial extension number of station to be alerted (the message waiting light of called station will flash). • To turn off the message waiting light at another station, 1.
GCA70–248 8.2 Programming Your Telephone Sending Messages To LCD Speakerphones NOTE: You can set system-supplied messages to be displayed by calling an LCD speakerphone. • To turn LCD messaging on, 1. Press INTERCOM. 2. Dial ✳ 0 2. 3. Choose message code number (0–9). 4. Press SPEAKER. 8.3 Station-To-Station Messaging • To activate station-to-station messaging (station must have BLF appearance at called station), 1. Make intercom call and hear ring-back tone. 2.
This page remains blank intentionally.
GCA70–248 9 9.1 Programming Your Telephone Programming Your Telephone Programming Your Telephone • To store autodial numbers, 1. Press INTERCOM and dial ✳ ✳ 1. 2. Press programmable button. 3. Press line button, or dial 1, 2, 3, or 4, to select line groups 1–4, or dial 0 for system to select line. 4. Dial number to be stored (16 digits maximum). To store hookflash in an autodial sequence, press TAP; press HOLD to store pause (only if needed). 5.
Programming Your Telephone GCA70–248 • To store personal speed dial numbers, 1. Press INTERCOM and dial ✳ ✳ 2. 2. Dial memory location (1–0). 3. Press line button, or dial 1, 2, 3, or 4 to select line groups 1–4 —OR— dial 0 for system to select line. 4. Dial number to be stored (16 digits maximum). Press TAP to store hookflash and press HOLD to store pause (if needed). 5. Press TRANSFER/CONFERENCE, dial next location, select line, and dial another number to be stored. 6.
GCA70–248 10 10.1 DSS/BLF Console Operating Your Telephone With A DSS/BLF Console Operating Your Telephone With A DSS/BLF Console The IB24X, IB48X, and IB64X consoles have additional buttons and status lights that extend the memory button capability of a companion telephone. You can program the buttons for automatic dialing (speed dial) or direct station selection (DSS) with busy lamp field (BLF) using instructions provided in chapter 9, Programming Your Telephone.
DSS/BLF Console 10.1.1 GCA70–248 Accessing The Button Levels The IB24X and IB48X DSS/BLF consoles have four levels of buttons, quadrupling the consoles’ button capacity. The four buttons at the bottom of each console allow you to select which button level is currently active. To change button levels, press one of the buttons at the bottom of the console. The leftmost button activates level 1, the next button activates level 2, etc.
GCA70–248 11 Troubleshooting Your Telephone Troubleshooting Your Telephone Should your Impact telephone fail to operate properly, or if you do not understand why it is operating in a certain manner, review the following list of symptoms and causes for help. SYMPTOM POSSIBLE CAUSE INTERCOM light is flashing. Your messaging is set. Dial INTERCOM, then # 0 2 and hang up. HOLD or MESSAGE light is flashing. Another telephone has activated your message waiting light. (See section 8.1.
This page remains blank intentionally.
GCA70–248 Index Index A Accessing The Button Levels (on DSS/BLF) . . . . . . . . . . . . . . . 10–2 Activating The CFOS Feature . . . . . . . . . . . . . . . . . . . . . . . . . . . . 7–4 Announcement, Making A Paging . . . . . . . . . . . . . . . . . . . . . . . . . 7–4 Answering Calls . . . . . . . . . . . . . . . . . . . . . . . . . . . . . . . . . . . . . . . 2–4 Answering SOHVA Calls . . . . . . . . . . . . . . . . . . . . . . . . . . . . . . . . 2–2 Automatic CallBack, Using . . . . . . . . . . . .
Index GCA70–248 E Engaging Automatic Set Relocation . . . . . . . . . . . . . . . . . . . . . . . 7–5 F Feature, Using The Recall/Flash . . . . . . . . . . . . . . . . . . . . . . . . . . 7–1 Features, Using The Other Telephone . . . . . . . . . . . . . . . . . . . . . . 7–1 Forwarding Calls . . . . . . . . . . . . . . . . . . . . . . . . . . . . . . . . . . . . . . 7–3 G Guide, Using This. . . . . . . . . . . . . . . . . . . . . . . . . . . . . . . . . . . . . . 1–1 Guidelines, Speakerphone User . . .
GCA70–248 Index N NonVerbal Messages, Sending And Receiving . . . . . . . . . . . . . . . 8–1 O Operating Your Telephone With A DSS/BLF Console . . . . . . . . 10–1 Outside Calls, Transferring . . . . . . . . . . . . . . . . . . . . . . . . . . . . . . 5–1 Overview. . . . . . . . . . . . . . . . . . . . . . . . . . . . . . . . . . . . . . . . . . . . . 1–3 P Paging Announcement, Making A . . . . . . . . . . . . . . . . . . . . . . . . . Placing Calls On Hold . . . . . . . . . . . . . . . . . . . . . . .
Index GCA70–248 U Understanding The Data Button Light. . . . . . . . . . . . . . . . . . . . . . 7–6 Understanding What The Lights Mean . . . . . . . . . . . . . . . . . . . . 1–10 Understanding What The Rings Mean . . . . . . . . . . . . . . . . . . . . . 1–11 Using Automatic CallBack. . . . . . . . . . . . . . . . . . . . . . . . . . . . . . . 3–4 Using Call Waiting . . . . . . . . . . . . . . . . . . . . . . . . . . . . . . . . . . . . . 7–5 Using The Dynamic Line Button Feature . . . . . . . . . . . .
GCA70–248 A Quick Reference Guide Appendix A Quick Reference Guide This quick reference guide provides you with a list of the feature dialing codes used on the Impact digital telephone system. Feature To Turn On Programmed Button, or Account Code INTERCOM ✳ 04 Assist Programmed Button Attendant INTERCOM 0 Automatic Callback INTERCOM Ext.
Quick Reference Guide Feature Night Answer Paging Zone 1 Paging Zone 2 Paging Zone 3 Paging All-Call Paging Meet-Me Paging External Paging Personal Ringing Tones Response Messaging Service Observe SOHVA Originate Station to Station Messaging System Speed Dialing Tracker Pager Tracker Pager—Send Tracker Page Toll Restriction Override Voice Announce Block Volume Save 2 – Quick Reference GCA70–248 To Turn On To Turn Off INTERCOM 80 INTERCOM 84 INTERCOM 85 INTERCOM 86 INTERCOM 87 INTERCOM 88 INTERCOM 89
NOTES
NOTES
This manual has been developed by Comdial Corporation (the “Company”) and is intended for the use of its customers and service personnel. The information in this manual is subject to change without notice. While every effort has been made to eliminate errors, the Company disclaims liability for any difficulties arising from the interpretation of the information contained herein.
R Charlottesville, Virginia 22901-2829 World Wide Web: http://www.comdial.com/ Printed in U.S.A. GCA70–248.