
IP Phone User Manual

APPENDIX G. USING THE COUNTERPATH SIP SOFTPHONES G-5
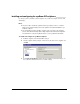
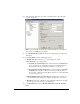
4. Next, the Settings dialog box opens. Choose the SIP Accounts \ Add a New SIP
Account \ Server tab.
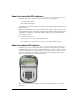
Note: If you accidentally exit the dialog box, right-click anywhere on the eyeBeam
phone and choose Settings to open it again.
5. Check Enable this SIP account. This enables the eyeBeam phone to register with
TeleVantage.
6. Under User details, enter the following information:
Q Display name. Enter your name as you want it displayed to callers.
Q User name. Enter one of the following:
Q If you have an external station. Enter a name that matches the Userinfo field
in your external station configuration as shown in Tools > Options, Phone \
Station Features tab. (See
“Configuring a SIP phone” on page 6-14.)
Q If you don’t have an external station. Enter a name that matches the Userinfo
of SIP URI
field of the SIP account that you want to use with the phone, as
shown in Tools > Options, Personal \ SIP Account tab. (See
“Customizing SIP
accounts” on page 18-19.)
Q Password/Authentication user name. Enter the authentication credentials your
system administrator provided (or leave blank if not required by your system).
Q Domain. Enter the name or IP address of the TeleVantage SIP Span to which this
phone is registered, as provided by your administrator.
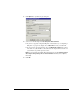
7. Under Domain Proxy, check both Register with domain and Use as outbound
proxy
.