PROFESSIONAL DIRECT DRIVE TURNTABLE OWNER'S MANUAL VESTAX CORPORATION 1-18-16 Wakabayashi, Setagaya-ku, Tokyo 154-0023 Japan Phone : 03-3412-7011 Fax : 03-3412-7013 E-mail : info@vestax.com www.vestax.com VESTAX Europe Ltd. Unit 5, Riverwey Industrial Park Alton, Hampshire GU 34 2QL, England. Phone : (0)1420-83000 Fax : (0)1420-80040 www.vestax.co.
CONGRATULATION Thank you for purchasing the Vestax PDX-2300MkII/MkII Pro, Professional Direct Drive Turntable. Please read this owner's manual carefully, so that you will fully understand all of the special features and enjoy the full use of this product.
IMPORTANT SAFEGUARDS READ BEFORE OPERATING EQUIPMENT This product was designed and manufactured to meet strict quality and safety standards. There are, however, some installation and operation precautions which you should be particularly aware of. 1. Read instructions-All the safety and operating instructions 13. Protective Attachment Plug-The appliance is equipped with an attachment plug having overload protection. This is a safety should be read before the appliance is operated. feature.
FEATURES • Advanced analogue turntable. • Enhanced pitch control. Fast and accurate beat matching adjustment with a 100mm +/-10% fine pitch fader. Ultra pitch control with a +/-50% control fader. Combined the total amount you can adjust the pitch by is a huge +/-60%pitch. Furthermore, with the pitch bend joystick, you can quickly push or pull the pitch for smooth mixes or dynamic effects. • Digital Pitch Display.
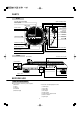
PARTS Front Turntable Platter(Option 2 ) Spare Cartridge Stand Center Spindle Tone-Arm Height Fixed Screw Balance Weight(Option 5 ) PDX-2300MkII Dynamic Needle Pressure Adjustment Knob Power Switch EP Adapter Holder Tone-Arm Height Gauge Tone Arm Arm Rest Slip Mat(Option 3 ) Headshell (Option 4 ) START/STOP Button Speed Select Button PDX-2300MkII Pro Fine Pitch Fader Detachable Stylus Illumination Jack START/BRAKE Controller Reverse Switch Ultra Pitch Fader Pitch Bend Joystick Rear Remote-
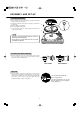
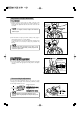
ASSEMBLY AND SET-UP Turntable Assembly q Place the platter on the center spindle. The platter will adjust itself to best fit over the spindle. w Adjust the positioning of the platter so that the screw holes line up perfectly. e Screw and tighten accordingly. r Place the slip mat on the platter. *** Care should be taken to avoid dropping either/both, the platter or the cabinet. DRIVER e r w q • If the player is operated without fixing the screws, the platter may not rotate properly.
Cartridge Installation q Make sure that you follow the instructions included with your cartridge. w Connect the lead wires to the respective terminals. Industry standard cartridges come with color-coded wires. Make sure that you match these colors correctly. NUT SHELL LEAD WIRE (OPTION r) SHELL WEIGHT TERMINAL (OPTION y) If using a light weight cartridge, we suggest the use of the shell weight enclosed.
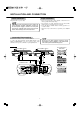
INSTALLATION AND CONNECTION Power Connection Player Installation Plug in the unit to a power outlet. • Do not expose this unit to direct sunlight, or install in an area that is typically humid and/or damp. • Place this unit on a stable, horizontal service in order to limit vibration and poor tracing/action of the tone arm. • Locate this unit at a suitable distance from any speakers so as to avoid feedback. • Interference may result from close proximity of an AM/FM tuner.
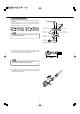
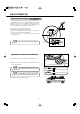
ADJUSTMENT ( S ) Adjustment Of Overhang As shown in the illustration, overhang indicates the distance from the stylus tip to the center of the turntable spindle when the stylus tip falls on the extension of a straight line from the pivot of the tonearm to the center of the spindle. If this adjustment is not correct, the stylus will not track the grooves properly. q Loosen the two cartridge mounting screws. w Position the tonearm over the center spindle.
Adjustment of Stylus Puressure q Hold the balance weight with one hand as shown in the drawing, and rotate only counter ring to bring the numeral "0" of the ring into alignment with the center line on the tone-arm rear shaft. Balance Weight Rotate this part If the balance weight is moved, readjust the horizontal balance again. Counter Ring w Turn the balance weight to present the reading on the gauge to the designed stylus force of your cartridge.
OPERATION q Place a record on the slip mat. w Switch on the unit using the Power on/off switch located on the rear panel. e Remove the stylus protector if applicable. r Start the platter spinning with the START/STOP button. t Position the tone arm over the record and gently lower to begin playback. y Set the playing speed to either 33 1/3 or 45 RPM. When turned on this unit is set to play at 33 1/3 RPM. To adjust to a 45RPM speed setting, press the 45 RPM button.
Advanced Pitch Control Features The PDX-2300MkII/MkIIPro features advanced digital pitch control features. Through three different controls you are able to adjust the playing pitch by up to +/-60%. q PITCH BEND & ULTRA SHIFT Using the pitch bend joystick will allow you to quickly pull or push the playing pitch of this unit. To pull means to slow down, push means to speed up. Pushing the joystick towards the tone arm will result in you being able to pull (minus) the playing pitch.
Start Speed You can adjust the starting speed of the platter by adjusting the SPEED ADJUSTMENT 'START' dial. A clockwise rotation slows down the starting speed whilst an anti clockwise rotation will speed it up. At its maximum setting after pressing the START button, the PDX-2300MkII/MkIIPro has an amazingly quick start up (to full speed) of around 0.5 seconds. Brake Speed As well as being able to change the start speed, you can alter the speed at which the platter brakes or slows down.
SPECIFICATION TURNTABLE MOTOR DIRECT DRIVE STARTING UP TIME 0.5sec (33 1/3rpm) 70° STARTING TORQUE 2.7kg・cm BRAKING SYSTEM ELECTRONIC BRAKE RAMBLE (S/N RATIO) 78dB (IEC 98 WTD) SPEED "33 1/3rpm, 45rpm" FINE PITCH ± 10% (100mm FADER) ULTRA PITCH ± 50% (45mm FADER) PITCH BEND ± 1,2,3,6 %( Front ⇔ Rear ) ± 50 %( Right ⇔ Left ) ARM WOW & FLUTTER 0.07% W.R.M.S.