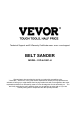
Technical Support and E-Warranty Certificate www. vevor. com/support BELT SANDER MODEL: S1P-HJ2501-H We continue to be committed to provide you tools with competitive price. "Save Half", "Half Price" or any other similar expressions used by us only represents an estimate of savings you might benefit from buying certain tools with us compared to the major top brands and does not necessarily mean to cover all categories of tools offered by us.
BELT SANDER MODEL: S1P-HJ2501-H NEED HELP? CONTACT US! Have product questions? Need technical support? Please feel free to contact us: Technical Support and E-Warranty Certificate www. vevor. com/support This is the original instruction, please read all manual instructions carefully before operating. VEVOR reserves a clear interpretation of our user manual. The appearance of the product shall be subject to the product you received.
Warning-To reduce the risk of injury, user must read instructions manual carefully. Always wear ANSl approved safety goggles when working with tools and equipment. Wear eye protection. Wear ear protection. Wear dust masks Wear protective gloves. Compliance is a EC & UK security certification. This product is of protection class II. That means it is equipped with enhanced or double insulation. CORRECT DISPOSAL This product is subject to the provision of European Directive 2012/19/EC.
Work area safety a) Keep work area clean and well lit. Cluttered or dark areas invite accidents. b) Do not operate power tools in explosive atmospheres, such as in the presence of flammable liquids, gases or dust. Power tools create sparks which may ignite the dust or fumes. c) Keep children and bystanders away while operating a power tool. Distractions can cause you to lose control. Electrical safety a) Power tool plugs must match the outlet. Never modify the plug in any way.
protection used for appropriate conditions will reduce personal injuries. c) Prevent unintentional starting. Ensure the switch is in the off-position before connecting to power source and/or battery pack, picking up or carrying the tool. Carrying power tools with your finger on the switch or energising power tools that have the switch on invites accidents. d) Remove any adjusting key or wrench before turning the power tool on.
moving parts, breakage of parts and any other condition that may affect the power tools operation. If damaged, have the power tool repaired before use. Many accidents are caused by poorly maintained power tools. f) Keep cutting tools sharp and clean. Properly maintained cutting tools with sharp cutting edges are less likely to bind and are easier to control. g) Use the power tool, accessories and tool bits etc.
allergicreactions and/or respiratory diseases to the operator or bystanders. Certain kinds of dust are classified as carcinogenic such as oak and beech dust especially in conjunction with additives for wood conditioning (chromate,wood preservative).Material containing asbestos must only betreated by specialists. Where the use of a dust extraction device is possible it shall be used. The work place must be well ventilated. The use of a dust mask of filter class P2 is recommended.
PRODUCT PARAMETERS MODEL Voltage Motor Power North America: Motor Speed 1000W AC120V 60Hz S1P-HJ2501-H EuropeanUnion: 1100-3200/rpm AC230-240V 50Hz 1300W Australia: AC230-240V 50Hz Sanding belt Optional Equipment A. 100PCS Sanding Belts 20 x Zirconia Corundum Belts, 60 Grit 20 x Zirconia Corundum Belts, 80 Grit 20 x Brown Corundum Belts, 180 Grit 20 x Brown Corundum Belts, 400 Grit 20 x Brown Corundum Belts, 800 Grit B.
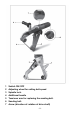
1 2 3 4 5 6 7 Switch ON /OFF Adjusting wheel for setting belt speed Spindle lock. Additional handle Tensioner arm for replacing the sanding belt. Sanding belt.
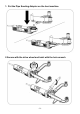
1. Put the Pipe Sanding Adapter on the host machine. 2.
3.Install the sand belt in this step as shown in the figure 4.
5. Install the handle as shown (according to the user's habits). 6.Try to assemble Pipe Sanding Adapter parallel to the host.
Commissioning Before plugging in, check that the rated mains voltage and mains frequency, as stated on the rating label, match with your power supply. Attaching the additional handle.Always work with the additional handle attached (4)! Secure the additional handle by screwing it tightly to the left or right. USE Always guide the machine with both hands. The machine must not be allowed to draw in additional dust and shavings. When switching the machine on and off, keep it away from dust deposits.
Setting belt speed The belt speed can be preset via the setting wheel (2) and is infinitely variable. There are 1-6 gear speeds to choose from: Sanding belt replacement Release the tensioner arm (5) and remove the sanding belt (6). Place the new sanding belt on the rollers such that its direction of circulation (arrows on the inside of the sanding belt) matches the arrow (7) on the gearbox.Release the tensioner arm (5).Ensure that the sanding belt is completely on therollers.
Address:Baoshanqu Shuangchenglu 803long 11hao 1602A-1609shi Shanghai Imported to USA: Sanven Technology Ltd. Suite 250, 9166 Anaheim Place, Rancho Cucamonga, CA 91730 Imported to AUS: SIHAO PTY LTD.
Technical Support and E-Warranty Certificate www. vevor.