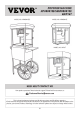
POPCORN MACHINE INSTRUCTION MANUAL
POPCORN MACHINE NP08001SEC&NP08001SE &NP16T MODEL NO.: NP08001SEC MODEL NO.: NP08001SE MODEL NO.: NP16T NEED HELP? CONTACT US! Have product questions? Need technical support? Please feel free to contact us: CustomerService@vevor.com This is the original manual, please read all the instructions carefully before operating. VEVOR reserves the right to interpret this user manual. The appearance of the product shall be subject to the product you received.
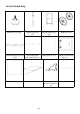
IMPORTANT SAFEGUARDS 1.Please read ALL the instructions before using your popcorn machine. 2.Do not touch the hot surface directly with your hands. Always operate with handles or knobs. 3.To prevent electrical shock, do not immerse the cord or plug into water or other liquids. 4.Do not let children and minors get close to or touch the machine. 5.When the machine is not in use or before cleaning, unplug the main power cord from the outlet. 6.Allow HOT parts to cool down before operation. 7.
IMPORTANT SAFEGUARDS Short Cord Instruction A short power-supply cord is to be provided to reduce the risk resulting from becoming entangled in or tripping over a longer cord. Extension cords are available and maybe used if care is exercised in their use. If a extension cord is used: 1.The marked electrical rating of extension cord should be at least as great as the electrical rating of the appliance; 2.the extension cord should be a grounding3-wire cord; and 3.
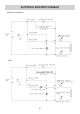
ELECTRICAL SCHEMATIC DIAGRAM NP08001SE & NP08001SEC: NP16T: 04
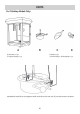
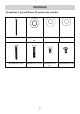
PARTS For Tabletop Models Only: A: Main Unit x 1 pc C: Popcorn Scoop x 1 pc B: Kettle x 1 pc D: Kernel Scoop + Oil Scoop Set x 1 pc Assemble the kettle (B) on the supporters which are built into the main unit (A), and then connect the socket.
For Cart Models Only: Rubber Feet (A) x 2 pcs Horizontal Supports Base (E) x 2 pcs Cabinet Back (I) x 1 pc Support Legs (B) x 2 Support Stands (C) x 2 pcs pcs Horizontal Supports with Screws (F) x 2 pcs Cabinet Base (G) x 1 pc Working Platform (J) x 1 pc 06 Working Platform Brackets (Large) (K) x 2 pcs Wheels (D) x 2 pcs Cabinet Front with Door (H) x 1 pc Push Handle (L) x 1 pc
HEADWEAR Screwdriver (1 pc) and Wrench (2 pcs) are also included.
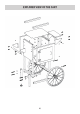
EXPLODED VIEW OF THE CART 08
POPCORN CART ASSEMBLY STEP 1: Screw one of the RUBBER FEET (A) into the bottom of each SUPPORT LEG (B). Tighten both rubber feet. STEP 2: Insert one WHEEL BOLT (O) into the bottom holes located on each side of the SUPPORT STAND (C). NOTE: Insert the bolt from the inside out, then secure the wheel bolts with one NUT (Q) on each side and tighten them with the wrench. STEP 3: Hang one WHEEL (D) onto one WHEEL BOLT (O) and secure it with one NYLOC NUT (P). Tighten them with the wrench.
POPCORN CART ASSEMBLY STEP 4: Attach both HORIZONTAL SUPPORTS-BASE (E) to the same SUPPORT STAND (C) with two BOLTS (T) and one WASHER (R) each. Tighten them with the wrench. STEP 5: Insert two BOLTS (U), each with one WASHER(R),into each SUPPORTLEG(B).Attach SUPPORT LEG (B) to the SUPPORT STAND(C) on the opposite side of the wheels. Tighten with wrench. STEP 6: Insert both HORIZONTAL SUPPORTS-WITH SCREWS (F) into the grooves at the ends of each SUPPORT STAND (C) ,as shown.
POPCORN CART ASSEMBLY STEP 8: Confirm the CABINET BASE (G) is locked in place. Secure the SUPPORT STANDS (C) with the SCREWS (V) as shown in the figure below. Tighten the screws with the screwdriver. STEP 9: NOTE: Before assembling the front and back panels, determine which side you want the cabinet door facing outward. Insert the CABINET FRONT (H) and CABINET BACK (I). Secure both panels to the SUPPORT STANDS (C) with SCREWS (V) as shown in the figure. Tighten the screws with the screwdriver.
POPCORN CART ASSEMBLY STEP 10: Remove the pre-assembled screws from the PUSH HANDLE (L). Attach one of the WORKING PLATFORM BRACKETS (K) to one end of the handle. Insert the WORKING PLATFORM (J) to the same bracket using the pre-installed posts. Insert the screw and tighten them. Repeat the steps above to attach the remaining bracket on the other side. STEP 11: Remove the pre-assembled screws from the HANDRAIL (N). Attach one of the HANDRAIL BRACKETS (M) to one end of the handle.
POPCORN CART ASSEMBLY STEP 12: Install the assembled WORKING PLATFORM on the right side of the cart (same side as wheels) with four BOLTS (U), WASHERS(R) and NUTS (Q). STEP 13: Install the assembled HANDLE on the left side of the cart (opposite the wheels) with four BOLTS (U), WASHERS (R) and NUTS (Q).
USING YOUR POPCORN MACHINE 1.Make sure the popcorn maker is unplugged before you do any of the following. 2.Before operation, please check carefully if its voltage is suitable to your country. (Please check if the voltage is matching with rating label specified next to the power cord). 3.Clean the internal surface of the kettle and the external surface of the main unit. 4.The main unit has 3 function switches as follows: Spot Light and Warmer (I) Stirrer (II) Stainless Steel Kettle Heater (III) 5.
CLEANING AND MAINTENANCE 1.Wipe the doors, glass and metal surface with a clean damp cloth. DO NOT use any acidic, citrus based cleaners or abrasive cleaners on the acrylic doors as they might cause scratching or dullness. 2.Frequently empty the catch tray of unpopped popcorn kernels and clean it with soap and water. Dry it thoroughly afterwards. 3.Frequent cleaning of the popcorn kettle is strongly recommended. This will help prevent burning of excess oils on the bottom of the kettle. 4.
E-mail: CustomerService@vevor.
POPCORN CART ASSEMBLY