V ai·Slid VPa de U r Manu User ual Since VPaiApp V and firrmware will be upgradedcontinuously, pleasee refer to the phhysical object.
Contents 1.Appearance ..........................................................................................................................4 2.Begin to Use ..........................................................................................................................5 2.1Charge the Battery............................................................................................................5 2.2 Power-ON & Power-OFF .......................................................................
Warning This device complies with part 15 of the FCC Rules. Operation is subject to the following two conditions: (1) This device may not cause harmful interference, and (2) this device must accept any interference received, including interference that may cause undesired operation. Note: This equipment has been tested and found to comply with the limits for a Class B digital device, pursuant to part 15 of the FCC Rules.
1. Appearance Front ViewBack View Left ViewPower Bank Upward ViewTop View Micro-B to Micro-B Connector Micro-B to Type-C Connector Power Key:Click Power Key for short time is taking a photo; click Power Key between 0.4s and 1.8s start recording video or stop it, when recording video the blue light will flash all the time except the end; click the Power Key more than 3.5s the camera will be turn off, click the Power Key for 2s the camera will be turn on.
on is full voltage. Micro SD Card Slot: The camera can support the max storage is 128GB Micro SD card(for short SD card) The SD card capacity over 32GB must change its format to NTFS file system. USB connection record/take photos, files are saved in your phone.WI-FI connected with SD card record/take photos, files are saved in SD card; WI-FI connected without SD cardrecord/take photos, files are saved in your phone. 2. Begin to Use 2.
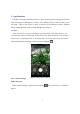
2.3.22 App Operration App Download d and Installl Figurre 1: Android d App Down nload Figure 2: iOS App D Download W When you connnected cam meras first time,Please t use mobile phones to sscan and correesponding Q QRcode of the t system, download the t VPai Appp. Anddroid App suppport Android 5.0and aboove, and the pphone must suupport OTG;iOS App sup pport iOS 8.0annd above. Anddroid App can also downlload it from VPai V official w website(www w.vpai360.
Figure 3: Camera USB connection tips Click “OK”, the system will automatically enter the VPai application, if you select “Use by default for this USB camera”, there no longer have the tips when you connect the camera,it will enter VPai application directly. After the camera is connected, click the Photo button to take pictures.Images can be viewed in the Gallery, and shared to the social platforms. Details refer to Gallery and Share.
Figure 4: WI-FI Connection VPai preview interface Click button, enter the interface as shown in Figure 5, so you can select the camera hotspot, the default password is: 12345678,you can change the connect password in the Camera Setting->Hotspot password interface.
3. App Functions VPaiApp contains the following features: 1. VPai: Including camera settings, photo shoot, video recording, live management; 2.Gallery: View and edit pictures / videos; 3.Share: select the image / video in the Gallery to share it with the social platforms; 4.Space: VPai360 built-in sharing platform; 5.Me: Account management, FAQs, etc. 3.1 VPai After connected, the VPai preview interface as picture below. In the VPai interface, you can switch the camera to: Time-lapse, Video, Photo, Live.
Figure 7: USB Connection Camera Settings interface Video resolution: It can set the Camera’s resolution to 2048x1024 or 1920x960. Device: You can view the Camera’s Module type, Serial number, Firmware version atthis place. WI-FI Connection When WI-FI connecting, click the Camera Settings that you will enter it, as shown in Figure8: Figure 8: WI-FI Connection Camera Settings interface Video resolution: It can set the Camera’s resolution to 2048x1024 or 1920x960.
the modification. After change the password the camerawill disconnected, then you need to enter the mobile phone WI-FI Settings to re-enter the modified password to connect the camera, are shown in Figure 9 below: Figure 9: WI-FI Connection Hotspot password modification interface Camera internet:Through the network camera can be connected to the Internet.Open camera network and enter the setting interface, at this time it will automatically search near 2.
Figure 10: WI-FI Connection Camera internet interface Device: You can check the Camera’s Module type, Serial number, Firmware version at this place. 3.1.2 Take Photos Switch to “Photo” mode, and thenclick the camera button Figure 11: Photo Mode 12 to take pictures.
:Timer; Click C this buutton to chooose the mode of “5s coountdown” or “10s couuntdown”, after select one of o mode to time-lapse photograph p hy, if you waant to stop iit that you can c click c buttoon again. the camera : Preview full screen button; : Exit full screen buttton; :The battery icon; he button too select the appropriatee beauty andd filter : Beauty and filter efffect,click th effecct when in ppreview or viewing v a piicture.
to stop. Figure 13: Video Mode Similarly, switch to"Time-lapse" mode then click to start record, click Figure 14: Time-lapse Mode 3.1.4 Live 14 to stop.
App can live through YouTube, Weibo,Facebook and RTMP. Click the Live button to select the live platform at first, as shown in Figure 15. When living use the USB connection modethe phone must connect Internet, WI-FI connection modecamera must connect Internet.
Figure 16: Create YouTube Live Stream Click "No login", and option to login a google account, you can also login a google account at “Me”. After login please Input live name, choose liveResolution and Privacysettings.Click start broadcast, the first use of account authorized certification will pop up, select allow confirm authorization.
If you're signed in to an account that does not have live permission on YouTube, you should turn on live permission at the web login URL (http://www.youtube.com/features). There is the webpage to set live-streaming permission, as shown in Figure 19: Figure 19: Turn on the permission of YouTube Click the Enable in Live Streaming to turn on live permission. After the above settings are normal, click Start Live Stream, thus you will start live, as shown in Figure 20.
Figure 20: Living interface Facebook It will enter into the Facebook Live interface when you select the Facebook Live platform. Input live stream Title, select the Resolution and Privacy after you bind a Facebook account. You can bind an account in ‘Me’or in the interface that pops up after you click ‘Start Live Stream’. If it is the initial use of the account, please authorize, as shown below.
Figurre 21: Createe Facebook Live L Figgure 22: Facebook accou unt permissio on If Faccebook sharinng or live faillure, please confirm c Facebbook app cann be used in yyour phone no ormally. Weib bo W Weibo live seettings are siimilar to YoouTube and Facebook live, l as show wn in Figurre 23. Inputt live stream m Title, seleect the Reso olution and P Privacy, theen click ‘Staart Live Strream’, it will start s live as shown in Figure F 20.
Figure 23:: Create Weiibo Live Streeam Weeibo live requiires real-nam me system authhentication. RTM MP Inpput the RTM MP Live UR RL of the livve platform and choosee a resolutioon to get staarted with RTM MP live, as shhown in Figgure 24. Figure 24:: Create RTM MP Live Streeam RT TMP Live URL L contains seerver address and live key, intermediatee with "/" connnection. As above, a “rtmpp://snd3.*******/live” is thhe server adddress, “2008****=off” is thhe live key. 3.
Toouch the thuumbnail to open o the imaage/video; long-press l t picture/vvideo thumb the bnail (or clickkthe "Select" button on the top righht corner) too select the file: Click clickk to shaare the file (details ( refeer to Share)), click todelette the file, to select aall. F Figure 25: G Gallery 3.2.
Figgure 26: View w Picture Th hedisplay modecan m be switched s to VR. In VR R mode, youu can also seelect differeent displlay modes too save screeenshots as described d abbove. Figure 27: VR R Mode W When viewinng a picture, click t add a filteer to the im to mage, click effecct.
Figure 28: F Filter 3.2.22 Cameraa Gallery Affter the cam mera insert SD S card, clicck the top riight corner of VPai inteerfaceSD caard icon c enter Caamera Galleery, in Cameera Gallery can check the can t picturess and video files, downnload, delette, and so onn.When looking at the files doublee-click the picture p / vid deo displlay area to change c the display d mod de ( paanorama, crystal ball and asterroid).Or chaange displayy mode in mode m select m menu.
Figure 29: Camera Gallery Files in Camera Gallery cannot add filters. 3.2.3 Cloud Gallery Cloud gallery saves the file which is shared through the VPai360Cloud and WeChat. Operations in Cloud Gallery are consistent with Local Gallery, such as view, delete and share. Files in Cloud Gallery cannot add filters. 3.
Figuree 30: The Shaare interfacee Im mage or videeo will be directly shared with the file to the personal p Faccebook or YouTube Y homee page whenn sharing thhrough Faceebook or YoouTube (onnly supportss video). It will be uplooaded to Clooud Galleryy at first if ppicture/ videeo shared thhrough ‘WeC Chat’ or d’, then shaare a link to other platfoorm. You caan share to oother platforms after ‘VPaai360 Cloud shareed to ‘WeChat’successsfully. Imagges that sharred to ‘VPa ai’ will be diisplayed in ‘Spaace’.
Figure 32: Share from m Cloud Galllery 3.4 Space Cllick ‘Space ’to enteer the space interface, yyou can view wpictures upploaded by yourself or othhers, and ennjoy the woonderful conntent. Click ‘Hot’ to vieew the recoommended content, c clickk ‘New’ to ssee the latest share. Clicck profile picture on thhe ‘New’ paage to access the user's homepagee. Click the love icon too applaud thhe picture. Touch T quickkly.
Figure 33: Hot In the New interface, click Figure 34: New to share the post to other platforms; click to report or delete the post (Only the post publisher can delete post), as shownFigure 35, 36: Figure 35:Share post Figure 36:Report or Delete post Click on thumbnail of the post to view it in full screen, double click on the image display area to switch the picture display mode (panorama, asteroid, crystal ball).
out the picture function menu, with screenshot, download, and delete function. As shown in Figure 37. Figure 37: View picture in Space Only the publisher of the current post will display the delete function, and other users will only show Screenshot, Download and Report. Click ‘Show Details’ to comment on the picture and view the comments published by others. Long press comment to report or delete it (Only the comment publisher pops up the delete option).
Figure 38: Show Details 3.5 Me Click “Me ”to enter the account management interface that you can manage your account.“Show Logo” is used to open or hide Logo on images.You can also check app updatesand read FAQ in this interface. Besides, you can click ‘About’ to check the app version or share it to your friends.
Figure 39::Me Affter loggingg in, click onn the registeered accounnt to enter thhe user's hom me page and d manage the published p coontent.
4.360player 360player is the software which can play the photos and videos of Camera on computer. You can download it at the VPai360 official website (www.vpai360.com). Unzip the compressed package after download, and run 360player.
Figure 42: Image interface of 360player At the Image interface, you can switch the photos by the buttons of “previous” and “next”. When "PanoramicView" is displayed in the lower right corner, you can drag the mouse in the screen display section to adjust the display angle of the photo; click the Panoramic View button, it will become “Non-Panoramic View”, at this point you can’t drag the photo. Click on the lower right corner of the "Full Screen", it can make the software display with full screen.
Figure 43: Video interface of 360player At the Video interface, you can operate the video to “Pause”, “Play”, “Stop”, and can also switch the videos by the buttons of “previous” and “next”. When "PanoramicView" is displayed in the lower right corner, you can drag the mouse in the screen display section to adjust the display angle of the video; this function is same as Image.