
User's Manual
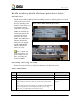


Table Of Contents

RCATS Auxiliary Mobile Platform Quick Start Guide
Updated: 5 May 2009 JDSU Page 2 of 4
Step Action Result
b. Confirm that the 12VDC power cable is plugged into the AMP
module. Plug the AC power cord into the AC adapter on the shelf.
Use the tie wrap provided to hold the cord in place. Guide the AC
power cord through the cutout in the back lip of the shelf to the AC
power source.
Note: See Figure 2 and
Figure 3.
c. Using the USB interconnect cable provided, connect the "USB"
connector on the back of probe to the "TO RCATS" connector on the
back of the AMP. Guide the USB cable through one of the five cable
ties on the back lip of the shelf.
Notes:
• Position the AMP close enough to the probe to ensure that the
USB cable can span the distance between the devices. See Figure
2.
• There needs to be sufficient play left in the cables so the AMPs
can slide out without pulling the cables. See Figure 2.
Note: See Figure 4.
d. If more than one AMP is to be attached to the probe, daisy-chain the
AMPs by connecting the "TO AMP" connection on the back of an
installed AMP to the "TO RCATS" connection on the back of the
next AMP in the chain using a USB cable.
Note: See Figure 4.
3. Apply power to the probe. Probe firmware 7.0.9.x
and higher will
automatically detect the
AMP.
Figure 3. AMP (back)