210002M01 High-Precision Tuning Fork Electronic Balance SJ-E Series Operation Manual IMPORTANT • To ensure safe and proper use of the balance, please read this manual carefully. • After reading this manual, store it in a safe place near the balance, so you can review it as needed. SHINKO DENSHI CO., LTD.
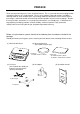
PREFACE Thank you for purchasing an SJ Series electronic balance. This is a precision instrument equipped with exacting mechanisms in a compact body. The SJ series provides enhanced functions, including a counting mode for stock control of parts, a percentage mode for comparative measurements given in percentages, and a limit function for measuring constant quantities by consecutive weighings. Despite its many functions, the balance is easy to operate and features user-friendly keys.
CONTENTS 1. Precautions on the Use ...........................2 7. Measuring Percentage ...........................20 2. Names of Component Parts ....................5 8. Limit Function.........................................22 2.1 Main Unit...........................................5 8.1 Limit Function Setup .......................22 2.2 LCD Indicators and Operating Keys ... 8.2 Setup of Limit Values by Actual Quantity Loads ..............................24 ........................................
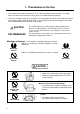
1. Precautions on the Use • This Section "Precautions Relating to Use" sets forth precautionary notes that the user should observe in order to prevent physical injury to the user and/or damage to property. • The nature of problems that may result in the event of improper operation, and consequential effects on the quality and performance of the balance, are indicated under the two categories of "Caution" and "Recommended," and explained using symbols.
Do not place the balance on an unstable base or use the balance in a location where it may be subjected to shock. 定格外禁止 Do Not Use 定格外禁止 Do Not Drop Do not lay the AC adapter cable on the surface of the passage. • Somebody may trip on the cable, causing the balance to fall off, thereby causing injury and/or damage to the balance. Do not touch the AC adapter or balance with wet hands.
Avoid applying excess force or impact to the balance. 定格外禁止 Do Not Apply Force Do not use the balance in a location were it may be subjected to abrupt changes in ambient temperature or humidity. • Accurate measurement may not be obtained. 定格外禁止 Do Not Use 定格外禁止 Do Not Overload • Optimum operations occur when ambient temperatures range from 5°C to 35°C, and less than 80% relative humidity. Do not use the balance when [] (Overloaded) is displayed.
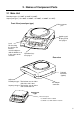
2. Names of Component Parts 2.1 Main Unit Round-pan types (SJ-220E, SJ-420E, SJ-620E) Square-pan types ( SJ-1200E, SJ-2200E, SJ-4200E, SJ-6200E, SJ-12KE) Front View (round-pan type) Measurement pan Liquid-crystal display (LCD) See page 6. Level For checking the level of the balance Turn the adjusters until the bubble rests in the center of the red circle. Operation keys See page 7.
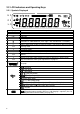
2.2 LCD Indicators and Operating Keys 2.2.1 Symbols Displayed HI 0 0 F Pcs # OK g% LO Display Description g Grams →0← Zero point →T← Tare being subtracted ○ Indication of stable balance (If the light is off, the balance is unstable.) * Balance powered up (Lights up when the power is turned off) or data transmitted Pcs Counting mode % Percentage mode Indication of judgement result (HI/OK/LO) when the limit function is active.
2.2.2 Names and Functions of Operating Keys Operating Key On/off key Memory key Set key Function key Zero/Tare key Function Key to turn on/off the unit power [Brief press] [Brief press] initiates print or output. saves the settings of the number of pieces or percentages (%), or the limit value when using the limit function. [Brief press] starts setting the number of pieces or percentages (%). [Continuous press] starts setting the limit value when using the limit function.
3. Basic Operations 3.1 Installation 1 Positioning the measurement pan First, mount the pan base on the main unit of the balance and place the measurement pan on top of it. Be sure to mount the pan base in the correct direction, as illustrated below. 2 Securing the exact level of the balance Turn the adjusters until the bubble rests in the center of the red circle on the level.
3.2 1 Operation Check When the balance has the AC adapter connected, it displays [*]. Pressing the On/Off key The display section lights up, and the balance is ready for operation. Turning on the power * 2 Checking the display HI 0 0 Pcs # F OK g% LO 3 Check to see if the display has any missing indications or unlit parts. A few seconds after startup, the indication is reset to zero. Switching the measurement mode Press the Function key.
3.3 Operation for Tare Subtraction 1 Place the tare (container) on the balance. 0・¦ As you place the tare, the balance indicates its weight. ¦ ¦ F g 2 Reset read-out indication to zero. →0← →T← 0・¦・¦ ¦ F g 3 Load the sample to be weighed. Press the Zero/Tare key. The tare is subtracted and the balance indicates zero. The balance will now indicate only the weight of the sample loaded in the tare.
☆ Key Points of the Procedure ☆ The following applies equally to all the measurement modes for weight measurement, counting, and percentages. 1. 2. 3. After the balance is switched off, there is still enough current to display [*]. This indicates that the AC adapter is connected to an electrical outlet, but that the balance is turned off. When the balance is switched on again, [*] will disappear. ※If the balance is running on batteries and the unit is switched off, the display does not display [*].
4. Functions 4.1 Setup and Checking of Functions 1 Invoking the function g Key released 指を離す Continuous pressing 2 3 Terminating the function selection 12 Pressing the Function key advances the function items at the rate of one item per press. Changing the content of an item 5 Press the Function key. The indication changes to the next item, [ (Limit function)].
4.
4.2 Description of Functions (cont.) ☆3 ☆4 ☆5 [ ] (tl_Hong Kong) [ Upper right] (tl_Singapore,Malaysia) [ Lower right] (tl_Taiwan) [mom] [ ] (to) Register measurement units [ Pcs ] by selecting [%] Function key Unit not set ☆1∼☆5: default factory settings []∼[] ※ 1 [] cannot be set at []. Setup of measurement units to be displayed※1 4.
5. Switching Function for Units of Measurement Pressing the Function key allows the user to switch the unit of measurement to [g], [ct], [%], and so on. During setup, a maximum of five different units can be registered for use in function setup mode. 5.1 Switching Units of Measurement Switching the units of measurement to be displayed g % Pcs Press the Function key. Each press advances through the units of measurement to be displayed.
Example: To change the default factory settings to pound units use [] in the factory settings. (cont.) 3 Pressing the [Set] key to restore measurement mode. 4 Pressing the Set key will reset the measurement mode g Pressing the [Function] key to change the units of measurement g % Press the Function key. Each press of the key changes the units of measurement to be displayed, as follows: [g] → [lb] → [Pcs] → [%] → [g] →··· Pcs ☆ Key Points of the Procedure ☆ 1.
6. Counting Pieces To implement piece-counting, the specified samples are loaded on the balance, and their average unit weight (hereinafter, simply the “unit weight”) is entered and saved. The procedure for saving unit weights is called sampling. The counting procedure consists of loading articles that have already been sampled on to the balance. The number of pieces is then calculated by dividing the total weight of the loaded articles by the unit weight saved in memory.
4 Changing the sampling number, if necessary. 数値の変わり方 How to change the value Pcs M 5 Loading samples Pcs M 6 Saving the unit weight of samples Pcs If samples to be counted widely deviate in weight, or a higher measure of accuracy is desired, it is recommended that users change the sampling number to a larger value. Press the Zero/Tare key. Each press of the key changes the value on the right end. Select the desired value.
6.2 Increasing the Counting Accuracy (Memory Update Method) ※This procedure is the same as the sampling procedure described on the previous page up, to the point at which the sampling number is changed. 1 Loading samples Pcs M 2 Saving the samples 10 pieces saved 10個で記憶 Pcs M 3 Adding samples Pcs M 4 Saving the samples 20 pieces saved 20個で記憶 Pcs Load the number of samples displayed. Count the samples precisely and load them on to the center of the measurement pan.
7. Measuring Percentage The percentage measurement function operates by weighing an actual sample, selected as the reference, and saving its weight as the reference value and indexing it as 100%. When a measurement sample loaded on the balance is lighter or heavier than the reference, its weight is indicated as a percentage (%) value relative to the reference weight. 1 Activating the percentage mode Press the Function key to disaplay [%].
☆ Key Points of the Prcedure ☆ 1. While samples are being saved, the value indication disappears temporarily, and only the [M] mark flashes. If the balance is affected by wind or other vibrations during this process, the saving time may be prolonged. 2. If [] appears briefly, it indicates one of the following states: (1) The weight of the reference sample is insufficient. For the limit weight that can be saved (% limit weight), please refer to “12. Specifications,” on page 31.
8. Limit Function The limit function judges measurements according to a limit value saved in the balance. The function shows the judgement result by displaying the [] mark as either HI (excessive), OK (appropriate), or LO (insufficient). This function is very useful when discriminating between conforming and nonconforming articles. It is also useful when measuring a given constant quantity consecutively, in conjunction with a range of reference weights defined by upper- and lower-limit values.
8.1 Limit Function Setup (cont.) 2 Selecting a function item 3 Setting the limit function Press the Function key. The display changes to the next item [Limit Function]. Press the Zero/Tare key to set the value on the rightmost side to [1].
8.2 Setup of Limit Values by Actual Quantity Loads 1 Starting the limit function Press and hold down the Set key. 長押し Continuous pressing 2 Key指を離す released Loading the sample for the lower-limit value Saving the lower-limit value g M 4 The upper-limit value setup 5 Load the sample of the lower-limit value on the measurement pan. g M 3 Release the key when [ ] is displayed. The currently set lower-limit value flashes.
8.3 Setting up Limit Values by Inputting Values 1 Starting the limit function Press and hold down the Set key. 長押し Continuous pressing 2 指を離す Key released Opening the value input screen M 3 5 6 g Selecting a digit M g M g Repeat Steps 3 and 4 Saving the lower-limit value M 7 g Entering a value M 4 g Setting up the upper-limit value Release the key when [ ] is displayed. The currently set lower-limit value flashes.
8.3 Setting up Limit Values by Inputting Values (cont.) 8 Opening the value input screen M 9 g Setting the upper-limit value M g M g 10 Saving the upper-limit value M g Press the Zero/Tare key. Follow the same procedure as in “Step 2.” Follow the same procedure as described for the lower-limit value and enter the upper-limit value. Press the Memory key. After saving the upper-limit value, the balance displays it briefly and terminates setup.
9. Calibrating the Balance Since electronic balances are affected by gravity gravitational acceleration, they produce different values in various locations. Therefore, before use, balances must be calibrated at the location where they are installed. Calibration is also required after long periods without use, or if a balance begins to produce inaccurate values. Calibration of a balance, or “span adjustment,” is required to produce accurate measurements.
Calibrating the Balance (cont.) 4 Calibrating the capacity point CAL 5 Terminating the span adjustment CAL Load the calibration weight in the center of the balance. The display flashes, indicating that capacity point calibration is in progress. When the calibration of the capacity point is finished, the original measurement mode is restored. g ☆ Key Points of the Procedure ☆ 1.
10. Operating the Balance with the Battery This function can be used only when the balance is battery-operated. 10.1 Specifications • Built-in nickel-cadmium battery • Charging time: Approximately 12 hours • Drive time: Approximately 32 continuous hours • Number of charge/discharge cycles: 300 or more 10.2 Charging Method ※While the balance is battery-operated, [ ] stays on. The indicator flashes [ ] (charging ], charge the battery by required) when battery capacity decreases.
11. Troubleshooting ※ The numbers in ( ) indicate reference pages Symptom Cause There is no indication on • The AC adapter is not connected. the display. • The balance is subject to air currents or vibration. The display is unstable. • The balance is situated on an unstable [M] remains flashing surface. without changing. • An object is contacting the sample being measured, the measuring pan, or the tare. • An error was made in the tare subtraction procedure.
12. Specifications 12.1 Basic Specifications Model Capacity [g] Readability [g] SJ-220E 220 0.01 SJ-420E 420 0.01 SJ-620E 620 0.01 SJ-1200E 1200 0.1 Measurable unit weight in counting mode [g] Minimum weight in percentage mode [g] Weight measuring method 0.01 0.01 0.01 0.1 1 1 1 10 Tuning fork vibration method Calibration method Pan Size [mm] With external calibration weight φ140 170x140 Model Capacity [g] Readability [g] SJ-2200E 2200 0.1 SJ-4200E 4200 0.1 SJ-6200E 6200 0.
12.3 Minimum Display by Unit of Measurement Model Unit_of measurement g (ct) (oz) (lb) (ozt) (dwt) (grain) (Hong Kong) (Singapore, Malaysia) (Taiwan) mom (momme) (to) SJ220E SJ420E SJ620E 220 0.01 1100 0.05 7.7 0.0005 0.48 0.00005 7 0.0005 140 0.01 3300 0.2 5.8 0.0005 5.8 420 0.01 2100 0.05 14 0.0005 0.92 0.00005 13 0.0005 270 0.01 6400 0.2 11 0.0005 11 620 0.01 3100 0.05 21 0.0005 1.3 0.00005 19 0.0005 390 0.01 9500 0.2 16 0.0005 16 1200 0.1 6000 0.5 42 0.005 2.6 0.0005 38 0.005 770 0.
Model Unit_of measuremant g (ct) (oz) (lb) (ozt) (dwt) (grain) (Hong Kong) (Singapore, Malaysia) (Taiwan) mom (momme) (to) SJ2200E SJ4200E SJ6200E SJ12KE 2200 0.1 11000 0.5 77 0.005 4.8 0.0005 70 0.005 1400 0.1 33000 2 58 0.005 58 4200 0.1 21000 0.5 140 0.005 9.2 0.0005 130 0.005 2700 0.1 64000 2 110 0.005 110 6200 0.1 31000 0.5 210 0.005 13 0.0005 190 0.005 3900 0.1 95000 2 160 0.005 160 12000 1 60000 5 420 0.05 26 0.005 380 0.05 7700 1 0.005 0.005 0.005 0.05 58 0.005 580 0.05 180 0.
13. Conversion Table of Units Unit 1g 1ct 1oz 1lb 1ozt 1dwt 1GN 1tl (HK) 1tl (SGP,Mal) 1tl (Taiwan) 1mom 1to unit 1g 1ct 1oz 1lb 1ozt 1dwt 1GN 1tl (HK) 1tl (SGP,Mal) 1tl (Taiwan) 1mom 1to 34 Gram 1 0.2 28.34952 453.59237 31.10348 1.55517 0.06480 37.429 37.79936 37.5 3.75 11.66380 Grain 15.43236 3.08647 437.5 7000 480 24 1 577.61774 583.33333 578.71344 57.87134 180 carat 5 1 141.74762 2267.96185 155.51738 7.77587 0.32399 187.145 188.99682 187.5 18.75 58.31902 Ounce 0.03527 0.00705 1 16 1.09714 0.