Index English 02 中文 14 01
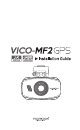
Vico-MF2 Installation Guide Thank you for choosing Vico-MF2 Car Camcorder. To ensure safety, please read this manual carefully before installation. Vico-MF2 Exterior Overview : 1. Start/Stop Recording/Confirm 2. Emergency Recording /Menu/Return 3. Up/Change Exposure Values 4. Down/Mute 5. External GPS socket 6. Power button 7. LED Indicator for Power 8. LED Indicator for Recording 9. LED Indicator for GPS 10. Lens 11. Power Port 12. Mini HDMI Output 13. USB Port (Data) 14. Reset 15.
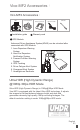
Vico-MF2 Accessories: Vico-MF2 Accessories: MF2 Suction Cup Mount Installation guide Adhesive Windscreen Mount 4 Meters MF2 Power Cable USB cable Warranty card GPS Module Advanced Driver Assistance System(ADAS) can be unlocked after connected with GPS Module. 1. Lane Departure Warning System 2. Lead Car Departure Notification System 3. Forward Collision Warning System 4. GPS Tracking 5. Driver Fatigue Alert System 6. Overspeed Alert System 7.
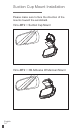
Suction Cup Mount Installation Please make sure to face the direction of the mounts toward the windshield.
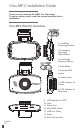
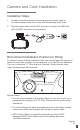
Camera and Cord Installation Installation Steps 1. In order to keep the device functioning properly, please use the VicoVation power cable that comes with the package at all times. 2. Plug the power cable into the D/C outlet then connect the USB side with Vico-MF2 insert into the power port. Recommend Installation Position for Wiring To achieve a clean looking installation after you have plugged the camera in follow the cord back from the camera and tuck it in under the roof headliner.
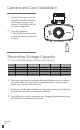
Camera and Cord Installation Insert the memory card into microSD Card Slot following the direction shown in the picture. Push to the end until you hear a light click. 2. Vico-MF2 supports 1296p/1080p recording, and a class 10 memory card must be used. Micro SD 1.
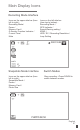
Main Display Icons Recording Mode Interface Icons on the upper side bar (from left to right) : Recording Mode / Power / Memory Card / G-Sensor Function Indicator / Current Time / Mute Icons on the left side bar (from top to bottom) : Recording Mode / GPS Indicator / Speed Warning setting / ADAS / HDR / EV / Recording Resolution / Loop Setting 000:19:48 0.
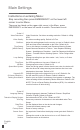
Main Settings Instructions on entering Menu: Stop recording then press EMERGENCY on the lower left corner to enter Menu. There are two labels on the upper right corner in the Menu, press EMERGENCY on the lower left corner to switch. Press twice to exit. 《Label 1》 Video Resolution: Video Resolution: Set video recording resolution. Default is 1080p HDR. Video Quality: Set video recording quality. Default is S.Fine. Deflicker: Adjust this setting depend on the country you are in. Default is Auto.
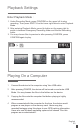
Playback Settings Enter Playback Mode: 1. Under Recording Mode, press CONFIRM on the upper left to stop recording. Then press SWITCH on the lower right twice to enter Playback Mode. 2. After entering Playback Mode, press Up button on the upper right to switch in between Emergency Recording folder and Normal Recording folder. 3. You may choose files to preview to after pressing CONFIRM, press CONFIRM again to play. Playing On a Computer 1. Connect the device to the computer using Vico-USB cable. 2.
3-Axis G-Sensor Settings Vico-MF2 is equipped with 3-Axis G-Sensor. Emergency Recording can automatically be trigged when impacts are sensed. In order to avoid false alert, this setting is OFF by default. Please turn on this function once the device is properly installed in car. Off(Default) High Medium Low Emergency Recording Settings 1. During driving, special circumstances, or emergency accidents, Emergency Recording can be manually trigged by pressing EMERGENCY on the lower left corner.
Accessories Vico-Power PLUS (Optional Accessory) Power PLUS is a power safety device which connects to car battery to work with Dash Cam/Black Box, continuously providing power after engine-off while parking. Together working with Parking Surveillance function, your Dash Cam can have motion-detection recording after you left your car, for having full protection of your car. Power Plus will auto-detect your battery status to cut-off power supply to prevent car battery from being drained out.
HD-Player 1. After connecting to the computer using the Vico-USB cable, HD Player would automatically appear in the folder. 2. Install HD Player onto the computer. Choose SD card to play files.Player would display GPS tracking and 3-Axis G-Sensor data.
Limited Warranty Service 1. The limited warranty starts from the Original Purchase Date. 12 months limited warranty is available on all car video recorders (body units only) and Vico-Power PLUS. 6 months limited warranty is available on all the accessories of VicoVation. The original valid proof of purchase will be required. 2. The limited warranty is only valid in the countries where this product is sold. Please contact the retailer or online shop who sold this unit for detailed in-warranty service. 3.
Vico-MF2 Ultra-HDR行車紀錄器安 裝操作指南 感謝您選購Vico-MF2 Ultra-HDR行車紀錄器,請詳閱安裝操作指 南,並注意相關提醒,正常操作主機。 Vico-MF2 產品外觀介紹 1. 錄影鍵 (確認鍵) 2. 緊急錄影鍵 (進 選單/返回鍵) 3. 向上鍵 (調整EV 值) 4. 向下鍵 (快速靜 音/錄音,模式切 換) 5. GPS模組接口 6. 電源開關 7. 電源指示燈 8. 錄影指示燈 9. GPS訊號指示燈 10. 百萬像素鏡頭 中文 14 11. 車充電源接口 12. Mini HDMI輸出接口 13. USB輸出接口 (連接電腦用) 14. Reset鍵 15.
Vico-MF2 產品盒內標準配件 MF2產品盒內標準配件內容: 主機 快速安裝指南 吸盤式支架 黏貼式支架 原廠4米車充 USB連接線 保固卡 GPS模組 安裝GPS模組後,主機增加智 慧行車輔助系統。 1.車道偏離警示 2.起步提醒 3.前車碰撞警示 4.行車軌跡記錄 5.疲勞駕駛提醒 6.超速提醒 7.低光源提醒 8.
支架安裝說明 盒內附有專用吸盤式支架以及黏貼式支架。安裝方式如下圖,使用 者可自行選擇適合自己愛車的方式以及安裝位置。 安裝以不影響行車視線為原則,請特別注意。 主機 + 吸盤式支架 主機 + 黏貼式支架 中文 16
車用環境安裝方式 安裝步驟 1. 請務必使用Vicovation原廠車充線,以確保主機運作正常。 2. 請將車充電源線接至汽車點菸座,另一端接至主機的車充電源接口 (請 特別留意,誤接到USB輸出接口會導致主機運作異常)。 建議安裝位置與電源走線 簡易DIY走線方式:車充電源線可由副駕駛座(腳踏墊下方),往上走右邊A 柱內側防水膠條(可能需要工具輔助,請注意復原膠條位置。),再經由副駕 駛座遮陽板上固定,走至主機。 建議安裝區域 特別注意 1. 若您的愛車A柱內有安全氣囊,建議由專業人員協助安裝,不建議自行埋 線安裝。 2. 安裝時請注意防水膠條的位置復原,否則可能影響車門防水性能。 3.
開始操作 請依照正確方向插入 MicroSDHC / SDXC 記憶卡。 輕推到底後會有輕微喀擦聲。 (請注意卡片金手指方向) 2. Vico-MF2支援1296p/1080p錄 影,嚴禁使用Class10等級以 下之記憶卡。 Micro SD 1. 錄影時間對照表 (不含緊急錄影時間) 8GB 16GB 32GB 64GB 中文 18 2560p 30fps 60 mins 120 mins 240 mins 480 mins 1296p 30fps 60 mins 120 mins 240 mins 480 mins 1080p 30fps 70 mins 140 mins 280 mins 560 mins 720p 60fps 90 mins 180 mins 360 mins 720 mins 720p 30fps 130 mins 260 mins 520 mins 1040 mins 3. 電源連接後 (請連接車充電源接口),自動開機進入錄影模式。首 次使用,請先設定時間並將記憶卡格式化。 4.
主畫面圖示與操作說明 一般錄影模式 畫面上方橫列由左至右依次為: 當前模式 (錄影模式 / 拍照模式 / 回放模式) / 車充電源圖示 / 記憶卡圖示 / 碰撞感測器運作圖示 / 錄影時間 / 錄音靜音圖示 畫面左側直行 由上而下依次為 當前模式 / GPS訊號 / 超速提醒設定值 / 智慧行車輔助功能圖示 / 錄影解析度 / EV值 / 影像大小 / 循環錄影檔案大小 000:19:48 0.
選單功能介紹 進選單方式 先停止錄影→按左下方緊急錄影鍵,即可進入選單。 選單上方右側共有兩個標籤,切換標籤方式請按左下方緊急錄影鍵。 《標籤一》 影像解析度設定: 影像品質: 光源頻率: 日期浮水印設定: [智慧行車輔助系統]: 循環錄影設置: 時區設定: 曝光值設定: 超速提醒設定: 按鍵燈設定: 重力感應靈敏度設定: 停車監控模式: 設定錄製影像解析度大小。預設值為1080p HDR。 設定影像壓縮品質。預設值為優質。 依照各國光源環境調整。預設為自動判斷。 開啟或關閉浮水印。預設為開啟。 設定台灣地區定點測速照相警示、車道偏離警示、開大燈 提醒、前車起步提醒、前方碰撞提醒、疲勞駕駛提醒。 可設定每個影像檔案時間為1分鐘 / 3分鐘 / 5分鐘。預設 值為3分鐘。 設定GPS時間校正區域。預設值為+8。台灣地區應設為 +8。 可調整整體曝光值。 設定提醒速限。預設值為關閉。(需加裝GPS模組) 設定按鍵的LED燈。預設值為開啟。 設定重力感測器靈敏度。預設值為中靈敏度。 關閉或開啟停車監控模式。預設值為關閉(此功能為停車 監控專用)。 《標籤二》 語言設定: 可選擇操作語言為繁體中文 / 簡體中文
回放操作 進入回放模式: 1. 錄影模式下,先按左上方確認鍵,停止錄影。然後按壓右下方切換鍵 兩次進入回放模式。 2. 進入回放模式後,按右上方上鍵可以切換緊急錄影資料夾或是一般錄 影資料夾。 3. 按確認鍵後可以開始選擇欲瀏覽的檔案,再按確認鍵即可撥放。 使用電腦撥放 1. 使用盒內附的USB連接線,一端接到主機的USB輸出接口,另一端與電 腦連接。 2. 連接電腦後,主機會開機並且進入USB模式。此時可以透過瀏覽資料 夾的方式點選欲瀏覽的檔案。 3. 建議將檔案複製到電腦後撥放,避免因傳輸速度不足造成影片撥放不 順暢。 4.
三軸G-Sensor碰撞感測器 Vico-MF2配備G-Sensor碰撞(三軸重力)感測器,能在碰撞發生 時,自動觸發緊急錄影功能。為了避免誤動作發生, G-Sensor功能預設值為關閉,請在車內安裝完畢之後進入選 單開啟此功能。 關閉(預設) 高 中 低 緊急錄影介紹 1. 行車途中,遇見特殊狀況或緊急事故時,可手動觸發緊急錄影(左下 方按鍵)。此時螢幕上方會出現一個黃色三角形符號。 2.
HD-Player 安裝HD-Player至電腦之後,選擇SD卡播放影像檔案,播放器會同步秀 出GPS軌跡路徑與3軸G-Sensor的感應值。 其他選購配件 Vico Power-PLUS (選配) Power-PLUS是一個車輛電力監控保護裝置,與車用電瓶連 接後,可在引 擎熄火之後持續供電給行車記錄器,提供停 車監控功能使用。同時監控 電瓶電壓狀態,電壓過低自動 斷電,避免電量過度消耗而無法發動引擎。 Power-PLUS 提供完整全面的保護功能,包含: 1. 低電壓斷電保護 2. 溫度過高斷電保護 3. 計時斷電保護 4.
售後服務支援 有任何安裝操作問題,歡迎來信或是致電視連科客服中心。 Email:Service@vicovation.com 客服專線:02-2627-5883轉分機22, 23客服部 行動客服專線:0975-023-262 視連科客服中心地址:台北市內湖區瑞光路358巷38弄36號2樓之2 客服時間:週一~週五上午10:00~12:30,13:30~19:00 (例假日與國定假日除 外) 歡迎您加入視連科Facebook專頁www.facebook.
維修服務與保固條款 視連科保證產品皆經過完整測試,避免原物料及加工過程之瑕疵,並 符合所公佈之規格。若產品在保固期間內,於正常環境使用下有任何 不良或損壞發生,您可與原購買的經銷商連絡,透過原購買經銷商寄 回視連科維修。若有其他相關維修問題,也歡迎您直接撥打客服專線 與我們聯繫。 客服專線:02 -2627-5883轉23 行動客服專線:0975-023-262 LINE線上客服ID:vicovation 視連科客服部地址: 台北市內湖區瑞光路358巷38弄36號2樓之2 免付費維修服務保固說明 1. 視連科產品主機提供一年保固,自消費者之原始購買日起算一年 。用戶須出示原始購買日之證明 (發票或是保固卡) 始能享有保固 服務。若無法提供正常購買證明,視連科將依產品序號判定保固 期間。 2. 若產品主機在購買七日內 (含),於正常操作下發生硬體故障,視 連科提供免費更換新品。 3. 所有配件 (車充,支架,線材)為耗損品,自購買日起享有六個月 的免費保修服務。 4.