
User guide

interior of the housing is required later. Additionally, a rear cover is supplied for those installations
requiring Canadian UL compliance or extra protection from fire.
Installation without the rear cover:
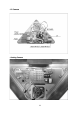
1. Remove the front plate using the no. 20 Torx bit provided; retain the screws in a safe place. Using
the camera mounting frame as a template, mark the locations of the mounting holes on the three
mounting tabs (2 holes per tab). Open a hole in the wall or ceiling to accommodate routing the
cables to the camera.
2. Route all necessary cables to the location if not already done so.
3. Drill suitable holes for the hardware selected appropriate for the wall/ceiling material. The use of
No. 8 (or 4 mm metric) mounting hardware is recommended. Use hollow-wall anchors or, if the
housing is being mounted on a sheet metal surface, use rivet nuts.
4. Secure the camera mounting frame to the wall/ceiling with fasteners appropriate for the mounting
surface. Route the cables through the access hole in the wall or ceiling.
5. When the camera mounting frame is secured to the surface, apply an epoxy security sealant
around the perimeter of the base plate where it meets the ceiling/wall. [Vicon recommends
DynaPoxy™ EP1200 (US) or Arbokol 1025 (UK) or equivalent for this purpose.]
Installation with the rear cover:
Note: The installation corner must be sharp and clean; if necessary, clean any excess material from
the installation location.
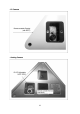
1. Remove the front plate using the no. 20 Torx bit provided; retain the screws in a safe place.
2. Select the cable access hole in the rear cover to be used (6 provided) and knockout the hole. Place
the rear cover in the corner; using it as a template, mark the locations of the three (3) mounting
holes and the cable access hole. Remove it from the corner.
3. Drill suitable mounting holes and open the hole to accommodate routing the cables to the camera
in the wall/ceiling. Be sure the cable access hole is large enough to accommodate the cable clamp.
4. Route all necessary cables to the location if not already done so. Fasten the cable clamp (provided)
into the cable access knockout hole so that the clamp is on the inside of the rear cover. Route
cables through the access hole and through the rear cover; be sure to allow enough cable length to
make connections to the camera board. Mount the rear cover to the wall/ceiling through the 3 holes
provided; use hardware appropriate for the mounting surface.
5. Using the camera mounting frame as a template, insert it into the rear cover and mark the
mounting holes on the 3 tabs (2 holes per tab) that align with the holes in the rear cover; drill
suitable mounting holes. Attach the camera mounting frame onto the wall/ceiling and secure it
using appropriate hardware for the mounting surface. The use of No. 8 (or 4 mm metric) mounting
hardware is recommended. Use hollow wall anchors or, if the housing is being mounted on a sheet
metal surface, use rivet nuts.
6. Make cable connections to the camera board. See instructions below. Adjust the cable length as
necessary and secure the cable clamp.
Caution: Installation of the rear cover is required for UL/Canadian UL compliance.
7. When the camera mounting frame assembly is secured to the surface, apply an epoxy security
sealant around the perimeter of the base plate assembly where it meets the ceiling/wall. [Vicon
recommends DynaPoxy™ EP1200 (US) or Arbokol 1025 (UK) or equivalent for this purpose.]
14