
User's Manual


6
Gateway Configuration
Initial Connection
Install the software on the CD provided with the VWG. The setup will guide you through the necessary
installation steps. The minimum system requirements for installation are:
• An Ethernet adapter with TCP/IP support
• A WEB browser installed.
IMPORTANT NOTE: Unless updated ( Jar files ), the tool used to service or commission the VWG should
always be the one originally supplier with the VWG
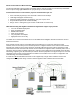
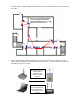
An Ethernet TCP/IP connection to the VWG is required for commissioning. For this initial Ethernet connection,
you can use either:
• A “crossover” cable connected directly between your PC and the VWG
• A normal LAN connection, meaning that both your PC and the VWG are physically connected to the
same Ethernet hub or switch.
As shipped from the factory, a VWG contains only the bare minimum software to run the wireless gateway
application. The gateway does not contain a Java Virtual Machine runtime environment, a WEB UI interface
or any additional software modules. A VWG does include a core Niagara software load and a Tridium
certificate. Using the supplied software appliance, you must connect to the VWG for initial configuration.
Some important related tasks including setting the VWG IP network address and related wireless database
setup can only be accomplished using this software appliance.
Initial IP address When shipped, a new VWG is pre-configured with an IP address in the range of:
192.168.1.12n (primary “LAN1” port, the “LAN2” port is disabled) where the last numeral (n) in the IP address
matches the last numeral in the VWG serial number. The VWG serial number can be found directly on the
label inside the VWG. In all cases, the default subnet mask is: 255.255.255.0 .
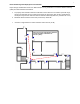
Two areas of preparation are required before proceeding with the configuration. Provide power and
connectivity. After you complete the commissioning process described in this document, you can mount and
wire the VWG controller at the job site, making permanent mounting and wiring connections.
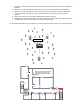
To prepare a new VWG for commissioning, do the following steps:
1. If not already installed, install the supplied Viconics Configuration Software on your local host PC
machine.
2. Attach one end of a standard category-5 Ethernet unshielded twisted pair (UTP) patch cable to the
RJ-45 Ethernet connector on the VWG.
3. Attach the other end of the patch cable to a network port or directly to an Ethernet hub.
4. Power up the VWG.
5. Record you PC’s current IP settings, then re-assign your PC’s IP address for its Ethernet LAN
adapter (if necessary, refer to Windows online Help for information about configuring TCP/IP
settings).
6. For this initial connection to a factory-shipped VWG, configure your PC to use an IP address in the
same subnet as the VWG, as well as a matching subnet mask.
7. Set the IP address in the range: 192.168.1.1 to 192.168.1.254 with a subnet mask of: 255.255.255.0
Note: Do not assign your PC the identical IP address as the VWG factory-assigned IP address.
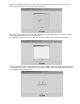
8. From your PC, start the Configuration software. ( under Start\Viconics Configuration Tool Setup 1.X.X