STATE VWRP-3800 7-IN-1 Wood Music Center Instruction Manual Please read carefully before use and keep for future reference
WARNING CAUTION: TO REDUCE THE RISK OF ELECTRIC SHOCK, DO NOT REMOVE COVER (OR BACK). NO USER SERVICEABLE PARTS INSIDE. REFER SERVICING TO QUALIFIED SERVICE PERSONNEL. DANGEROUS VOLTAGE: The lightning flash with arrowhead symbol within an equilateral triangle is intended to alert the user to the presence of uninsulated dangerous voltage within the product`s enclosure that may be of sufficient magnitude to constitute a risk of electric shock to persons.
11. Use only with the cart, stand, tripod, bracket, or table specified by the manufacturer, or sold with the apparatus. When a cart or rack is used, use caution when moving the cart/apparatus combination to avoid injury from tip-over. 12. Unplug the apparatus during lighting storms or when unused for long periods of time. 13. Refer all servicing to qualified personnel.
TABLE OF CONTENTS FEATURES........................................................................................................................................... 6 SPECIFICATIONS ............................................................................................................................... 6 PRODUCT OVERVIEW ....................................................................................................................... 7 SETUP & BASIC OPERATION.....................................
FEATURES The STATE 7-IN-1 Wood Music Center is loaded with features. The 3 Speed turntable stands ready to play your favorite vinyl. The Dual Bluetooth model allows streaming of your music to an external speaker. Includes a Cassette & CD Player, built in Speakers, and FM Radio. 3-speed record player will play 33 1/3, 45, 78 rpm records Bluetooth In connectivity allows you to stream music from another source up to 33 feet away.
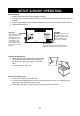
PRODUCT OVERVIEW A. Turntable Parts of the Turntable B. Transportation Screw: Before use, completely loosen the screw. When transporting the unit, tighten the screw to secure the turntable. C. Cue Lever: Use this lever to lift the tone arm. D. Tone Arm H older E. Speed Selector F. Tone Arm G. 45 RPM Adaptor and Holder H. Stop/Pair Button: Press to stop playback in CD mode. Press and hold to activate Bluetooth® pairing. I. Program Button: Arrange the playback order in CD mode J. Repeat Button K.
SETUP & BASIC OPERATION Essential Setup 1. Unpack the unit and remove all packaging materials. 2. Place the unit on a flat and level surface. The selected location should be stable and free from vibration. 3. Plug the power adaptor into the electrical outlet and connect other end to the back of the unit. 4. Extend the FM antenna. While in FM mode, tune in an FM station and extend the antenna to find a position for the best reception.
LISTENING TO A CD 1. Turn the unit ON by pressing the POWER button. 2. Set the FUNCTION KNOB to CD position. "--" blinks for a few seconds. When no disc is loaded, "no" appears on the display. 3. Press the OPEN/CLOSE button ( ). 4. Place a disc on the tray with the printed label face up. Never place more than one disc on the tray. The disc must be placed in the center of the disc tray. If the disc is not correctly loaded, it may not be possible to open the tray again once it has closed.
LISTENING TO AN AUX SOURCE Playing via 3.5mm AUX-IN Jack on the Front of Unit: 1. Turn the unit ON by pressing the POWER button 2. Set the FUNCTION KNOB to the AUX position. 3. Connect the 3.5mm AUX-IN cable (included) into the 3.5mm Headphone jack or AUX OUT Jack of an external audio source, such as CD player, tablet, MP3 player. And the other end to Aux In jack on this unit. LISTENING VIA EXTERNAL DEVICES LINE-OUT Jacks on the Back of Unit: You can connect other stereo speaker system to this unit. 1.
To fast forward: During playback, press and hold the TAPE OPERATION BUTTON until you find the part you want to listen to. You can also push in the TAPE OPERATION BUTTON about 1/4" (5mm) to start the fast forward operation and press the button again to release it and resume normal speed playback. NOTE: DO not insert an Aux In cable when the cassette is playing, or it will turn to Aux In mode. LISTENING TO A RECORD 1.
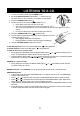
10. Move the TONE ARM gently to the edge of the record (or the starting point of a track). The turntable will begin to turn. 11. Gently lower the TONE ARM by slowly releasing the CUE LEVER. You can lower the TONE ARM manually if the CUE LEVER has not been raised. cue lever 12. Turn the VOLUME KNOB to adjust the volume. 13. When playback has finished, slightly lift the tone arm using the CUE LEVER and return it to the TONE ARM holder. The rotation stops.
LISTENING TO BLUETOOTH® You can listen to an external Bluetooth® device on the VWRP-3800 built-in speakers. 1. Turn the unit ON by pressing the POWER button. 2. Set the FUNCTION KNOB to the FM/ position. 3. Select (Bluetooth) using the switch. The FM ST/BT indicator starts blink in blue which indicates the unit is ready to establish the Bluetooth connection. 4. Ensure that the Bluetooth function is activated in your player (e.g. mobile phone). 5.
MAINTENANCE Always keep the turntable clean. If the surface of the unit gets dirty, wipe with a soft dry cloth or use a diluted mild liquid soap. Be sure to remove any excess liquid completely. Do not use thinner, benzine or alcohol as they may damage the surface of the unit. Allow the surface of the unit to dry completely before using.
MAINTENANCE Using Cassette Tapes Tape Handling: ● Use your finger or a pencil to turn the cassette tape's hub and take up any slack tape. ● Avoid touching the tape. Fingerprints attract dust and dirt. ● Avoid dropping or subjecting cassettes to excessive shocks. ● As C-120 tapes are physically weak and could become entangled in the transport mechanism, do not use them. Do not store tapes in the following places: ● On top of heaters, exposed to direct sunlight or in any other places with high temperatures.
MAINTENANCE ● Handle with care, as the stylus is delicate. Use of a bent or broken stylus may damage the record and cause the turntable to malfunction. ● Do not expose stylus to extreme heat. ● Contact a qualified repair company if you experience difficulty in changing the stylus. Removing an Old Stylus 1. Set a screwdriver at the tip of the stylus and push down to the direction "A". 2. Pull the stylus out toward direction "B". Installing a New Stylus 1.
TROUBLESHOOTING GUIDE In case of trouble with the unit, please look through the problems below and see if you can solve them yourself before calling your dealer. Function Problem Solution No power General Radio a switched outlet and if it is, turn the switch on. Make sure there is power to the AC outlet by plugging another item such as a lamp or fan. No sound Adjust the volume The sound has interference The unit is too close to a TV set or similar appliance.
FCC NOTICE This device complies with Part 15 of the FCC Rules. Operation is subject to the following two conditions: (1) this device may not cause harmful interference, and (2) this device must accept any interference received, including that may cause undesired operation. NOTE: This equipment has been tested and found to comply with the limits for a Class B digital device, pursuant to Part 15 of the FCC Rules.
CAUTION ON MODIFICATIONS Any changes or modifications not expressly approved by the grantee of this device may void the authority granted by the FCC to operate this equipment. Electric and electronic equipment contains materials, components and substances that can be hazardous to your health and the environment, if the waste material (discarded electric and electronic equipment) is not handled correctly. Electric and electronic equipment is marked with the crossed-out trash can symbol, seen the right side.
STATE VWRP-3800 Centro de Música de Madera 7-en-1 Manual de Operación FAVOR DE LEER EL MANUAL COMPLETAMENTE ANTES DE OPERAR ESTE PRODUCTO.
ADVERTENCIA PRECAUCIÓN RIESGO DE CHOQUE ELÉCTRICO, NO ABRIR PRECAUCIÓN: Para reducir el riego de fuego o choque eléctrico, no exponer este producto al goteo o salpicadura de agua, a la lluvia o humedad. No colocar objetos con líquidos, como vasos con agua cerca o encima del producto.
10. Protección del cordón de alimentación. El cordón de alimentación debe colocarse de forma tal que no exista probabilidad de pisarlo o apretarlo sobre los lugares donde será colocado o contra el producto mismo. Poner atención particular en el cordón, la clavija, el tomacorriente y en los puntos en donde estos salen del producto. 11. Accesorios. Usar solo accesorios/refacciones recomendadas por el fabricante. 12. Usar armarios, estantes o bases recomendados por el fabricante o vendidos con el producto.
INDICE CARACTERISTICAS...............................................................................................................25 ESPECIFICACIONES............................................................................................................. 25 DESCRIPCION DE PARTES.................................................................................................. 26 OPERACION BASICA Y AJUSTES.........................................................................................
CARACTERISTICAS El centro de música de madera STATE 7-EN-1 está repleto de funciones. El tocadiscos de 3 velocidades está listo para reproducir los discos de vinil favoritos. La función dual Bluetooth® permite la transmisión de la música a una bocina externa. Incluye reproductor de Casete y Disco Compacto, bocinas incorporadas y Radio FM.
DESCRIPCION DE PARTES A. B. C. D. E. F. G. H. I. J. K. L. M. N. Tocadiscos Base giratoria Tornillo de transporte: Antes de usar, aflojar completamente el tornillo. Al transportar la unidad, apretar el tornillo para asegurar el tocadiscos. Palanca: Usar para levantar el brazo fonocaptor. Soporte Selector de velocidad. Brazo fonocaptor. Adaptador de 45 rpm STOP/PAIR: Presionar para detener la reproducción en el modo de Disco Compacto. Presionar y sostener para activar la función de sincronía Bluetooth®.
OPERACIÓN BASICA Y AJUSTES Ajustes Esenciales 1. Desempacar la unidad y remover todos los materiales de embalaje. 2. Colocar la unidad sobre una superficie nivelada, estable y libre de vibraciones. 3. Enchufe el adaptador de corriente en el tomacorriente y conecte el otro extremo a la parte posterior de la unidad. 4. Extender y direccionar la antena alámbrica de FM. Abrir la cubierta del Tocadiscos: 1. Levantar la cubierta antipolvo hasta llegar al tope. 2.
OPERACIÓN DEL DISCO COMPACTO 1. Presionar POWER para encender la unidad. 2. Colocar el Selector de Función en la posición de CD. "--" empieza a destellar en la pantalla por unos segundos. SI no hay algún disco cargado, la pantalla despliega “NO” 3. Presionar OPEN/CLOSE ( ) para expulsar la bandeja del disco. 4. Insertar un disco en la bandeja con la etiqueta hacia arriba. No colocar más de un disco en la bandeja. El disco debe colocarse sobre el pestillo central de la bandeja.
ENTRADA AUXILIAR Reproducir una fuente de audio externa a través del conector de Entrada Auxiliar de Ø 3.5 mm AUX-IN: 1. Presionar POWER para encender la unidad. 2. Colocar el Selector de Función en la posición de AUX. 3. Insertar un extremo del cable auxiliar (incluido) en el conector de entrada auxiliar AUX IN de la unidad, conectar el otro extremo del cable al conector de salida para audífonos del dispositivo de audio externo, como reproductor de CD, Reproductor MP3, Tableta, etc.
OPERACIÓN DEL CASETE 1. Presionar POWER para encender la unidad. 2. Colocar el Selector de Función en la posición de AUX. 3. Insertar un casete en el compartimiento hasta escuchar un clic. El casete solo entra de una forma, no forzar el casete. La unidad inicia automáticamente la reproducción del casete, la reproducción se detiene cuando la cinta llega al final. 4. Girar VOLUME para ajustar el volumen al nivel deseado.
9. Mover la palanca hacia atrás para levantar el Brazo Fonocaptor del soporte. Brazo Fonocaptor Palanca 10. Mover suavemente el Brazo Fonocaptor al borde del disco (o al inicio de una pista deseada). La base del tocadiscos empieza a girar. 11. Mover la palanca hacia delante para bajar suavemente el Brazo Fonocaptor en el disco. Puede bajar el Brazo Fonocaptor manualmente si la palanca no fue movida hacia atrás. Palanca 12.Girar VOLUME para ajustar el volumen al nivel deseado. 13.
SINCRONIA BLUETOOTH® Sincronía de Entrada Bluetooth® Puede escuchar la reproducción de un dispositivo de audio externo Bluetooth® a través de las bocinas de la unidad 1. Presionar POWER para encender la unidad. 2. Colocar el selector de función en la posición de FM/ . (Bluetooth®). El indicador FM ST/BT 3. Colocar el selector de modo en la posición de empieza a destellar en azul indicando que la unidad está en modo de sincronía. 4.
MANTENIMIENTO Mantener siempre limpia la base giratoria. Si la superficie de la unidad se ensucia, limpiar con una tela suave, limpia y seca o usar un jabón líquido suave diluido. Asegúrese de eliminar por completo cualquier exceso de líquido. No usar diluyentes, benceno o alcohol, estos pueden dañar la superficie de la unidad. Permita que la superficie de la unidad se seque completamente antes de usarla.
● Si tiene alguna duda sobre el cuidado y manipulación de un disco CD-R/CD-RW, leer las precauciones proporcionadas con el disco o comunicarse con el fabricante del disco. Uso de los Casete Manejo de los Casetes: ● Usar lápiz o pluma para girar el engrane de la cinta de casete y apretar cualquier cinta floja. ● Evitar tocar la cinta. Las huellas de los dedos atraen el polvo y la suciedad. ● Evitar dejar caer o someter los casetes a golpes excesivos.
Cómo reemplazar la cabeza fonocaptora La cabeza fonocaptora debe durar unas 50 horas con un uso normal. Sin embargo, se recomienda reemplazarla tan pronto como note cambios en la calidad del sonido. El uso prolongado de una aguja desgastada puede dañar los discos. El desgaste de la cabeza fonocaptora se acelerará al reproducir discos de 78 rpm. La alta velocidad de los discos de 78 rpm puede desgastar el captado óptico más rápidamente. Precaución: ● No doblar la aguja.
GUIA PARA SOLUCION DE PROBLEMAS En caso de problemas con la unidad, revisar la siguiente guía para solución de problemas y vea si puede resolverlo usted mismo antes de llamar al distribuidor o acudir al centro de servicio autorizado. Función Problema No enciende General Radio Asegurarse que hay energía en el tomacorriente. Presionar POWER para encender la unidad. • Ajustar el nivel del volumen • La unidad está cerca de una TV o Radio.
NOTICIA FCC Este dispositivo cumple con la parte 15 de las reglas FCC. La operación del aparato está sujeta a las dos siguientes condiciones: (1) Este aparato no puede causar interferencia perjudicial y (2) este aparato debe aceptar cualquier interferencia recibida, incluyendo interferencias que puedan causar un funcionamiento no deseado. NOTA: Este producto ha sido probado y cumple con las limitaciones des un equipo digital Clase B, de acuerdo con la Parte 15 de las Normas FCC.
PRECAUCION SOBRE MODIFICACIONES Cualquier cambio o modificación no aprobado expresamente por el concesionario de este dispositivo puede anular la autoridad otorgada por la FCC para operar este equipo. Los equipos eléctricos y electrónicos contienen materiales, componentes y sustancias que pueden ser peligrosos para su salud y el medio ambiente, si el material de desecho (equipos eléctricos y electrónicos desechados) no se manipula correctamente.