CD Stereo System with Bluetooth ® Model: ITCDS-5000 Instruction Manual PLEASE READ THIS INSTRUCTION MANUAL CAREFULLY BEFORE USE AND KEEP IT FOR FUTURE REFERENCE.
CONTENT Important Safety Instructions ................................................................................. 1 Buttons and Controls ............................................................................................... 3 Remote Control ........................................................................................................ 4 Getting Started .........................................................................................................
IMPORTANT SAFETY INSTRUCTIONS 1. Read these instructions – All the safety and operating instructions should be read before this product is operated. 2. Keep these instructions – The safety and operating instructions should be retained for future reference. 3. Heed all warnings – All warnings on the appliance and in the operating instructions should be adhered to. 4. Follow all instructions – All operating and use instructions should be followed. 5.
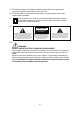
19. The battery (battery or batteries or battery pack) shall not be exposed to excessive heat such as sunshine, fire or the like. 20. The mains plug is used as disconnect device, the disconnect device shall remain readily operable. 21. This equipment is a Class II or double insulated electrical appliance. It has been designed in such a way that it does not require a safety connection to electrical earth. 22.
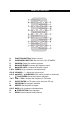
BUTTONS AND CONTROLS MAIN UNIT A. B. C. D. E. F. G. H. I. J. K. BASS KNOB L. NEXT BUTTON M. SCAN BUTTON N. TREBLE KNOB O. TUNE DOWN BUTTON P. TUNE UP BUTTON Q. LED DISPLAY R. EJECT/ENTER BUTTON S. CD COMPARTMENT T & U.
REMOTE CONTROL A. FUNCTION BUTTON: Select a source B. ON/STANDBY BUTTON: Set the unit to ON / STANDBY C. RANDOM: Select for random playback D. BALANCE RIGHT: Increase right speaker output E. BALANCE LEFT: Increase left speaker output F & N. TREBLE (+/-): Increase or decrease treble G & Q. VOLUME + / - : Adjust the volume level H & S. NEXT / PREVIOUS: Skip tracks forward or backward I. PLAY/PAUSE: Pause and resume playback J & T. TUN- / TUN+ : Adjusts the frequency in FM mode K.
GETTING STARTED CONNECTING THE EXTERNAL SPEAKERS The speaker input sockets are located at the back of the main unit. 1. Unwrap the speaker wire from the left speaker and plug it into the left (L) speaker socket on the main unit. 2. Unwrap the speaker wire from the right speaker and plug it into the right (R) speaker socket on the main unit. 3. Make sure the speaker cables are not run in areas where they could cause danger.
SETTING FM RADIO PRESETS The CD Stereo System can store up to 20 radio station presets. To Manually Set Presets 1. Find the radio station you would like to save. 2. Press the PROGRAM button on the remote control. 3. Press NEXT BUTTON / PREVIOUS BUTTON to select the preferred Preset Number. The display will show “P 01, P 02, etc...” 4. Press the PROGRAM button again to save the station. 5. Repeat steps 1-4 until you have finished saving your presets. 6.
LISTENING TO A CD 1. Press FUNCTION button until the display reads “CD”. 2. Press the EJECT/ENTER button to open the CD door, put a CD onto the CD tray with the printed label facing up (towards you). To close the CD door, press EJECT/ENTER button again. Note: Remember to remove the CD when you are finished listening. To Play a CD When Stopped: Press the PLAY/PAUSE button. The disc will play from track 1. To Pause a CD While Playing: Press the PLAY/PAUSE button.
DISC MAINTENANCE Depending on the quality of the disc, and the condition of the recording, some CD-R/CD-RW discs may not be playable. How to remove the disc How to hold the disc How to clean the disc 1. Always place the compact disc in the disc tray with the label facing upward. (Compact discs can be played only on one side). 2. To move a disc from its storage case, press down on the center of the case and lift the disc out, holding it carefully by the edges. 3.
AUX-IN OPERATION External (auxiliary) audio sources such as tablets, smartphones or MP3 players, can connect to the CD Stereo System via aux-in. 1. Press POWER button to turn the unit ON and then press FUNCTION button to select “AUX”. 2. Set the volume to the minimum level with the VOLUME KNOB. 3. Plug in an AUX-IN cable (not included) into the AUX-IN jack on the front of the unit. 4. Plug the other end of the cable into the headphone or Line-Out jack of the external source. 5.
• If the remote control unit is operated near other appliances which generate infrared rays, or if other remote control devices using infrared rays are used near the unit, it may operate incorrectly. Conversely, the other appliances may operate incorrectly. TO ACTIVATE THE REMOTE CONRTOL The remote control comes with a cell battery already installed. To activate the battery, remove the transparent tab at the bottom of the remote control. The remote control is now ready to use.
TROUBLESHOOTING GUIDE In case of trouble with the unit, please look through the problems below and see if you can solve them yourself before calling your dealer. PROBLEM CD PLAYER RADIO UNIT WHOLE UNIT Unit does not turn ON when POWER is pressed. CAUSE • Unit is unplugged SOLUTION • Connect unit to AC power supply No sound comes out of the speakers. • The external speakers are disconnected. • The volume is turned down (to MIN). • The input selector does not match the playback source.
SPECIFICATIONS AMPLIFIER Section Output Power.................................................... 25W + 25W Frequency Response ........................................ 60 to 20,000 Hz TUNER Section FM Section Frequency Range .............................................. 87.5 to 108 MHz CD PLAYER Section Frequency Response ........................................ 60 to 20,000 Hz Signal-to-Noise Ratio ........................................ 55 dB (IEC-A) SPEAKER SYSTEM Section Impedance.....................
FCC STATEMENT Warning: Changes or modifications to this unit not expressly approved by the party responsible for compliance could void the user authority to operate the equipment. NOTE: This equipment has been tested and found to comply with the limits for Class B digital device, pursuant to part 15 of the FCC Rules. These limits are designed to provide reasonable protection against harmful interference in a residential installation.
Innovative Technology Electronics Corp. Limited Warranty: 90 Days Labor, One Year Parts Innovative Technology Electronics Corp. (IT) warrants the product to be free from “Defects” in materials under normal use for a period of “One Year” from the date of the original purchase. The Warranty is “Not” transferable. IT agrees, within the initial “90 Day” period, to repair or replace the product if it is determined to be defective at “No Charge”.
5000130700E