MODEL: VTA-270B 6-IN-1 TURNTABLE 1
Important Safety Instructions .................................................................................... 3 Product Overview ...................................................................................................... 5 Setup / Basic Operation ............................................................................................. 8 Listening to the FM Radio ......................................................................................... 9 Listening to a CD..................
CAUTION: To reduce the risk of fire or electric shock, do not expose this appliance to rain or moisture. WARNING: To prevent electric shock, do not use this (polarized) plug with an extension cord, receptacle or other outlet unless the blades can be fully inserted to prevent blade exposure. WARNING: Invisible laser radiation when open and interlock failed or defeated. Avoid direct exposure to laser beam. Important Safety Instructions 1. 2. 3. 4. 5. 6. 7. 8. 9. 10. 11. 12. 13. 14.
15. -This lightning flash with arrowhead symbol within an equilateral triangle is intended to alert the user to the presence of non-insulated “dangerous voltage” within the product’s enclosure that may be of sufficient magnitude to constitute a risk of electric shock. -Warning: To reduce the risk of electric shock, do not remove cover (or back) as there are no user-serviceable parts inside. Refer servicing to qualified personnel.
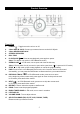
Product Overview Front View : Toggle to turn the unit on or off. 1. POWER 2. 3.5mm AUX IN JACK: Connect your external source to the AUX IN jack. 3. 3.5mm HEADPHONE JACK 4. STEREO SPEAKERS 5. DISC TRAY 6. PLAY/PAUSE : Press to start playback, press again to pause. (Note: This button only works in CD & Bluetooth mode.) 7. OPEN/CLOSE : In CD mode, use to open and close the disc tray. (Note: CD door takes four (4) seconds to open when open/close ( 8. 9. STOP ) is pressed in CD mode.
Left side View 18. CASSETTE FF & EJECT: Press halfway to fast forward, press all the way to end and eject the tape. Rear View 19. LINE OUT jacks For amplifier device with RCA auxiliary input sockets, insert the white and red plugs on the RCA cable into the unit. Insert the opposite end into the amplifier device. Be sure to connect the white plug to the white jack and the red plug to the red jack. 20. AC Power Cord Connect the AC plug into a wall outlet.
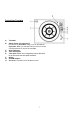
Parts of the Turntable A. Turntable. B. Safety Screw (for transport) Before using the unit, turn the screw clockwise using a coin or screwdriver. Important: When you transport the unit, turn the screw counterclockwise to secure the turntable. Speed Selector. Tone Arm holder. Tone Arm. Before use, completely loosen the twist C. D. E. tie on the tone arm and uplift tone arm. F. G. H. Stylus. 45 RPM adaptor. Cue-lever. Use this lever to lift the tone arm.
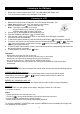
Setup / Basic Operation Setup 1. Remove white protective needle cover by gently pulling towards front of unit. 2. Remove any packaging materials from the unit. 3. Connect the AC power cord to a wall outlet. Note: For the plug shown below, you must use a socket with an earthing terminal. Note: -You’re strongly recommended that this product should be operated only from the type of power source indicated on the marking label.
Listening to the FM Radio 1. 2. Rotate the Function Knob to select “FM”. The LED Display will display “rad”. Tune to the desired station using the Radio Tuner Knob. Listening to a CD 1. Rotate the Function Knob to select CD. The LED Display will display “Cd--”. (Note: When no disc is set, “disc” will appear on the display.) 2. Press the OPEN/CLOSE button to open the tray. Note: - This button only works in CD mode. - CD door takes four (4) seconds to open when OPEN/CLOSE is pressed in CD mode. 3.
Programmed Playback Up to 20 tracks can be programmed to play in the desired order. Notes: - Programmed playback works with CD discs only. 1. Select “CD” mode, then load a CD. 2. While the CD is stopped, press the PROGRAM button. 3. “PROG” indicator lights up and “P01” blinks on the display. 4. Press ( or ) to select a track number. 5. Press the PROGRAM button again to set the next program track, “P02” appears and blinks. Repeat steps 4 through 5 to program the additional tracks. 6.
Listening to an External Audio Device (AUX Mode) Rotate to select “AUX” function. The LED Display will display “AUX” In AUX (auxiliary) mode, this unit can play audio from an external device (iPod, MP3 Player, Portable CD Player, etc.) There is an AUX IN jack on the front of the unit. When connecting a device that has a headphone jack, use a 3.5mm cable on both ends to connect the external device with the apparatus. 1. Plug one end of the 3.5mm cable (not included) into the AUX IN jack. 2.
Maintenance / Proper Handling Compact Disc Handling • Always place the disc on the disc tray with the label side facing upward (compact discs can be played/recorded only on one side) • To remove a disc from its storage case, press down on the center of the case and lift the disc upward, holding it carefully by its edges. • To clean a disc, wipe the surface from the center hole outward towards the outer edge with a soft, dry cloth.
Specifications • • Hereby, Innovative Technology Electronics, LLC, declares that this Wooden Music Center is in compliance with the essential requirements and other relevant provisions of Directive 2014/53/EU. The full test of the EU declaration of conformity is available at the following internet address: www.victrola.com/eudoc GENERAL Power Requirements Power Consumption Dimensions (W x H x D) Weight AC 230 V~50 Hz 40W 18.9in x 15in x 7.87in (approx.) 480mm x 380mm x 200mm (approx.) 18.15 lbs (approx.
GENERAL Troubleshooting Guide Symptom Possible Cause Solution • Unit • Unit • Connect on. • No sound output from speakers. • The • Noise/Distortion • The TAPE FM RADIO in • The cassette tape is not inserted properly. • The tape has reached the end. • Cannot • The • Properly fails to respond. tape does not play. listen to any station, or signal appears weak. sound is distorted. unit is too close to a TV set or another interfering device.
BLUETOOTH • No sound. • Sound • Unable is garbled. to pair with a Bluetooth device. • The unit is not switch to Bluetooth mode. • Your device’s and/or the unit’s volume not turn up. • Your device is too far from the unit or there’re some obstacle between your device and the unit. • Your device’s and/or the unit’s volume not adjust properly. • Your device doesn’t have Bluetooth connectivity. • The Bluetooth pairing is not successful. • Ensure the unit is switched to BT mode.