
User Manual


8
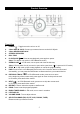
Setup / Basic Operation
Setup
1. Remove white protective needle cover by gently pulling towards front of unit.
2. Remove any packaging materials from the unit.
3. Connect the AC power cord to a wall outlet.
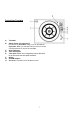
Note: For the plug shown below, you must use a socket with an earthing terminal.
Note:
-You’re strongly recommended that this product should be operated only from the type of power
source indicated on the marking label.
-To prevent interference, avoid bundling audio signal cables together with the AC power cord.
Standby
The main unit will switch to economic standby mode when the speaker is idle for approximately 15
minutes, except in Radio mode. Once the unit goes into standby mode, turn off the unit and then turn
on the unit again.
Basic Operation
1. Move the POWER toggle to the ON position. The LED light around the radio dial will light up.
2. Select a play mode by rotating the function knob (FM/CD /BT/AUX/PHONO/TAPE).
3. Rotate the VOLUME knob to adjust the desired level of sound.
Listening through RCA LINE OUT
For amplifier device listening, first reduce the volume level to minimum. Insert the white and red
plugs on the RCA cable into the back of the unit, then insert the opposite end into your amplifier
device. Be sure to connect the white plug into the white jack and the red plug into the red jack.
Listening through Earphones/Headphones (not included)
For private listening, first reduce the volume level to minimum.
Insert your headphones’ plug into the 3.5mm jack, then
adjust the volume up by turning the VOLUME knob.
Note: The speakers will automatically be deactivated while
headphones are plugged in.
CONDENSATION WARNING:
When the unit is moved from a cold or warm place, or is used following a sudden temperature change, there is the
danger that water vapor in the air may condense on the unit, preventing proper operation. In such cases, leave the
unit for 1-2 hours after plugging it into an AC outlet to allow it to stabilize at the temperature of its surroundings.