Jackson 7-in-1 Turntable Model: VTA-80 Instruction Manual PLEASE READ THIS INSTRUCTION MANUAL CAREFULLY BEFORE USE AND KEEP IT FOR FUTURE REFERENCE.
IMPORTANT SAFETY INSTRUCTIONS CAUTION RISK OF ELECTRIC SHOCK DO NOT OPEN The lightning flash with arrowhead within an equilateral triangle is intended to alert the user to the presence of uninsulated “dangerous voltage” within the product’s enclosure that may be of sufficient magnitude to constitute a risk of electric shock. WARNING: TO REDUCE THE RISK OF ELECTRIC SHOCK, DO NOT REMOVE COVER (OR BACK). NO USER-SERVICEABLE PARTS INSIDE. REFER SERVICING TO QUALIFIED SERVICE PROFESSIONAL.
• • • • • Avoid installing this unit in places exposed to direct sunlight or close to heat radiating appliances such as electric heaters, on top of other stereo equipment that radiates too much heat, places lacking ventilation or dusty areas, places subject to constant vibration and/or humid or moist areas. Do not attempt to clean this unit with chemical solvents as this might damage the finish. Use a clean dry cloth. Operate controls and switches as described in the manual.
GENERAL OVERVIEW ASSEMBLY If you want to place the unit on a shelf, you can leave the short rubber feet (pre-installed) on the unit. OR To install the included legs on the unit: 1. Remove the short rubber feet. 2. Take all 4 legs out of the packaging. 3. Loosen the screws under the unit. 4. Insert the wooden leg into the hole and fix it with the screws firmly. 5. Repeat the above for all 4 legs. POWER SUPPLY This product is designed to operate on 120V~60Hz AC only.
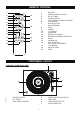
OPERATIONS AND CONTROLS FRONT VIEW 1 2 1 2 3 4 5 6 7 8 9 3 4 5 6 7 10 HEADPHONE JACK AUX-IN JACK USB PORT CD DOOR LCD DISPLAY OPEN/CLOSE BUTTON (CD DOOR) POWER/MODE BUTTON PLAY/PAUSE BUTTON STOP BUTTON 11 12 13 14 15 8 9 10 11 12 DN/F-R BUTTON (BACK/REWIND) UP/F-F BUTTON (NEXT/FAST FORWARD) PLAY MODE BUTTON (PLAYBACK MODES) RECORD BUTTON VOLUME KNOB TUNER/PRESET KNOB REAR VIEW 16 16 17 17 ANTENNA SOCKET 4 13 14 POWER CORD 15
REMOTE CONTROL 1 2 3 4 15 5 6 7 16 8 9 10 17 11 18 12 1 2 3 4 5 6 7 14 MODE REPEAT 8 9 10 11 12 13 14 15 16 19 RANDOM 13 17 18 19 RECORD OPEN/CLOSE (CD DOOR) EQ SETTINGS VOLUME DOWN PLAY MODE (PLAYBACK MODES) PLAY/PAUSE DN/F-R BUTTON (BACK/REWIND) STOP PRESET -10 TRACKS PROGRAM REPEAT PLAYBACK RANDOM PLAYBACK (SHUFFLE) MODE VOLUME UP UP/F-F BUTTON (NEXT/FAST FORWARD) +10 TRACKS DELETE (USB) MUTE TURNTABLE LAYOUT 1 OVERHEAD TURNTABLE VIEW 3 6 2 4 5 7 1 2 3 TRANSIT SCREW LIFT LEVER TON
TURNTABLE OPERATION Before use, be sure to remove the white stylus guard off of the needle. Always make sure that the tone arm is unlocked and free to move across the record while operating. Lock the tone arm in place again when it is not in use. *IMPORTANT: To prevent damages during transportation, a transit screw is located at the upper right side of the turntable platter. Before use, turn the transit screw in a clockwise direction with a screwdriver.
FM RADIO OPERATION NOTE: Insert the FM ANTENNA into the FM ANTENNA SOCKET (on the back of the unit) and fully extend for best reception. Press the POWER/MODE button to select “FM” mode. TUNING • Use the TUNER/PRESET KNOB (on the unit) OR the UP/F-F or DN/F-R buttons (on the unit or remote) to manually adjust the Radio to the desired station.
AUX-IN OPERATION 1. 2. 3. Press the POWER/MODE button to switch to “AUX” (AUX-IN) mode. Connect one end of a 3.5mm cable (not included) into the AUX-IN JACK on the front of the unit and the other end into the 3.5mm AUX-IN jack on your external device. Use your external device to control playback. HEADPHONE OPERATION Plug the headphones (not included) into the Headphone Jack on the front of the unit to listen. The built-in speaker will stop playing once the headphones are plugged in. USB OPERATION 1. 2.
RECORDING FROM PHONO/BLUETOOTH/AUX-IN 1. Insert the USB memory stick into the USB PORT. 2. While playing in PHONO/BLUETOOTH/AUX-IN mode, press the RECORD button one time. “USB” will appear on the LCD DISPLAY. 3. Wait about 5 seconds and “USB”and “REC” will flash on the LCD DISPLAY, and the recording will begin. 4. Press the STOP button to stop recording, and “END” will appear on the LCD DISPLAY. DELETE USB • DELETE CURRENT TRACK During USB mode, press the DELETE (on the remote) button once.
SPECIFICATIONS GENERAL Power Requirements: ............................................................... 20W*2ch Power Consumption: ................................................................ 65W Dimensions:.............................................................................. 28.35" (720mm) x 14.25" (362mm) x 31.1" (790mm) AMPLIFIER Output Power: .......................................................................... 20W*2ch Frequency Response: ............................................
WARRANTY Victrola is a registered trademark of Innovative Technology Electronics LLC. Innovative Technology Electronics LLC. Limited Warranty: 90 Days Labor, One Year Parts Innovative Technology Electronics LLC. (IT) warrants the product to be free from “Defects” in materials under normal use for a period of “One Year” from the date of the original purchase. The Warranty is “Not” transferable.