
Product Manual


5
victron energy
INSTALLATION
WARNING: Qualified personnel only
Location
The Phoenix Charger must be installed in a dry,
well-ventilated area.
Too high an ambient temperature has the
consequence of lower output, shorter life or a
complete shutdown of the Phoenix Charger.
The Phoenix Charger is suitable for floor and wall
mounting. However, for optimum cooling, a
vertical position is recommended. The cables
between the Phoenix Charger and the battery
must be kept as short as possible to minimise
cable losses.
Required tools and cables
• Socketdriver & socket 10 mm.
• Screwdriver no. 2.
• Crosshead screwdriver no. 2 phillips.
• Battery cables and external fuse:
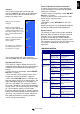
Model
Length 0
-
6 m
Fuse
12/30 16 mm² 40 AT
12/50 25 mm² 60 AT
24/16 10 mm² 20 AT
24/25 16 mm² 30 AT
Cables longer then 6 m are not recommended.
Cable eyes with M6 holes should be used.
For supply connection use wires suitable for at
least 75°C (167°F).
CAUTION: Replace defective cords or wires
immediately.
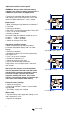
Connection sequence
• Disconnect mains.
• Disconnect battery cables from the battery.
• Remove the frontplate.
• Remove carfuses if placed.
• Connect the housing of the charger to ground.
The housing is fitted with an M4 ground screw for
this purpose.
• Connect the accompanying temperature sensor
to the +T-sense and –T-sense and mount the M8
cable-eye to one of the battery clamps. The
connector is located on the front PCB.
• Voltage sense is recommended. Connect 0.75
mm² wires to +V-sense and –V-sense and use a 5
AT fuse near the battery for protection. The
connector is located on the front PCB.
• Connect the starter battery (if present) to the
Trickle-charge connector located near the minus-
output bolt. Use a 25 AT carfuse near the battery
for protection.
• If used, the Phoenix Charger Control panel can
be connected by means of a standard 8-pole
communication cable with 8-pole communication
connector. The maximum length is 100 m.
• Connect battery cables to the charger. Note that
there’s only one “minus”- output to connect both
battery minus poles. Use a fuse according the
table near the battery for protection.
• Connect battery cables to the battery.
• Watch if the POLARITY LED does NOT
illuminate.
• If it does reverse battery cables
• Put the car fuses in their sockets
• Connect the AC-in by means of a 3-core cable of
2.5 – 4 mm² flexible core to the AC-in terminal
block. Note that a real PE-connection is strictly
necessary.
• Replace the frontplate.
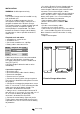
Phoenix Charger dimensions