VIDEO MOUNT PRODUCTS Instruction Sheet For: PMC-S For more information, please contact us at: 345 Log Canoe Circle, Stevensville, Maryland 21666 Toll Free: 877.281.2169 Phone: 410.643.6390 Fax: 410.643.6615 www.videomount.
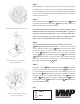
1 6 5 2 ITEM NO. 1 2 3 4 5 6 7 3 7 DESCRIPTION Lower Cage Top Panel Security Bar Security Screw M6*P1.0*L12 Washer 6.4* 18*T1.6 Nylon Nut M6*P1.0 Allen Key 4 QTY.
Step 1 Before starting, lay out all parts to your mount and match them to the parts list provided. Verify that you have all your parts before attempting to assemble the mount. Note: For the instructions PMC-S parts have circles around their numbers, PM-2 has triangles, PM-3 has hexagons and AK-1 has diamonds. Step 2 First remove the top plate 1 PMC-S from the bottom box 5 PMC-S by removing the M6 security screws 7 PMC-S and lifting off the top plate from the hooks on the bottom box.
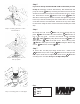
Step 5 If you have already mounted the PM-3 with an AK-1 then proceed to Step 6. Otherwise continue with this step. First disassemble the projector mount 7 PM-3 by removing the M6 socket screws and washers on the sides of the projector mount where there is a “J” shape slot. Next take the washer 3A AK-1 and 5/8” screw 4 AK-1 and slide the screw through the washer and then through the large hole in the top of the PM-3 making sure the washer will be on the inside of the PM-3 when it is reassembled.
Step 8 The next steps assume you are attaching the PMC-S to an already mounted PM-2. If the mount is not assembled please f rst follow the instruction sheet provided with the PM-2 up to the point where you decide if you are using the ceiling mast or f ush mounting and skip step 9. Remove the projector from the clamps. Next remove the extension support 17 PM-2 by removing the 5/16” screw 18 PM-2 and nylon nut 17 PM-2.
Step 11 If you are using the AK-1 with the PM-1, place the AK-1 washers and 3A AK-1 on top of the center hole in the top plate 3B 1 PMC-S and underneath the center hole in the master support 2 PM-2. Insert the 5/8” screw through the washers, master support, and top plate and using the hex head nut 5 washer , 6 AK-1 connect the female couple 1 AK-1 and spring 2 , and 7 AK-1 to the top plate 1 PMC-S. Step 12 Reinsert the projector in the clamps of the PM-1.
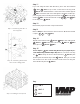
Step 16 Lift the hooks of the bottom box 5 PMC-S onto the running shafts 2 PMC-S. Then swing the bottom box 5 PMC-S up so the holes on the top plate 1 PMC-S line up with the slots on the bottom box 5 PMC-S. Secure the bottom box in place using the M6 security screws 7 PMC-S. Step 17 Maintenance Notes: For maintenance of the projector the bottom box 5 PMC-S can either be lifted off the top plate 1 PMC-S or the box can be swung on the hooks in the rear of the of the bottom box.