
Manual


Step 1
Before starting, lay out all parts to your mount and match them to the
parts list provided. Verify that you have all your parts before attempt-
ing to assemble the mount. Note: For the instructions PMC-S parts have
circles around their numbers, PM-2 has triangles, PM-3 has hexagons
and AK-1 has diamonds.
Step 2
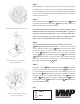
First remove the top plate PMC-S from the bottom box PMC-S
by removing the M6 security screws PMC-S and lifting off the top
plate from the hooks on the bottom box.
To determine which steps to follow f rst you need to determine which
VMP part numbers you are trying to use with the PMC-S. If you are
using only a PM-3 proceed to step 3. If you are using a PM-3 with
an AK-1 proceed to step 5. If you are using only a PM-2 proceed to
step 8. If you are using a PM-2 with an AK-1 proceed to step 11.
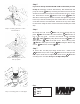
Step 3
If you have not attached the projector to the projector mount
PM-3 please take time to do so now. Remove the lower half
of the ceiling mounting bracket PM-3 by removing the 5/16”
screw and nylon nut from the mast. Next remove the projec-
tor mount PM-3 from the lower half of the ceiling mounting
bracket PM-3 by removing the M6 screws PM-3 and washers
PM-3. Remove the ¼” brake screw in the ceiling mounting
bracket so you are able to remove the ¾” screw in the bottom of
the ceiling mounting bracket PM-3.
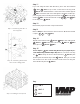
Step 4
Insert the ¾” screw PM-3 through the top plate PMC-S. Screw
the lower half of the ceiling mounting bracket PM-3 onto the
¾” screw making sure the square plate of the bracket is on
top of
the top plate PMC-S and both of those are sandwiched between
the
mast and ¾” screw. Using the M6 security screws PMC-S and
washers
PMC-S attach the ceiling mounting bracket PM-3
to
the projector mount PM-3 with the top plate PMC-S between
them. Proceed to step 15.
Step 2: Removing the lower cage
Step 3: Removing the ceiling
mounting bracket
Step 4: Attaching the ceiling
mounting bracket
Key:
VIDEO MOUNT PRODUCTS
PMC-S
PM-3
1
5
7
7
1
7
1 4
5
1
1 1
1
1
8
7
1
7
1