
Manual

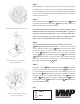


Step 5
If you have already mounted the PM-3 with an AK-1 then proceed
to Step 6. Otherwise continue with this step. First disassemble the
projector mount PM-3 by removing the M6 socket screws and
washers on the sides of the projector mount where there is a “J” shape
slot. Next take the washer AK-1 and 5/8” screw AK-1
and
slide the screw through the washer and then through the large hole
in the top of the PM-3 making sure the washer will be on the inside
of the PM-3 when it is reassembled. Reattach the top of the PM-3
to the bottom using the same screws removed in the fi rst part of this
step.
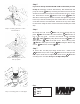
Step 6
Now take the 5/8” screw AK-1 and pass it through the top
plate PMC-S and slide the other washer AK-1 down on
top of the top plate. Connect the female couple assembly
, , and AK-1 by using the hex head nut AK-1 and
spring
washer AK-1 on the 5/8” screw. Attach the top plate
PMC-S
to the projector mount PM-3 using the M6 security
screws PMC-S and washers PMC-S.
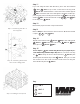
Step 7
To attach the 1.5” NPT pipe simply loosen the ¼” brake screw
AK-1 in the top of the couple AK-1 and screw the pipe into
the couple. Make sure to retighten the brake screw AK-1 after
screwing in the 1.5” NPT. Now you can skip to Step 15.
Key:
PMC-S
PM-3
VIDEO MOUNT PRODUCTS
Step 5: Inserting the AK-1 screw
into the PM-3
Step 6: Attaching the AK-1 to
the top plate
Step 7 : Inserting the 1.5” NPT pipe
AK-1
7
4
3A
4
1
3B
1
2
7
5
6
1
7
7 8
1
7
7