SDI & HDMI to USB3.0 Video Capture VER 1.
Thank you for Purchasing This Product For optimum performance and safety, please read these instructions carefully before connecting, operating or adjusting this product. Please keep this manual for future reference. Surge Protection Device Recommended This product contains sensitive electrical components that may be damaged by electrical spikes, surges, electric shock, lighting strikes, etc. Use of surge protection systems is highly recommended in order to protect and extend the life of your equipment.
1. Introduction UC2018R is a professional and easy-to use device to capture SDI or HDMI signal over USB3.0 for graphics capture, live streaming, recording on your laptop, PC. Video resolution supports up to 1080p60Hz. It is compatible with various systems including Windows, Linux, OS X etc. and UVC and UAC compliant, so it will work with all DirectShow compatible software. The device is real plug and play, no need driver.
3. Package 1× SDI & HDMI to USB3.0 Video Capture 1× USB3.0 Cable 4. Specifications Connections USB interface Input interface Output interface Audio Input USB3.0,360MB/s Bandwidth (Compatiable USB2.0) 1×SDI IN [BNC] 1×HDMI 1.4a 1 x USB3.0 (Compatiable USB2.0) 1 x HDMI Local Loop Out HDMI/SDI Embedded Audio Standard Input resolution HDMI 1.4a Compliance, Support 1080P/60HZ 8bit,(RGB,YUV) SD/HD/3G-SDI,SMPTE259/274/296/372/424/425/292 Compliance Frame rate 25/29.97/30/50/59.
General Housing Metal Enclosure Color Black Dimensions 70mm [W] x 99.6mm [D] x 24mm [H] Weight 125g Power Consumption 3W Operating Temperature 0 ~ 50°C Storage Temperature Relative Humidity -20 ~ 70°C 20 ~ 90% RH (no condensation) 5. Interface No. Name Function description 1 SDI In Connect to SDI source such as video switcher, camera, recorder etc. 2 HDMI1.4a In Connect to HDMI source such as PC, video switcher, camera,media player etc. 3 USB 3.0 Capture out USB3.
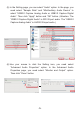
. Software Instruction For example: OBS (Open Broadcaster Software) software, windows10 system. (1) Install “OBS” application software on the computer. (2) Double click “OBS Studio” shortcut to open the application. (3) Click the “+”, you can see a up-down menu and select “Video Capture Device”, and then click “OK” button. (4) In the Device option box to select “USB3.0 Capture Video”, at the buttom of the box to option for “Use custom audio device”, and select “USB3.0 Capture Digital Audio or USB3.
(5) In the Setting page, you can select “Audio” option. In the page, you need select “Sample Rate” and “Mic/Auxiliary Audio Device” to select “USB3.0 Capture Analog Audio or USB3.0 Capture Digital Audio”. Then click “Apply” button and “OK” button. (Attention: The “USB3.0 Capture Digital Audio” is SDI IN port audio. The “USB3.0 Capture Analog Audio” is AUDIO IN input audio.) (6) Use your mouse to click the Setting icon, you need select “Advanced Audio Properties” option.
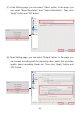
(7) In the Setting page, you can select “Video” option. In the page, you can select “Base Resolution” and “Output Resolution”. Then click “Apply” button and “OK” button. (8) Open Setting page, you can select “Output” option. In the page, you can browse recording path for capturing video, select the recording quality, select recording format etc. Then click “Apply” button and “OK” button.
(9) When you have finished all settings, you need click the “Start Recording” button to start video capture. If it has finished, click this button again to stop video capture. (10) When the video capture is over, you can click the “Exit” button to close the software. Attention: The all instruction of the software is only about video capture settings at the above content. You can brower other related settings function.
7. The way of Selecting Capture Audio This product supports analog stereo audio and SDI source audio (digital audio). It has two audio capture ways when it captures video. For example: OBS (Open Broadcaster Software) software. When the product captures video, it can select analog stereo audio or SDI source audio. This moment, these two places need to be set up the same. It is be set either “USB3.0 Capture Analog Audio” the same or “USB3.0 Capture Digital Audio” the same. As shown in the image below. 8.