L I G H TA M P ™ D L P ™ P R O J E C T O R Version 1.
TABLE OF CONTENTS Introduction ......................................................................................................................... 2 Warnings & Safety Precautions ......................................................................................... 3 Two Year Limited Warranty .............................................................................................. 5 Projector Rear Panel Description ...............................................................................
INTRODUCTION » Introduction to the Vidikron Vision Model 100 LIGHTAMP™ DLP™ Projector Vidikron’s new flagship Vision™ Model 100 has been specifically engineered to produce high performance video in the kinds of environments most people use to enjoy their entertainment - family rooms, great rooms and living rooms. Most high-end video projectors are intended for use in dedicated home theater environments with controlled lighting.
WARNINGS & SAFETY PRECAUTIONS WARNING FCC Regulations state that any unauthorized changes or modifications to this equipment not expressly approved by the manufacturer could void the user’s authority to operate this equipment. CAUTION: TO PREVENT FIRE OR SHOCK HAZARDS, DO NOT REMOVE COVER. DO NOT EXPOSE THIS UNIT TO RAIN OR MOISTURE. ALSO DO NOT USE THIS UNIT’S POLARIZED PLUG WITH AN EXTENSION CORD RECEPTACLE OR OTHER OUTLETS, UNLESS THE PRONGS CAN BE FULLY INSERTED.
WARNINGS & SAFETY PRECAUTIONS DECLARATION OF CONFORMITY VIDIKRON PROJECTOR, MODEL 100 This device complies with Part 15 of the FCC rules. Operation is subject to the following conditions: (1) This device may not cause harmful interference, and (2) this device must accept any interference received, including interference that may cause undesired operation. WARNING Some IC chips in this product include confidential and/or trade secret property belonging to Texas Instruments.
LIMITED WARRANTY TWO YEAR LIMITED WARRANTY For Projectors, Video Processors and Controllers Congratulations on your purchase of a Vidikron video product and welcome to the Vidikron family! With proper installation, setup and care, you should enjoy many years of unparalleled video performance. This is a LIMITED WARRANTY as defined in the Magnuson-Moss Warranty Act. Please read it carefully and retain it with your other important documents.
LIMITED WARRANTY EFFECTIVE WARRANTY DATE: This Limited Warranty begins on the effective date of delivery to the end user. For your convenience, keep the original bill of sale as evidence of the purchase date. IMPORTANT: WARRANTY REGISTRATION: Please fill out and mail your warranty registration card. It is imperative that Vidikron knows how to reach you promptly if we should discover a safety problem or product update for which you must be notified.
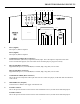
PROJECTOR REAR PANEL INPUTS 1 2 3 4 5 6 7 8 ����������� ������������������������� LAMP COVER 9 1. 10 11 12 13 14 15 16 17 18 19 DVI 1 (Digital) DVI input #1, HDCP compliant. DVI 2 (Digital) DVI input #2, HDCP compliant. 2. COMPONENT VIDEO (RCA connectors) Standard Definition (480i/576i) Component (YPrPb) input. This is the input for component video from sources such as DVD players. (For best results do not run DVD player in progressive mode). 3.
PROJECTOR REAR PANEL INPUTS 7. IR Wired input from an external remote control. 8. RS-232 CONTROL Connection for an external RS-232 controller device to place the Projector under system automation control. 9. VACUUM FLORESCENT DISPLAY Reads out all relevant status information of the Projector at all times. Can be used instead of the On Screen Display. Indicates the model number, current source, scan rate (resolution) and aspect ratio. 10.
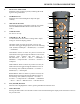
REMOTE CONTROL DESCRIPTION 1. IR OUTPUT INDICATOR Illuminates when a button in pressed, indicating that an IR signal is being transmitted. 2. LIGHT BUTTON Illuminates the remote backlight for improved night visibility. 3. 4. 5. 1 ����� 2 3 �� ��� OFF and ON BUTTON Switches the projector ON and OFF. (These do not operate when POWER/STANDBY indicator of the main unit is off.) CODE BUTTON For Service use only.
REMOTE CONTROL DESCRIPTION MEMORY SETTINGS BUTTONS Four video preset memory setting buttons are available: 8. ISF NT – ISF Night 9. ISF DAY – ISF Day 10. CUST 1 – Custom One 11. CUST 2 – Custom Two SOURCE SELECTION BUTTONS Direct source selection buttons: These will enable direct access to desired inputs, or selection of a number in certain cases. These buttons are: 12. VIDEO BUTTON Press this button to select VIDEO (composite video) as the source. 13.
QUICK CONNECTION AND SETUP GUIDE While there are many different ways to connect your source equipment to your Vidikron Projector, the examples below are the most common. ANALOG INPUTS: • Composite Video Input Composite video is the most common type of signal used, but is also the lowest in picture quality. Many sources have outputs that are limited to composite video, such as some VCR’s and camcorders; others such as Laser Disc players actually produce slightly better results when using composite video.
QUICK CONNECTION AND SETUP GUIDE Follow the steps below ensure proper installation of the Vision Model 100 projector. NOTE: These steps should be performed by a qualified custom video installation specialist. Step I Connection: 1. Connect Power to the Projector. 2. Connect Video (Composite), S-Video to 1 or 2, Component 480i (RCA) input, HD signals to HD1 or HD2 (BNC), DVI 3. Turn ON the system from the projector control panel and main power switch. Step II 1. Press Menu to select Main window.
HOW TO INSTALL OR REMOVE THE PROJECTOR LAMP IMPORTANT NOTE: LAMP INSTALLATION OR REMOVAL SHOULD ONLY BE PERFORMED BY AN AUTHORIZED VIDIKRON SYSTEM INSTALLER OR TECHNICIAN. Step One: INSURE PROJECTOR AC POWER IS OFF AND POWER CORD IS REMOVED PRIOR TO INSTALLING OR REMVOING THE LAMP ASSEMBLY.
HOW TO INSTALL OR REMOVE THE PROJECTOR LAMP Next, grasp the lamp assembly handle and pull gently, removing the lamp module out of the projector housing. Lamp Assembly Handle Step Four: Replace lamp module and replace, retighten all screws.
LENS SHIFT RANGE Lens Option 1: Throw Distance 1.2 - 1.4 x Width of Screen When only Vertical or only Horizontal Shift is used: Maximum. Vertical Shift ↑ = 60% of screen height (.60 x height) Maximum. Vertical Shift ↓ = 24% of screen height (.24 x height) Maximum Horizontal Shift = 10% of screen width (.10 x width) Amount of Horizontal Shift when Vertical is @ maximum: Maximum Horizontal Shift < 5% of screen width (.
LENS SHIFT RANGE Lens Option 4: Throw Distance 2.35 - 3.60 x Width of Screen When only Vertical or only Horizontal Shift is used: Maximum. Vertical Shift ↑ = 60% of screen height (.60 x height) Maximum. Vertical Shift ↓ = 24% of screen height (.24 x height) Maximum Horizontal Shift = 16% of screen width (.16 x width) Amount of Horizontal Shift when Vertical is @ maximum: Maximum Horizontal Shift < 5% of screen width (.
LENS SHIFT RANGE » Example of Horizontal and Vertical Lens Shift VERTICAL LENS SHIFT (UP OR DOWN) Note: This is a general example of Vertical Lens Shift. Each lens type will vary. No particular lens was used in this example.
MENU DESCRIPTION AND NAVIGATION When the MENU button is pressed on either the remote control or the rear panel, the main menu will appear on-screen. An example of the main menu is shown to the right. The UP and DOWN buttons on the rear panel, and IR Remote Control will move the selected item on the menu.
MENU DESCRIPTION AND NAVIGATION Aspect Ratio provides selection of one of five aspect ratios: Anamorphic, Standard 4:3, Letterbox, IntelliWide and Cinema. To select an aspect ratio via the main menu, press either the up and down buttons on the remote or rear panel, highlight ASPECT RATIO and press ENTER. The aspect ratio menu will then appear with the four choices; highlight the desired aspect ratio with the up or down buttons and press ENTER.
MENU DESCRIPTION AND NAVIGATION While each of the picture quality adjustments can be set to suit the needs of the user, there is a ‘proper’ way to set the adjustments. For setting TINT and COLOR, please refer to the color bar test pattern below. TINT (also known as ‘hue’) is essentially the ratio of red to green in the color portion of the image. If TINT is decreased, the image will appear redder, and increasing it will cause the image to appear greener.
MENU DESCRIPTION AND NAVIGATION » Input Position Indicates selection has been made for the Input Position selection menu. These settings are stored separately for each input and each resolution for that input. • Press ENTER to shift the Image Position Left/Right with the LEFT and RIGHT arrows. • Press ENTER to shift the Image Position Up/Down with the LEFT and RIGHT or UP/DOWN arrows. • Press ENTER to adjust the Image Position Width with the LEFT and RIGHT arrows.
BASIC TROUBLESHOOTING TIPS The following is a basic troubleshooting guide that can assist you in resolving typical problems may result in normal operation. If you have encountered problems that are not listed in this guide, please contact your Vidikron dealer for assistance. PROBLEM POSSIBLE CAUSE SOLUTION The Projector does not turn on after initial installation. The Power LED stays red after the power button is pressed. The Projector is on, but there is no video image on-screen.
RS-232 COMMUNICATIONS Baud rate: 19200 (fixed) Bits: 8 No Parity All protocol in ASCII format RS-232 input connector pin numbers: TxD= Pin# 2, RxD= Pin# 3, GnD= Pin# 5 Command format (single command): command value (i.e. brightness 100). NOTE: A space (not an underscore) or comma may be used between the command and its value. Command string format: command, command value, command etc. (i.e.
RS-232 COMMANDS Command Parameter (min/max) Value Stored? Description POWER ON OFF COMPOSITE SVIDEO1 SVIDEO2 COMPONENT HD1 HD2 DVI1 DVI2 HD1Pass HD2Pass OUT43 OUT169 ANAMORPHIC STANDARD LETTERBOX INTELLIWIDE RGBNN RGBPP RGBS YUV IHPOS IVPOS IWIDTH IHEIGHT OVERSCAN OHPOS OVPOS OWIDTH OHEIGHT BRIGHTNESS CONTRAST COLOR TINT SHARPNESS NIGHT DAY CUSTOM1 CUSTOM2 TRIGGER BKGND 0/1 NA NA NA NA NA NA NA NA NA NA NA NA NA NA NA NA NA NA NA NA NA NA -100/100 -100/100 -100/100 -100/100 0/10 -100/100 -100/100 -100/
RS-232 COMMANDS Command Parameter (min/max) Value Stored? Description IHPOS? IHEIGHT? OHPOS? OHEIGHT? COLOR? ASPECT? INPUT? OUTRES? SERIALNUM? DATE? IVPOS? OVERSCAN? OVPOS? BRIGHTNESS? TINT? PRESET? POWER? ASPECTIN? SWVER? IWIDTH? PHASE? OWIDTH? CONTRAST? SHARPNESS? BKGND? INRES? ASPECTOUT? HWVER? NA NA NA NA NA NA NA NA NA NA NA NA NA NA NA NA NA NA NA NA NA NA NA NA NA NA NA NA NA NA NA NA NA NA NA NA NA NA NA NA NA NA NA NA NA NA NA NA NA NA NA NA NA NA NA NA Returns input horizontal position valu
DIMENSIONS ������ ������ � � ������ � ����� � ������ ������ ����� ����� � � ����� ������ 26
SPECIFICATIONS Vision Model 100 Projector: Projector Type: Digital Light Processing™ (DLP™), 3-chip, 16:9 HD-2+, DMD™ Native Resolution: 1280 x 720 (16:9) Aspect Ratios: 4:3, Letterbox, 16:9 Anamorphic, Intelliwide™ Video Standards: NTSC, PAL DTV Compatibility: 480p, 720p, 1080i Scan Frequency: Contrast Ratio: Horizontal: 15 – 100 KHz Vertical: 28 – 78 Hz Recommended Width: 72 – 120 in. Maximum Width: 250 in. Lens Option 1: Zoom 1.20–1.40 x width Lens Option 2: Zoom 1.40–1.
RUMA-011085 1-18-05 v1.