
LightAmp Digital Projector Installation/Operation Manual


Maintenance and Troubleshooting
82 Vision Model 140/150 Installation/Operation Manual
PRE
L
IMINAR
Y
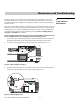
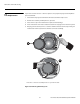
4. Grasp the lamp by its housing only and pull it straight out (lamp slides along guides)
until it’s free; see
Figure 5-3. Discard the lamp using safe disposal/recycling practices or
contact your Vidikron dealer for a possible re-lamping program.
Figure 5-3. Removing the Lamp
5. Align the new lamp with the top and bottom guides on the left side of the lamp
compartment; see
Figure 5-4. Slide the lamp all the way in. A slightly harder push may be
required right at the end to make sure it is fully seated into the terminal block. NOTE: The
projector will not power up again if the lamp is not fully connected to the terminal block.
Figure 5-4. Installing A New Lamp
6. Pull (out) and turn the lamp lock lever (turned up in Step 3) a quarter turn clockwise to
“lock” the lamp in place.
7. Replace the lamp door and tighten the four screws to secure it.
8. Re-attach the power cord to the projector and power it up.
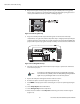
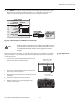
9. Press MENU on the projector remote control (Figure 3-17) or rear-panel keypad (Figure
2-3).
10. Select Lamp Adjust from the Main Menu.
11. Select Change Lamp from the Lamp menu.
12. Enter the serial number in the Lamp S/N text box using the remote numeric keypad
(
Figure 3-17).
If you can’t turn the lamp lock into position, the lamp may not be fully
inserted. In this case, partially remove the lamp and try pushing it back in
again. Then, try switching the lock lever to the “lock” position.
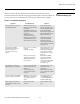
AC IN 220V 50HZ
Note