
Unit installation


Vitocrossal 300, CT3 Series Installation
5285 873 - 02
20
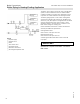
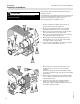
Insulation Installation
Assembly
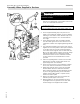
1. Remove combustion chamber door. Remove all
hexagon bolts and the two hinge pins.
2. Mount the three distance bolts to the threaded
openings provided on the top of the boiler shell.
3. Mount the three mounting brackets (long) complete
with bolts and washers to the boiler front.
4. Mount the three mounting brackets (short) complete
with bolts and washers to boiler rear.
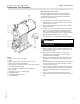
5. Mount large rear insulation blanket (black nylon
backing facing out) on top of main vessel, sliding
it through the boiler supply header.
6. Insert four spacer bolts M8 x 105 into the threaded
holes in the front and back of the boiler.
7. Mount small front insulation blanket (black nylon
backing facing out) on top of front combustion
chamber.
Ensure that all pipe connections and distance bolts
are properly pushed through, and secure with supplied
spring hooks.
8. Mount lower front and lower rear insulation blankets
over the distance brackets and secure in place with
supplied spring hooks.
9. Install top rear and top front insulation blankets.
Ensure that all brackets and openings for the
attachment of bolts, brackets and pipe connections
are properly pushed through.
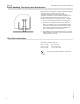
All necessary parts are packed and shipped inside the
insulation cartons.
The installation of the insulation should only be performed
once all the piping has been attached to the boiler shell
and all access openings are properly closed.
See following pages for installation steps.
CAUTION
Do not put any tools or any other objects into the
combustion chamber.