
Technical data


Installation on Sloped Roofs
9
Installing the Mounting Frames
Install the panel array level or slightly inclined (approximately ½” / 10 mm) towards the connection s ide to ensure complete
venting. Always locate an air vent at the highest point in the piping.
Attaching roof brackets on shingled roof
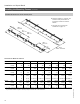
1. The roof brackets
should be laid
out as close as possible to the
dimensions shown in the chart on
page 10 for SV collectors, and page
11 for SH collectors.
2. Locate the roof joist by tapping
along the roof to find its general
location (stud finders do not work
well through shingles and roof
sheathing).
3. Pry up t he shingles and drill small
pilot holes to locate exact location
of roof joist. If necessary, check
where pilot hole is coming through
roof from inside of attic.
4. Drill pilot holes into center of joist as
shown. Fill the pilot holes and coat
the bottom of roof bracket with
silicone sealant.
5. Attach bracket to roof joist using
appropriate stainless steel lag bolts
or screws (field supplied). Lag
bolt should penetrate the roof joist
at least 2½” / 64 mm.
5285 710 v2.0
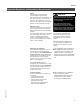
Correct Incorrect
Source: CANSIA
Source: CANSIA
Lag
bolt
Washer
Mounting
bracket
Silicone
sealant
Minimum
6.3 cm /
2.5 in
Too close
to edge
Drill within
0.2” / 5 mm
of center
The roof bracket must be securely
attached to the roof joist of the
structure. Only use stainless steel
attachment s crews.
CAUTION
The 3.1” / 80 mm screws supplied
with the mounting kit may not be
sufficient length for some roof
structures. The installer must ensure
screws will penetrate roof joist
sufficiently, and if not, must provide
longer screws or lag bolts.
CAUTION