RA NS FE R DIAL PRESS MENU PUSH ERASE VPC55BT T
1. NOTA SOBRE LOS DISCOS Condensación de la humedad En días lluviosos o en zonas muy húmedas, la humedad se puede condensar sobre las lentes en el interior de la unidad. Si sucede esto, la unidad no funcionará correctamente. En estos casos, extraiga el CD y espere aproximadamente una hora hasta que la humedad se haya evaporado. NOTAS SOBRE LOS CD Notas sobre los discos 1. Un CD sucio o defectuoso puede causar pérdidas de sonido durante la reproducción.
2. INSTALACIÓN Ɣ Antes de instalar de forma definitiva la unidad, conecte los cables temporalmente y asegúrese de que todo está bien conectado y de que la unidad y el sistema funcionan con normalidad. Ɣ Utilice únicamente las piezas incluidas con la unidad para garantizar la correcta instalación. El uso de piezas no autorizadas puede provocar fallos de funcionamiento. Ɣ Consulte a su distribuidor más cercano si la instalación requiere hacer agujeros u otras modificaciones en el vehículo.
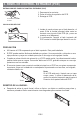
EXTRACCIÓN DE LA UNIDAD a a. Marco b. Introduzca los dedos en la ranura en la parte frontal del marco y tire hacia usted para extraer el marco. (Cuando vuelva a instalar el marco, coloque el lateral junto a una ranura hacia abajo y sujételo bien). c. Inserte las palancas suministradas con la unidad en las ranuras de ambos lados de la unidad, como se muestra en la figura, hasta que hagan clic. Si tira de las palancas podrá extraer la unidad del salpicadero.
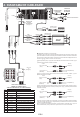
3. PANEL DE CONTROL EXTRAÍBLE (PCE) EXTRACCIÓN DEL PANEL DE CONTROL EXTRAÍBLE (PCE) 1. Desconecte la corriente. 2. Pulse el botón de expulsión del PCE 3. Extraiga el PCE. BOTÓN DE EXTRACCIÓN DEL PANEL COLOCACIÓN DEL PCE 1. Instale el panel primero por el lado derecho, el punto B de la unidad principal debe estar en contacto con el punto A del PCE (tal y como se muestra en el diagrama). 2. A continuación, empuje el lado izquierdo del PCE contra la unidad principal hasta oír un clic.
4.
5. ABRIR/CERRAR PANEL La unidad está equipada con el sistema más avanzado de deslizamiento motorizado completamente lógico. Puede disfrutar de esta tecnología avanzada simplemente pulsando el botón “OPEN” (ABRIR). Lea con atención las siguientes instrucciones de funcionamiento antes de utilizar la unidad. ABRIR / CERRAR PANEL Pulse el botón Abrir para bajar (abrir) un panel cerrado o subir (cerrar) un panel abierto.
6.
7. FUNCIONES BÁSICAS MODO ANIMATRIX ” del panel repetidamente para seleccionar el En el modo reproducción, pulse el botón “ modo de animación de pantalla deseado: BOTÓN LIBERACIÓN DEL PANEL (REL) Pulse este botón para extraer el panel de control. BOTÓN ENCENDIDO (ON)/APAGADO (OFF) (1) Pulse el botón POWER o cualquier otro botón del frontal de la radio (excepto Abrir/Expulsar) para encender la unidad. Pulse el botón POWER otra vez para apagar la unidad.
ENTRADA AUXILIAR Conecte el dispositivo exterior a la línea RCA de la toma hembra situada en la parte trasera de la unidad, luego pulse el botón Mode para seleccionar modo Aux. Vuelva a pulsar el botón Mode para salir del modo Aux y seleccionar otro modo. Conecte el dispositivo externo al AUX de la toma hembra situada en el panel frontal, luego pulse el botón Mode para seleccionar modo Aux. Vuelva a pulsar el botón Mode para salir del modo Aux y seleccionar otro modo.
8. FUNCIONAMIENTO DEL MENÚ DEL SISTEMA El usuario puede ajustar la configuración del sistema de esta unidad entrando en el menú del sistema, lea las instrucciones de funcionamiento de cada elemento del menú del sistema que aparece a continuación: Acceso a la lista de funciones del menú del sistema Pulse el botón MENU durante más de 3 segundos para acceder a los elementos del menú del ” aparecerá en la pantalla momentáneamente. El usuario puede navegar a trasistema.
Bajo Cuando esté en BASS, el usuario puede usar el botón pista + o - para seleccionar el parámetro de bajos deseado y hacer girar el botón del codificador para cambiar el parámetro deseado: 1. NIVEL: ajuste el nivel de bajos desde -6 a +6. 2. C.FREQ: ajuste la frecuencia del centro de bajos en 60Hz, 80Hz, 100Hz o 200 Hz. 3. BASS-Q: ajuste el factor de calidad de bajos en 2N, 1N, 1W o 2W. La figura 1 muestra el factor de Calidad de Bajos (Bass Quality factor) (Características de la Curva) de cada paso.
Agudos Cuando esté en AGUDOS, el usuario puede usar el botón pista + o - para seleccionar el parámetro deseado de agudos y hacer girar el botón del codificador para cambiar el parámetro deseado: 1. NIVEL: ajuste el nivel de agudos desde -6 a +6. 2. C.FREQ: ajuste la frecuencia de centro de agudos (C.FREQ) en 10Hz, 12,5 KHz, 15KHz o 17,5KHz.
Tecla Tono Beep La característica del tono beep permite seleccionar un tono beep audible que se escuchará cada vez que se pulse un botón del panel de esta unidad. “On” es la opción por defecto. Haga girar el botón del codificador para seleccionar la opción “Off”. Programar Vol Esta opción permite configurar el nivel de volumen que tendrá esta unidad de manera automática cuando se encienda por primera vez. El nivel de volumen “12” es la configuración por defecto.
Regional – Seleccionar On/Off REGIONAL “OFF” se visualizará por defecto. Si se selecciona “on”, durante una búsqueda AF o PI, ejecutará estaciones que tengan todos los códigos PI iguales a la estación actual. Si se selecciona “off”, durante una búsqueda AF o PI, se ignorará el código regional en el código PI de formato. Es posible recibir una estación regional. La Configuración On/Off de la función regional es válida cuando la función “AF” se encuentra en posición “on”.
Sincronización – con dispositivo Bluetooth Esta característica se usa para emparejar el sistema Bluetooth de esta unidad con el teléfono móvil u otro dispositivo Bluetooth. En modo “Pairing”, pulse el botón “MENU” para activar el sincronización. Consejos Consulte “EMPAREJAR, CONECTAR Y ELIMINAR UN DISPOSITIVO BLUETOOTH” para más detalles sobre el funcionamiento de la “SINCRONIZACIÓN”.
9. FUNCIONAMIENTO DEL SINTONIZADOR (TUNER) BÚSQUEDA LISTA NAVI (NAVI) Usando el método avanzado de búsqueda lista NAVI de esta unidad, el usuario puede pulsar el botón NAVI para acceder al modo BÚSQUEDA NAVI, y luego, hacer girar el botón del codificador para seleccionar la emisora memorizada preconfigurada que desee escuchar. Una vez haya seleccionado la memoria preconfigurada de la lista que desee, pulse el botón “MENU” para confirmar y empezar la reproducción.
10.
11. FUNCIONAMIENTO DEL CD/MP3/WMA INSERTE Y EJECUTE EL CD Inserte el CD, con el lado de la etiqueta hacia arriba, con la unidad encendida y el disco comenzará a reproducirse. Pulse el botón Eject para detener la reproducción del CD y expulsar el CD. Esta unidad no tiene por qué estar encendida para expulsar el CD. Funcionamiento CD-DA PAUSE BUTTON (BOTÓN PAUSA) Pulse el botón pausa para suspender la reproducción del disco. Pulse el botón pausa otra vez para reanudar la Reproducción del disco.
Pueden aparecer en pantalla hasta 200 caracteres en el formato de nombre largo del archivo. Los medios reproducibles en esta unidad tienen las siguientes limitaciones: Ɣ Número máximo de carpetas anidadas: 8 Ɣ Número máximo de archivos por disco: 999 Ɣ Número máximo de archivos por dispositivo: 2.
Orden de reproducción de archivos Cuando seleccionamos la reproducción, búsqueda de carpetas, búsqueda de archivos o selección de carpetas, se accede a los archivos o carpetas en el orden en que han sido grabados por el PC writer. A causa de esto, el orden en el que se espera que se reproduzcan puede no coincidir con el orden en el que están siendo realmente reproducidos.
Reproducción del modo repetición de archivos/carpetas (1) Pulse el botón M3 durante más de 3 segundos durante la reproducción del disco MP3/ WMA para activar la repetición de la reproducción de todos los archivos de la carpeta actual. Continuará con el modo repetición de la carpeta actual hasta que se deshabilite el modo “repeat play”.
12. FUNCIONAMIENTO DEL USB La unidad también es compatible con la Función de Host USB. Puede reproducir formatos de audio MP3 y WMA guardados en la Memoria USB o Reproductor de Música USB. Lea más abajo las instrucciones antes de comenzar a utilizar la Función USB HOST.
13. FUNCIONAMIENTO DE LA TARJETA DE MEMORIA La unidad es compatible con la reproducción de formatos de audio MP3 y WMA guardados en tarjetas de memoria SD y MMC. Lea las siguientes instrucciones antes de comenzar a manejar la Tarjeta de Memoria. Insertar o retirar una tarjeta SD o MMC de la unidad principal.
ES-26
a. En modo grabación, el FM/iPod/AUX no está activo, como Tune Up / Down (sintonizador anterior/siguiente), Preset Memory 1 -6 (memoria presintonizada) etc. b. El Audio permanecerá en modo grabación aunque la function MUTE (silencio) esté activada. c. La Grabación se detendrá automáticamente si la memoria del dispositivo de almacenamiento está llena. Consejos Calidad de Grabación – la unidad tiene dos modos de calidad de grabación, estándar y alta, que pueden seleccionarse en el MENU.
ES-28
Cancelar Grabación 1. Para cancelar la grabación, mantenga pulsado de nuevo el botón COPY / RECORD. La pantalla mostrará “ “. Las pistas que se hayan grabado de forma incompleta se borrarán. La unidad cancelará la grabación automáticamente si se realiza otra acción y la pista grabada de forma incompleta será borrada. a. Cambie al modo off b. Cambio de modo c. Inserte un CD d. Inserte la memoria USB e. Separe el panel frontal de la unidad principal. Ô ATENCIÓN 1.
ES-30
ES-31
6. Cuando se complete la transferencia del archivo, la pantalla mostrará “ ” durante unos segundos y reproducirá automáticamente el archivo de música que se ha transferido. El archivo de música transferido se guarda automáticamente como un archivo en la Carpeta “MY_MP3” (MI_MP3) o “MY_WMA” (MI_WMA) por el avanzado sistema de “Gestión de Archivos” de esta unidad. Consejos Para obtener más información sobre el sistema administrador de archivos de esta unidad, consulte “ADMINISTRADOR DE ARCHIVOS’’.
17. ELIMINACIÓN DE LOS ARCHIVOS DE MÚSICA Puede borrar archivos de la memoria USB o de la Tarjeta de Memoria. Lea a continuación para más detalles sobre esta función: ARCHIVOS MULTIMEDIA QUE PUEDEN ELIMINARSE Memoria USB y Tarjeta de Memoria. Los archivos de música que están en el CD NO PUEDEN SER ELIMINADOS por esta unidad. ELIMINAR LOS ARCHIVOS DE MÚSICA DE LOS DISPOSITIVOS Hay TRES métodos diferentes para eliminar archivos.
ES-34
18. ADMINISTRADOR DE ARCHIVOS Sistema avanzado de “Administración de archivos”. El sistema de esta unidad puede ayudarle a organizar todos los archivos de música como un PC. Consulte más abajo el apartado correspondiente, para saber más: ADMINISTRACIÓN DE LAS CARPETAS Esta unidad creará automáticamente por sí sola las carpetas por defecto en cualquier dispositivo USB / SD / MMC, una vez que estos dispositivos sean insertados en la unidad.
19. FUNCIONAMIENTO DEL IPOD Esta unidad está equipada con la función iPod Ready que permite al usuario tener un control directo del iPod en la unidad y permite mostrar la información del iPod en la pantalla LCD. Lea más abajo para saber más acerca de esta función. Tabla de compatibilidad con el iPod Esta unidad es compatible con la siguiente versión de software de iPod iPod 1G No compatible iPod 2G No compatible iPod 3G Versión de firmware 2.
Activación del Modo iPod Cuando la unidad fuente esté encendida y el iPod conectado al conector de 30 Pin, pulse el botón mode para cambiar al modo iPod. La unidad comenzará a leer los archivos de música del iPod y comenzará su reproducción de forma automática. Pulse el botón Mode de forma repetida para cambiar a otro modo o volver al modo USB. Información del iPod en la pantalla de la unidad Esta unidad puede mostrar el nombre de la canción, artista o álbum y el tiempo transcurrido en la pantalla.
20. FUNCIONAMIENTO DEL BLUETOOTH Esta unidad incluye la tecnología bluetooth wireless más avanzada. Lea las instrucciones siguientes antes de utilizar la función bluetooth disponible en esta unidad: El nombre del dispositivo bluetooth de la unidad es “BT70” por defecto. “BT70” debería mostrarse en el dispositivo conectado / sincronizado.
Guía de usuario para el Funcionamiento del BlueTooth 1. Cuando el usuario utilice nuestra UNIDAD PRINCIPAL de Bluetooth, asegúrese de que el teléfono móvil que use tenga / sea compatible con la función de Bluetooth (perfil de Auriculares, Manos Libres o ambos). 2. Antes de que comience a utilizar nuestra UNIDAD PRINCIPAL Bluetooth asegúrese de que se conecta de forma adecuada a su teléfono móvil. Vaya a la sección “PAIRING” (SINCRONIZACIÓN) del manual de usuario.
Lista de Compatibilidad con el Teléfono móvil con bluetooth Esta unidad es compatible con las especificaciones del bluetooth v1.2 o superior, y con los perfiles del bluetooth como los auriculares o manos libres. Sin embargo la funcionalidad puede ser limitada debido a alguna especificación de interfaz propia de dichos teléfonos. Esta lista solo se actualizará en el momento de su impresión. Esta lista ofrece un ejemplo de un teléfono móvil bluetooth disponible en el mercado.
Nokia 8.910 6.600 6.230 N90 7.600 N91 9 9 9 9 9 9 9 9 9 9 9 9 9 9 9 9 9 9 9 9 9 9 9 9 9 9 9 9 9 9 9 9 9 9 9 9 9 9 9 9 9 9 9 9 9 9 9 9 9 9 9 9 9 9 9 9 9 9 9 9 9 9 9 9 9 9 9 9 9 9 9 9 6.111 6230i 7.
Motorola V600 E398 V501 V3 V80 V3X 9 9 9 9 9 9 9 9 9 9 9 9 9 9 9 9 9 9 9 9 9 9 9 9 9 9 9 9 9 9 9 9 9 9 9 9 9 9 9 9 9 9 9 9 9 9 9 9 9 9 9 9 9 9 9 9 9 9 9 9 9 9 9 9 9 9 9 9 9 9 9 9 Características Caller ID (Identificador de llamadas) Pairing Pairing (Sincronización de dispositivos) (Sincronización Pairing cancel de dispositivos) (Cancelar asociación) In-Band Ring Tone (Tono de llamada in-band) Ringing Talk (Hablar) (Llamada) Reject (Rechazar) Talking (Hablando) Audio Transfer (Transferencia de
Siemens & BenQ S55 S88 9 9 9 9 9 9 9 9 9 9 9 9 9 9 9 9 9 9 9 9 9 9 9 9 818 565 A700 8.
Samsung & LG D508 D528 K G320 9 9 9 8 9 9 9 9 9 9 9 8 9 9 9 8 9 9 9 9 9 9 9 8 9 9 9 9 9 9 9 9 9 9 9 9 Características Caller ID (Identificador de llamadas) Pairing Pairing (Sincronización de dispositivos) (Sincronización Pairing cancel de dispositivos) (Cancelar asociación) In-Band Ring Tone (Tono de llamada in-band) Ringing Talk (Hablar) (Llamada) Reject (Rechazar) Talking (Hablando) Audio Transfer (Transferencia de audio) Volumen arriba/abajo Hang up (Colgar) Dialing (Marcación) Audio Transfer
Responder una llamada entrante ERASE RA NS FE R PUSH PRESS MENU DIAL VPC55BT T Tecla de función de panel 1 MENÚ DEL SISTEMA 2 Botón de control de volumen 3 BAND (BANDA) Función Bluetooth Manos Libres -Acceda al modo entrada de números de teléfono -En este modo, utilice el teclado numérico para introducir los números -En una llamada entrante utilice -En el modo de entrada de números de teléfono edite el número.
Sincronización, conexión y desconexión de un dispositivo bluetooth Cuando se conectan dispositivos bluetooth por primera vez a esta unidad, es necesario un registro, denominado “sincronización”. Este registro (sincronización) es necesario solamente la primera vez, ya que, en adelante, esta unidad y el resto de dispositivos se reconocerán automáticamente. Después de registrar los dispositivos (sincronizados) con esta unidad el usuario puede seleccionar el dispositivo registrado y conectarlo.
Método 2-Búsqueda de esta unidad para sincronizar “desde otro dispositivo bluetooth”. (1) (2) (3) Ponga el dispositivo bluetooth que se vaya a sincronizar con esta unidad en el modo “búsqueda”. a. Para que esta unidad sea detectada por el otro dispositivo, el modo “VISIBILITY” (visibilidad) del MENÚ del bluetooth debe estar en “SHOW” (mostrar). Consulte el MENÚ del bluetooth para saber más acerca de la configuración del modo “VISIBILITY”. b.
Consejos Si el icono del bluetooth “ ” desaparece de la pantalla, significa que la conectividad del dispositivo Bluetooth con esta unidad se ha perdido. (2) (3) Con algunos modelos de teléfono móvil, después de que se haya activado el modo transferencia y que la llamada se haya transferido al teléfono móvil, la conectividad con esta unidad se pierde. El usuario ha sincronizado esta unidad con más de un dispositivo de la lista y quiere reconectarse con uno de ellos otra vez.
Uso del manos libres para llamar Responder una llamada entrante El usuario puede pulsar el botón “ENTER” (MENU) o “MODE” para responder / aceptar la llamada. (1) Cuando hay una llamada entrante, el sonido del tono de llamada sale desde el altavoz del coche, y el número de la persona que llama se mostrará en pantalla. Si la llamada entrante no posee número de identificación, la pantalla mostrará “UNKNOWN” (desconocido).
d. Durante el modo conversación, si la pantalla está deshabilitada, la unidad continuará la conversación incluso aunque la pantalla esté desconectada. Al terminar la conversación, el usuario puede pulsar el botón “CLEAR” para apagar la unidad.
Configuración del nivel del tono de llamada Esta unidad permite al usuario configurar el volumen del tono de llamada entrante para los altavoces. La configuración de fábrica es “20”.
Bluetooth Audio Streaming A2DP (Perfil de distribución de audio avanzado) El usuario puede escuchar archivos de música de un dispositivo de audio en esta unidad si el dispositivo de audio es compatible con el perfil de distribución de audio avanzado (A2DP) de tecnología bluetooth. Lea las instrucciones siguientes antes de utilizar la función bluetooth audio streaming de esta unidad.
Funcionamiento de un dispositivo de audio con esta unidad AVRCP (perfil de control remoto de audio y vídeo) Esta unidad puede realizar las siguientes operaciones con el dispositivo de audio conectado, lo cual es compatible con el AVRCP (perfil de control remoto de audio y vídeo) y sólo si el dispositivo de audio es compatible con el AVRCP: (1) Iniciar la reproducción – Cada vez que el usuario cambie el modo por “BT AUDIO”, esta unidad automáticamente enviará el comando “PLAY” (reproducir) por medio del AVR
Descarga de archivos de música por bluetooth (OPP) Gracias a la tecnología bluetooth inalámbrica más avanzada, el usuario puede transferir sin necesidad de cables archivos de música y descargarlos a un dispositivo USB, tarjeta de memoria o memoria flash incorporada de esta unidad. Lea las instrucciones que aparecen a continuación antes de utilizar la función de descarga de archivos de música mediante bluetooth de esta unidad.
a. Asegúrese de mantener el dispositivo Bluetooth que se va a sincronizar en un radio de 2 metros desde esta unidad durante la descarga de archivos de música. b. Si no está disponible ningún dispositivo de almacenamiento en la unidad, como una memory stick USB, tarjeta de memoria , al girar el botón del codifica-dor no se mostrará ningún dispositivo. c. Si no hay ningún dispositivo de almacenamiento disponible en esta unidad donde descargar los archivos, la pantalla mostrará “ ”. d.
Reproducción de los archivos descargados a esta unidad El usuario puede escuchar los archivos de música descargados cambiando el modo al dispositivo de almacenamiento y buscando en la carpeta de música “MY_BT”. Esta unidad creará automáticamente un nombre para la carpeta de música (“MY_BT” – Mis archivos bluetooth) del dispositivo de almacenamiento para guardar todos los archivos de música descargados desde el dispositivo bluetooth.
1 EJECT 2 3 - 7 5 + NAVI MUTE 6 MODE TRACK 10 MENU INT 1 2 AF RPT RDM AS/PS SUB-W 3 4 ID3 INFO TA F - DN F - UP COPY REC 5 6 14 20 16 BAND PAU 12 18 4 8 9 11 13 19 15 PTY X-BASS ES-57 21 17
23.ESPECIFICACIONES REPRODUCTOR DE CD Sistema Disco compatible Frecuencia de muestreo Nº de bits de cuantificación Frecuencia Número de canales Ratio S/N Sistema de audio del CD CD 44,1KHz 1 bit 5-20.000Hz 2 estéreo 70dB SECCIÓN DE MEDIOS Puerto USB Tarjera de memoria .Sistema de archivos compatible Sistema de archivos compatible Puerto 1.1 compatible con 2.0 SD y MMC (32MB hasta 2GB) .
24. RESOLUCIÓN DE PROBLEMAS Antes de examinar la lista de verificación, verifique las conexiones del cableado. Si cualquiera de los problemas persiste después de comprobar la lista, consulte al distribuidor más cercano. Síntoma No hay corriente Causa Solución El contacto no está encendido. Si el suministro eléctrico está bien conectado al terminal del vehículo, coloque la llave de encendido en la posición “ACC”. El fusible está fundido. Sustituya el fusible.
RA NS FE R DIAL PRESS MENU PUSH ERASE VPC55BT T
1. NOTE OF DISCS MOISTURE CONDENSATION On a rainy day or in a very damp area, moisture may condense on the lenses inside the unit. Should this occur, the unit will not operate properly. In such a case, remove the disc and wait for about an hour until the moisture has evaporated. NOTES ON CDs NOTES ON DISCS 1. A dirty or defective disc may cause sound dropouts while playing. To enjoy optimum sound, handle the disc as follows. Handle the disc by its edge.
Removing the unit a a. Frame b. Insert fingers into the groove in the front of frame and pull out to remove the frame. (When re-attaching the frame, point the side with a groove down wards and attach it.) c. Insert the levers supplied with the unit into the grooves at both sides of the unit as shown in figure until they click. Pulling the levers makes it possible to remove the unit from the dashboard. b c Trim Plate Installation: Push the trim plate against the chassis until it is fitted.
3. DETACHABLE CONTROL PANEL (D.C.P.) Removing The Detachable Control Panel (D.C.P.). PANEL RELEASE BUTTON 1. Turn the power off 2. Press the D.C.P. release button 3. Remove the D.C.P. Attaching the DCP 2 A B 1. Attach the panel at the right side first, with point B on the main unit touching point A on the D.C.P. (As shown on the diagram). 2. Then press the left side of D.C.P. onto the main unit until a “click” sound is heard. CAUTION DO NOT insert the D.C.P from the left side. Doing so may damage it.
4.
5. PANEL OPEN/CLOSE OPERATION This unit is equipped with the most advanced full logic motorized slide down system. You can enjoy this advance technology with just a single press of the “OPEN” button Please read carefully the following operation instruction before operating the unit. OPEN / CLOSE THE PANEL Press the Open button to slide down (open) a closed panel or to slide up (close) an opened panel. LOADING A CD When the panel is in the slide down position, the disc slot becomes accessible.
6.
7. BASIC OPERATIONS ANIMATRIX MODE Under playback mode, pressing the “ animation display mode: ” button on the panel repeatedly to select the favor > > > > > PANEL RELEASE BUTTON (REL) Press this button to remove the control panel. POWER ON/OFF BUTTON ( ) Press POWER button or any other button on the front of the radio (except Open/Eject) to turn the unit on. Press POWER button again to turn the unit off.
AUX INPUT Connect the external device to the RCA line in jack located at the rear of the unit , then press Mode button to select Aux mode. Press Mode Button again to exit Aux Mode and select other mode. Connect the external device to AUX in jack located on the front panel , then press Mode button to select Aux mode. Press Mode Button again to exit Aux Mode and select other mode.
8.SYSTEM MENU OPERATION User can adjust the system setting in this unit by entering into the system menu, please read the below details operation for each system menu items: Access into System Menu Function List Long press the MENU button for more than 3 seconds to access into the system menu items. will appear on the display momentarily. User can navigate thru the menu items by rotating the encoder knob clockwise or anti-clockwise to move to the next or previous option.
Bass When in BASS, user can use the track up or down button to select the desired bass parameter and rotate the encoder knob to change the desired parameter: 1. LEVEL: adjust the bass level from -6 to +6. 2. C.FREQ: adjust the bass center frequency as 60Hz, 80Hz, 100Hz, or 200Hz. 3. BASS-Q: adjust the Bass Quality Factor as 2N, 1N, 1W or 2W. Figure 1 shows the Bass Quality factor (Curve characteristics) of each step. 15.0 12.5 10.0 7.5 1W Level (dB) 5.0 2W 1N 2N 2.5 0.0 10.0 100.0 Frequency (Hz) 1.
Treble When in TREBLE, user can use the track up or down button to select the desired TREBLE parameter and rotate the encoder knob to change the desired parameter: 1. LEVEL: adjust the Treble level from -6 to +6. 2. C.FREQ: adjust the Treble center frequency (C.FREQ) as10KHz, 12.5KHz, 15KHz, or 17.5KHz. Balance & Fader (Bal / Fad) When in BAL & FADER mode, user can use the track up or down button to switching mode between FADER and BALANCE for adjustment. 1.
Key Beep Tone The beep tone feature allows the selection of an audible beep tone to be heard each time any button is being pressed on the panel of this unit. "On" is the default. Rotate the encoder knob to select the "Off" option. Program Vol This option allows the setting of the volume level of this unit will automatically assume when first turned on. Volume level "12" is the default setting.
Regional- On/Off selection REGIONAL “OFF” will be displayed by default. If “on” is selected, then during an AF search or PI seek, it will implement to station which have all the PI codes which are the same as the current station. If “off” is selected, then during an AF search or PI seek the regional code in the format PI code will be ignored. A regional station is possible to be received. The Regional function On/Off Setting is valid only when the “AF” function is “on”.
Paring – with Bluetooth device This feature is used for the pairing of this unit's Bluetooth system to mobile phone or other Blue tooth device. Under the “Pairing” mode, press the “MENU” button to activate the Pairing. Tips Please refer to “PAIRING, CONNECTING AND DELETING WITH A BLUETOOTH DEVICE” for the details operation of “PAIRING”. Paired Device – Reconnect or Delete a Bluetooth Device This feature allows to Reconnect or Delete a paired mobile phone or Blue tooth device manually.
9. TUNER OPERATION NAVI LIST SEARCH ( NAVI ) Using the advance NAVI list search method on this unit, user can press he NAVI button access into the NAVI SEARCH mode, then rotate the encoder knob to select the desired preset memory station to listen. Once selected the desired preset memory on the list, press the “MENU” button to confirm and begin the playback. BAND BUTTON( BAND/SEARCH ) Press BAND to change between FM bands and AM(MW)bands.
10. RDS OPERATION RDS functions The unit is equipped with the following RDS function: - AF Alternative Frequencies CT Clock Time PI Program identifications PS Program service name PTY Program Type REG Regional Change TA Traffic Announcement TP Traffic program AF Function By pressing AF button < 3 seconds to select AF ON/OFF. “AF ON” or “AF OFF” will show & remain on the display for 5 seconds..
BR - 20
Up to 200 characters can be displayed in the long file name format. The media reproducible on this unit has the following limitations: Maximum number of nested folders: 8 Maximum number of files per disc: 999 Maximum number of files per media device: 2000 Maximum number of folders per disc: 255 MP3/WMA written in the formats other than the above may not be successfully played and their file names or folder names may not be properly displayed.
Files Playing Order When selected for play, Folder Search, File Search or Folder Select, files and folders are accessed in the order in which they were written by the PC writer. Because of this, the order in which they are expected to be played may not match the order in which they are actually played. For example, a media with the following folder/file hierarchy is subject to Folder Search, File Search or Folder Select as shown below. An outline of a Media with MP3/WMA is shown below.
File/folder Repeat Play (1) Press M3 button more than 3 seconds during playing MP3/WMA disc for “repeat play” all files of the current folder. And keep on repeat playing the current folder until “repeat play” is disabled. To disable current folder “repeat play”, long press M3 button more than 3 seconds (2) Press M3 button less than 3 seconds to “repeat play” the current file. And keep on repeat, Playing the current file until the “repeat play” is disabled.
12. USB OPERATION The unit can support USB Host Function. It can playback MP3 and WMA Audio format which are stored into USB Memory Stick or USB interface Music Player. Please read below before you start the operation of USB HOST Function.
13. MEMORY CARD OPERATION The unit can support playback MP3 and WMA Audio format which are stored into SD and MMC Memory Card . Please read below before you start the operation of Memory Card.
BR - 26
a. Under recording mode, all the FM/iPod/AUX operation is not functional, like Tune Up / Down , Preset Memory 1 -6 etc. b. The Audio will remain in recording mode even MUTE function is activated. c. The Recording will automatically stop if the storage device memory is full. Tips Record Quality- The unit have TWO record quality mode, Standard & high for selection in the MENU. Please see “MENU”- “RECORD MODE” for details operation the below table indicates the difference of TWO Record quality mode.
BR - 28
WARNING: 1. Never remove the USB Stick while recording to USB Stick. It may damage the USB Stick and sometimes will caused the unit system lock up. 2. This is not recommend to insert USB stick while recording is under progress to other storage device. Always remember to stop the record or after the record is completed, then insert the USB stick.
BR - 30
Under transferring mode, All the MP3/WMA operation is not functional, like file up / down, Repeat, Random, and Intro etc. The audio will remain recording by the unit system even MUTE function is activated The Transferring will automatically stop if the storage device memory is less than 2MB WARNING: 1. Never remove the USB Stick while recording or file transferring to USB Stick. It may damage the USB Stick and sometimes will caused the unit system lock up. 2.
BR - 32
18. FILES MANAGER The advance “File Management.” System of this unit can help to well you organize all the music files just like a PC . Please read below for details: FOLDERS MANAGEMENT This unit will automatically self-create the below default folders onto any USB /SD / MMC media device, once these devices are inserted into the unit.
19. iPod OPERATION This unit is equipped with iPod Ready function which allow end user to have direct control of the iPod on the unit and display iPod song information on the unit's LCD display. Please read below for more details operation. iPod Compatibility Chart This unit is support following iPod software version iPod 1G Not Supported iPod 2G Not Supported iPod 3G Firmware Version 2.
Switch to iPod Mode When the Head unit is power on and iPod is connected to the 30 pin connector, press the mode button to change to iPod mode and the then starts Reading the music files contained in the iPod and the playback will automatically start. Press Mode button repeatedly to change to other modes or switch back to iPod mode.
BR - 36
User Guide For Blue Tooth Operation 1. When user use our Blue tooth HEAD UNIT, please make sure the mobile phone you use must / does support Blue tooth functions (Headset or Handsfree profiles or both). 2. Before you start to use our Bluetooth HEAD UNIT, please make sure complete pairing with your mobile phone first. Please refer to the user manual, section “PAIRING” for detail “PAIRING” instruction.
Bluetooth Mobile Phone Compatibility List This unit can support bluetooth specification v1.2 or higher, and compatible with bluetooth profiles such as handsfree or headset profiles. however the functionality may be limited due to some phones' own dedicated interfacing specification. This list is only updated to the time this list is being printed.
Nokia 8910 6600 6230 6111 6230i 7380 Features Caller ID Pairing Pairing Pairing cancel In-Band Ring Tone Ringing Talk Reject Audio Transfer Talking Volume up/down Hang up Audio Transfer Dialing Volume up/down Redial last call Features Caller ID Pairing Pairing Pairing cancel In-Band Ring Tone Ringing Talk Reject Audio Transfer Talking Volume up/down Hang up Audio Transfer Dialing Volume up/down Redial last call BR - 39 N90 7600 N91
Motorola V600 E398 V501 Panasonic X88 GX-T15 GX-T71 Features Caller ID Pairing Pairing Pairing cancel In-Band Ring Tone Ringing Talk Reject Audio Transfer Talking Volume up/down Hang up Audio Transfer Dialing Volume up/down Redial last call Panasonic & Sharp Features Caller ID Pairing Pairing Pairing cancel In-Band Ring Tone Ringing Talk Reject Audio Transfer Talking Volume up/down Hang up Audio Transfer Dialing Volume up/down Redial last call BR- 40 V3 V80 V3X
Siemens & BenQ S55 S88 Features Caller ID Pairing Pairing Pairing cancel In-Band Ring Tone Ringing Talk Reject Audio Transfer Talking Volume up/down Hang up Audio Transfer Dialing Volume up/down Redial last call Dopod & MIO & Blackberry 818 565 A700 Features Caller ID Pairing Pairing Pairing cancel In-Band Ring Tone Ringing Talk Reject Audio Transfer Talking Volume up/down Hang up Audio Transfer Dialing Volume up/down Redial last call BR - 41 8700
Samsung & LG D508 D528 KG320 Features Caller ID Pairing Pairing Pairing cancel In-Band Ring Tone Ringing Talk Reject Audio Transfer Talking Volume up/down Hang up Audio Transfer Dialing Volume up/down Redial last call BR - 42
Answering An Incoming Call ERASE RA NS FE R PUSH PRESS MENU DIAL VPC55BT T Panel Function Button Blue Tooth Hand Free Function 1 SYSTEM MENU - Enter phone number input mode 2 Encoder volume Knob - Under phone number input mode Use as numeric input 3 BAND 4 5 - Under an incoming call use as reject call - Under phone number input mode use as edit number.
Pairing, Connecting And Deleting With A Bluetooth Device When connecting Bluetooth devices at the first time with this unit, a mutual registration is required, this is called “Pairing”. This registration (Pairing) is required only at the first time, as this unit and the other devices will recognize each other automatically from the next time. After the devices are registered (Paired) with this unit. User can select the registered device and connect it, this is called “Connecting”.
Method 2-Searching this unit for Pairing “from a other Bluetooth Device ”. (1) Set the other Bluetooth device which need to be paired with this unit into “Searching” mode . a. To allow this unit searching by the other device, the “VISIBILITY” in the MENU of BT must be set to “SHOW”. Please refer to MENU of BT for more details of how to set the “VISIBILTY” mode. b. Please refer to the instruction manual of your Bluetooth device on how to enter into the Bluetooth device searching mode.
disappears from the display, it means the Tips If the Bluetooth icon connectivity of the Bluetooth device with this unit is lost. (2) Some models of mobile phone after the call transfer mode is activated, and call is transferred to the Mobile Phone, the connectivity will be lost with this unit. (3) User has paired with more than one Bluetooth devices in the list, and want to reconnect with one of them again. Tips This unit can Paired up to 8 devices each for Hands free and / or Audio devices.
Hands-Free Phoning Answering An Incoming Call User can press the “ENTER” (MENU) button or “MODE” button to answer / accept the incoming call. (1) When there is an incoming call, the ring tone is output from the car speaker, and the caller number will be shown on the display. If the incoming call has no caller number, the display will shown “UNKNOWN”. (2) Always press the “ENTER (MENU) button or “MODE ' button to answer / accept the call after the display showing the “Caller Number” or “UNKNOWN”.
d. During the talking mode, if the Ignition is being turned off, the unit will keep the conversation even if the Ignition is Switched off. After the conversation is finished, user can press the “CLEAR” button to switch off the unit. To Activate The Privacy Talking Mode (Incoming Call Transfer Mode) During the talking mode, user can LONG press the “TRANSFER” (MODE) button to transfer the phone call from the unit back to the mobile phone for privacy reason.
To Set The Incoming Ring Tone Level This unit allows the user to preset the most suitable incoming call ringing volume level from the car speakers. The factory default is set at '20'. User can adjust the volume level in the MENU of BT – PHONE VOLUME Please refer to MENU Operation for more details of how to access into and operates the MENU of BT – PHONE VOLUME.
Bluetooth Audio Streaming A2DP (Advanced Audio Distribution Profile) User can listen to music files on an audio device on this unit if the audio device supports A2DP (Advanced Audio Distribution Profile) of Bluetooth Technology. Please read the below instruction before operating the Bluetooth Audio streaming function on this unit. Connecting A Bluetooth Audio Device With This Unit Before using audio device to play music on this unit, the audio device must be paired with this unit first. a.
Operating an audio device with this unit AVRCP ( Audio Video Remote Control Profile ) This unit can perform the following operations with the connecting Audio device which supports AVRCP (Audio Video Remote Control Profile) & only if the Audio device does support AVRCP. (1) Start playing - Every time when user change mode into “BT AUDIO” mode, this unit will automatically send a “PLAY” command via AVRCP to the audio device to command the auto start playing song in the audio device.
BR - 52
BR - 53
Hands Free Phoning Is Not Supported While Music File Download If the download Bluetooth device is a Hand Phone with HFP (Hands free profile) & connected to this unit, during the file download, all the hands free function are NOT SUPPORTED at this moment, the Bluetooth hands free will automatically RESUME only after the file download is completed.
21.
23.SPECIFICATIONS CD PLAYER System Usable disc Sampling frequency No of quantization bits Frequency Number of channels S/N Ratio Compact disc audio system Compact disc 44.1KHz 1bit 5-20,000Hz 2 stereo 70dB MEDIA SECTION USB Host Host 1.1 compatibles 2.0 Memory Card SD and MMC (32MB up to 2GB) Built-in Flash Memory Nand Flash 1GB Suppor File System FAT 16 and FAT 32 RADIO SECTION FM Frequency Range Intermediate Frequency Usable Sensitivity Stereo Separation S/N Ratio 87.5-108 Mhz 10.
24.TROUBLE SHOOTING Before going through the check list, check wiring connection. If any of the problems persist after check list has been made, consult your nearest service dealer. Symptom Cause Solution No power The car ignition is not on. The fuse is blown. Replace the fuse. Disc cannot be loaded or ejected Presence of CD disc inside the player. Remove the disc in the player, then put a new one. Inserting the disc in reverse direction. Insert the compact disc with the label facing upward.