AgileMesh™ i-Pro Viewer User’s Guide Version 1.2.
i-Pro Viewer Table of Contents Table of Contents...............................................................................................................................2 Introduction ........................................................................................................................................3 Software Installation...........................................................................................................................4 Overview .............................
i-Pro Viewer Introduction i-Pro Viewer is the software that enables users to view and record the images from AgileMesh cameras at up to 16 different locations simultaneously. i-Pro Viewer also allows users the ability to control or Pan/Tilt/Zoom (PTZ) AgileMesh cameras from any computer that has the i-Pro software installed on it. Any analog camera can be connect to an AgileMesh node and can be displayed by I-Pro Viewer.
i-Pro Viewer Software Installation Use the AgileMesh Master Installer CD or download i-Pro Viewer form the AgileMesh website (Products Software login. Contact AgileMesh to get a unique login and password. Execute “i-Pro Viewer 1.2.5a Setup.exe” file to install the viewing application software. Select your language and click “OK” button. Click “Next >“ button. Assign the directory where I-Pro Viewer is to be installed. To change the directory, click the “Browse...” button. Click “Next >“ button.
i-Pro Viewer Wait until the process finishes. To cancel it, click “Cancel” button. When the installation is complete, click “Finish” button. i-Pro Viewer can be loaded on any number of PCs. Notes: 1. The default IP address of an AgileMesh camera is 192.168.224.XXX. PCs used to view and or record using I-Pro Viewer should have their local Area Network (LAN) adapter set to an IP address in the range of 192.168.224.10 to 192.168.224.20. 2.
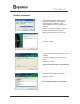
i-Pro Viewer Overview Channel Selection Buttons Viewing Option Buttons Pan/Tilt Control Panel Status Window Function Tab & Buttons Display Window Display Window Shows images from cameras. Channel Selection Buttons Enables user to select the camera to control. Viewing Option Buttons Simultaneous Multi-Channel (1/4/9/16 camera view), Sequential and Full Screen Monitoring. Pan/Tilt Control Panel Pan/Tilt Control.
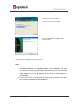
i-Pro Viewer Initial Setup Locate and double-click the desktop icon for I-Pro Viewer to start the viewing application. i-Pro Viewer can be configured uniquely for each customer application. The configuration will only be done once. On the “General tab” at the bottom left corner of the I-Pro Viewer frame, click on the button that looks like an “ON/OFF” switch. i-Pro Viewer requires a password to start and stop the application. A password entry box will appear when I-Pro Viewer starts.
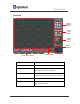
i-Pro Viewer The middle tab on the on the I-Pro Viewer Setup screen is the “Recording” Tab. The table below describes the options that can be configured on the “Recording” tab. The “Record Interval” should be set to 1 Frame Per Second (FPS) to conserve disk space. Record Interval Folder Recording Size Disk Margin Delete Old Files Frame rate to record. (FPS: Frames per Second) Set to 1 FPS to save disk space. Specifies the directory to record video. More than one hard disk can be specified.
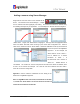
i-Pro Viewer Adding a camera using Server Manager Single click the “Connect” button on the “General” tab as shown. This will launch the Server Manager. A single click on “General” will select (highlight) it for editing. to something meaningful to your application. “SWAT Cams”. Click “Edit” and rename the “General” entry In this example, the “General” tab was changed to Single- click“ SWAT Cams” to highlight it.
i-Pro Viewer Additional cameras can be added by a single-click to “SWAT Cams” (this will highlight it). Next right click the highlighted “SWAT Cams” and select “New Site” which will bring up the “Server Add” configuration box. Refer to Appendix 1 for the camera IP addresses and video port numbers. Click “OK” to add the second camera. Note: Alphanumeric characters can be used in the Server Name (camera name), but the Server Name (camera name) must start with a letter of the alphabet.
i-Pro Viewer Viewing Cameras i-Pro Viewer can present the video from 1 to 16 cameras on a display at one time. Selection and Viewing Option controls are described below. The Channel Notice that the 16 viewing locations in i-Pro Viewer are labeled “CH1” through “CH16”. Clicking on one of the Channel Selection buttons will select the camera to be controlled. The user can also click on the viewing location directly to select a camera as well.
i-Pro Viewer On Screen Display The OSD button on the General tab of I-Pro Viewer turns on the On Screen Display on all video displays. The video from a camera named 72P749B is displayed in the Channel 1 window as shown below. Notice that this viewing window has been selected as indicated by the yellow rectangle surrounding the frame. Also notice that PTZ controls are enabled for this camera and there are 2 active viewers connected to this camera.
i-Pro Viewer General Tab & Buttons General Tab “On/OFF” Button Enter or exit the program. (enter the iPro Viewer password for both) “Setup” Button Configure I-Pro Viewer. All channels must be disconnected when choosing this setting. “i-PRO Player” Button Playback the video recorded by i-Pro. “Sensor Alarm List” Button This function is not implemented in this release. “OSD” Button On/Off button for On Screen Display, that shows the camera name, date & time and connected users.
i-Pro Viewer Record Tab & Buttons Recording Tab “Image Capture” Button Saves an image of the selected video in JPEG format to the directory of your choice. “Schedule Record” Button Refer to the “Recording Setup” for more information. Note: All channels should be disconnected. “Stop All” Button Stops the recording function of all the channels. “Record All” Button Records all cameras that are streaming video in i-Pro Viewer. A red “R” will appear in each video display.
i-Pro Viewer Recording Setup Recording Tab Click “Schedule Recording” Button in the Recording Tab to set up the automatic schedule recording function of each channel with assigned date & time. Channel The video source to record. Cycle Enables a user to record video periodically by year/month/week/day. Start Date/Time The date & time to start recording End Date/Time The date & time to end recording Add Adds a schedule recording list. Update Update the schedule recording lists.
i-Pro Viewer Image Tab & Slider Bars Image Tab “Color” Slider Bar, Set to + (color)* (−) position : Black & White (+) position : Color “Contrast” Slider Bar, Set to 64 Contrast Adjustment (0 - 127) “Brightness” Slider Bar, Set to 128 Brightness Adjustment (0 - 255) “Quality” Slider Bar, Set to 3 Video Quality Adjustment.(5 Levels) Note: The higher the video quality, the more bandwidth is consumed. “Resolution” Slider Bar, Set to 1 (320 X 240) Video Resolution Adjustment.
i-Pro Viewer PTZ Tab & Buttons “Preset” List (0 – 128) PTZ Tab PTZ Tab Shows preset list. “Save” Button Sets the pan/tilt device to move to selected preset position. “Delete” Button Deletes all the previous information of the selected preset. “Move” Button Commands the pan/tilt device to move to selected preset position. Pattern, Swing and Group functions are not presently supported “Digital Output” Button Not presently supported “Iris” Button Adjusts the Iris of camera.
i-Pro Viewer Pan/Tilt Control Pan and Tilt functions are available for Pan/Tilt control capable cameras connected to the Camera 1 or Camera 2 input on AgileMesh AV7510 or AV7520 tactical nodes. RS-485 differential pair for PTZ control. bits, no parity and 1 stop bit. The AgileMesh nodes use The default protocol setup is Pelco-D, 2400 baud, 8 data A green “P” will appear in the upper right corner of a viewing window if the node has been setup for PTZ controls.
i-Pro Viewer i-Pro Player Description i-Pro Player is launced from the General tab of I-Pro Viewer using the button with a film strip image. Menu Status Indicator Player Screen Playback Speed Playback Pause Search Slide Bar Menu “File” allows search and selection of recorded video to be viewed. “Help” menu indicates version of i-Pro Player. Status Indicator Shows information about the video currently being displayed such as the recorded date & time, the frame number / the total frame number.
i-Pro Viewer i-Pro Player Menu Description From the i-Pro Player menu, select “File” “File Open” From the “Record” directory (default directory), select the file to be displayed by selecting the Channel Number, the Camera Name, the Date (formatted YYYYMMDD). 1\CAM\20040621. Example) . \Record\Channel- See Appendix 2 for AgileMesh camera naming convention. The default directory for I-Pro Viewer is C:\Program Files\Network Video Server\i-Pro Viewer\Record when downloaded from the AgileMesh website.
i-Pro Viewer Trouble Shooting Tips If video from cameras connected into AgileMesh equipment cannot be viewed and or controlled by I-Pro Viewer, check the follow list of common issues and resolutions. Symptom “Cannot find the network video server” Possible cause Can you ping 192.168.225.150? • error message displayed If not, is the PC running I-Pro Viewer connected to powered up AgileMesh node? • Is the PC LAN address set to 192.168.224.
i-Pro Viewer Appendix 1 – AgileMesh default Camera IP Addresses Camera 1 Camera 2 Node # IP Address Video Port # IP Address Video Port # 0 192.168.224.49 7049 192.168.224.50 7050 1 192.168.224.52 7052 192.168.224.53 7053 2 192.168.224.55 7055 192.168.224.56 7056 3 192.168.224.58 7058 192.168.224.59 7059 4 192.168.224.61 7061 192.168.224.62 7062 5 192.168.224.64 7064 192.168.224.65 7065 6 192.168.224.67 7067 192.168.224.68 7068 7 192.168.224.70 7070 192.168.224.
i-Pro Viewer Appendix 2 – AgileMesh camera naming convention Note: the camera name must not contain a dash (“-“) and should be limited to 7 characters.