
User guide


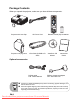

Table Of Contents
- VPD-X5600-EN-8G-0804.pdf
- FCC Notice
- Safety Instructions
- Notes on the AC Power Cord
- Powering On the Projector:
- Powering Off the Projector:
- 1. Press button to turn off the projector lamp. You will see a message "Power off? Press Power again" appear on the screen.
- 2. Press button again to confirm.
- 3. Disconnect the AC power cord from the electrical outlet and the projector.
- 4. Do not turn on the projector right after power off.
- Adjusting the Projector
- Adjusting the Projector Height
- Adjusting the Projector Zoom and Focus
- Adjusting Projection Image Size
- Menu Operation
- 1. Press the MENU button to open the OSD menu.
- 2. When OSD is displayed, use p / q to select any feature in the main menu.
- 3. After selecting the desired main menu item, press u to enter sub-menu for feature setting.
- 4. Use p / q to select the desired item and adjust the settings with t / u.
- 5. Press the MENU button, the screen will return to the main menu.
- 6. To exit OSD, Press the MENU button again. The OSD menu will close and the projector will automatically save the new settings.
- Network Control
- 1. Connect one end of the internet cable to the Network Control connector on the projector.
- 2. Connect the other end of the internet cable to an available RJ-45 connector on your computer.
- 3. Turn on your projector and computer.
- 1. Enable DHCP from the projector OSD, under Network Config.
- 2. Start browser in PC and specify following URL, then click “Go” button.
- 3. If connection succeeds, the login screen is displayed. Enter your User name and Password and click “OK”. Below are the factory default settings for administrator, user and passwords.
- 1. Set IP Address and Subnet Mask under Network Config.
- 2. From your computer, go to Start > Settings > Network and Dial-up Connections > Local Area Connection and right click to select Properties..
- 3. Select "Intel Protocol (TCP/IP)" and click "Properties".
- 4. Set your PC’s IP address, and click OK.
- 5. Start browser in PC and specify following URL, then click “Go” button.
- 6. If connection succeeds, the login screen is displayed. Enter your User name and Password and click “OK”. Below are the factory default settings for administrator, user and passwords.
- 1. Go to Tools > General and click "Settings".
- 2. Click "Every visit to the page" and "OK".
- 3. Click "OK" to exit "Internet Properties".
- Maintenance
- Cleaning the Lens
- Cleaning the Projector Housing
- Cleaning the Filter Cover
- Replacing the Lamp
- 1. Turn off the projector.
- 2. If the projector is installed in a ceiling mount, remove it
- 3. Unplug the power cord.
- 4. Loosen the screw in the side of the lamp cover and remove the cover.
- 5. Remove the screws from the lamp module, raise the handle, and lift out the module.
- 6. Insert the new lamp module into the projector and tighten the screws.
- 7. Replace the lamp cover and tighten the screw.
- 8. Turn on the projector. If the lamp does not turn on after the warm-up period, try reinstalling the lamp.
- 9. Reset the lamp hour. Refer to the “Setting” menu.
- Specifications
- Appendix
- Menu Operation
- Computer:
- Video:
- Start-up problems
- Image problems
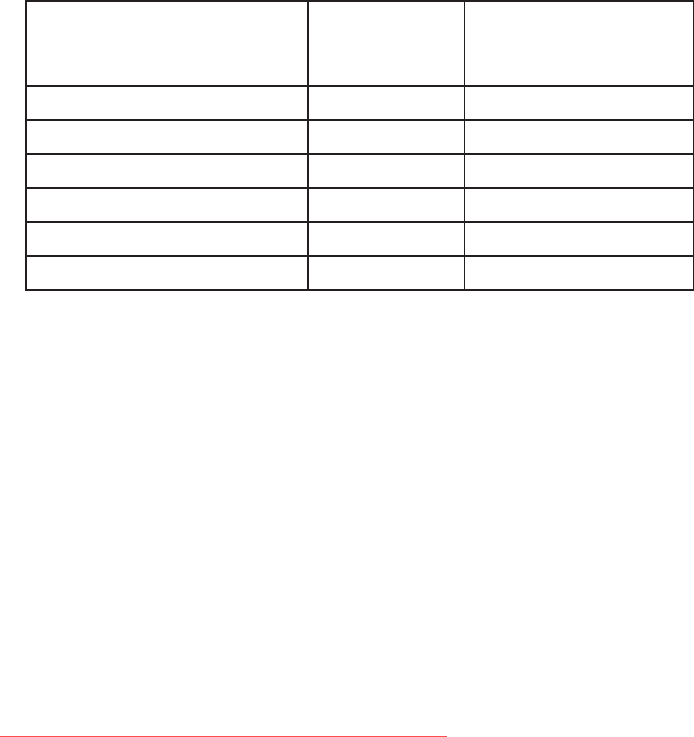
Declaration of RoHS Compliance
This product has been designed and manufactured in compliance with Directive 2002/95/EC of the
European Parliament and the Council on restriction of the use of certain hazardous substances in
electrical and electronic equipment (RoHS Directive) and is deemed to comply with the maximum
concentration values issued by the European Technical Adaptation Committee (TAC) as shown below:
Substance
Proposed Maximum
Concentration
Actual Concentration
Lead (Pb) 0.1% < 0.1%
Mercury (Hg) 0.1% < 0.1%
Cadmium (Cd) 0.01% < 0.01%
Hexavalent Chromium (Cr
6+
) 0.1% < 0.1%
Polybrominated biphenyls (PBB) 0.1% < 0.1%
Polybrominated diphenyl ethers (PBDE) 0.1% < 0.1%
Certain components of products as stated above are exempted under the Annex of the RoHS Directives
as noted below:
Examples of exempted components are:
1. Mercury in compact uorescent lamps not exceeding 5 mg per lamp and in other lamps not
specically mentioned in the Annex of RoHS Directive.
2. Lead in glass of cathode ray tubes, electronic components, uorescent tubes, and electronic ceramic
parts (e.g. piezoelectronic devices).
3. Lead in high temperature type solders (i.e. lead-based alloys containing 85% by weight or more lead).
4. Lead as an allotting element in steel containing up to 0.35% lead by weight, aluminium containing up
to 0.4% lead by weight and as a cooper alloy containing up to 4% lead by weight.
EN-1
Downloaded From projector-manual.com Viewsonic Manuals