CDE6500-L/CDE4200-L/CDE3200-L Full HD Professional LED Display User Guide IMPORTANT: Please read this User Guide to obtain important information on installing and using your product in a safe manner, as well as registering your product for future service. Warranty information contained in this User Guide will describe your limited coverage from ViewSonic Corporation, which is also found on our web site at http:// www.viewsonic.
Contents Compliance Information FCC Compliance Statement................................................................. i Industry Canada Statement.................................................................. i CE Conformity for European Countries................................................ii Declaration of RoHS2 Compliance......................................................iii Copyright Information Product Registration...........................................................................
Other Information Troubleshooting................................................................................. 24 Specifications.................................................................................... 26 RS232 Protocol................................................................................. 28 1. Introduction.................................................................................... 28 2. Description............................................................................
Compliance Information NOTE: This section addresses all connected requirements and statements regarding regulations. Confirmed corresponding applications shall refer to nameplate labels and relevant markings on unit. FCC Compliance Statement This device complies with part 15 of FCC Rules.
CE Conformity for European Countries The device complies with the EMC Directive 2004/108/EC and Low Voltage Directive 2006/95/EC. Following information is only for EU-member states: The mark shown to the right is in compliance with the Waste Electrical and Electronic Equipment Directive 2002/96/EC (WEEE). The mark indicates the requirement NOT to dispose the equipment as unsorted municipal waste, but use the return and collection systems according to local law.
Declaration of RoHS2 Compliance This product has been designed and manufactured in compliance with Directive 2011/65/EU of the European Parliament and the Council on restriction of the use of certain hazardous substances in electrical and electronic equipment (RoHS2 Directive) and is deemed to comply with the maximum concentration values issued by the European Technical Adaptation Committee (TAC) as shown below: Substance Proposed Maximum Concentration Actual Concentration Lead (Pb) 0.1% < 0.
Copyright Information Copyright © ViewSonic® Corporation, 2014. All rights reserved. ViewSonic, the three birds logo, OnView, ViewMatch, and ViewMeter are registered trademarks of ViewSonic Corporation. Disclaimer: ViewSonic Corporation shall not be liable for technical or editorial errors or omissions contained herein; nor for incidental or consequential damages resulting from furnishing this material, or the performance or use of this product.
Important Safety Instructions USE 1. 2. 3. 4. 5. 6. 7. 8. 9. 10. 11. 12. AC power Cord Keep the following guidelines to protect the AC power cord from being damaged. If the AC power cord is damaged, it may result in a fire or an electric shock. Stop using it and ask your dealer or ViewSonic service center to exchange it. • Do not place the display where the power cord is subject to wear or abuse. • Do not pinch, bend, or twist the cord excessively.
Optional equipment If optional equipment is to be installed, leave some space between optional equipment and the display set. Picture distortion and/or noisy sound may occur if the display set is positioned in close proximity to any equipment emitting electromagnetic radiation. Section 810 of the National Electrical Code (NEC) in the U.S.A.
• When lifting or moving the display, hold it securely from the bottom. Place your palm directly under the panel. Do not install the display set as follows: Air circulation is blocked. Objects and ventilation holes Never push any objects into the slots on the display cabinet as they may touch dangerous voltage points or short out parts that could result in a fire or an electric shock. Do not place any objects on the display. VENTILATION Slots and openings in display are provided for ventilation.
Broken pieces Do not throw anything at the display. Doing so may break the screen glass and cause serious injury. If the surface of the display cracks, unplug the AC power cord before touching the display. Otherwise electric shock may result. • Do not install the display in a place exposed to direct air conditioning. • If the display is installed in such a location, moisture may condense inside and may cause a malfunction. • Do not place the display in hot, oily, humid or excessively dusty places.
Getting Started Package Contents Please make sure the following items are included with your display. If any items are missing, please contact your dealer.
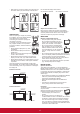
Installing the Display Installing the Stand (For 65”) 400 400 Place the display face down on a protective surface. Afterwards attach the neck piece onto the display and screw in the 4 screws to secure the neck. then insert the neck onto the bottom stand and secure the parts by inserting the screws and tightening them with the screwdriver provied. Note: Attaching the stand requires two people.
Installing the Stand (For 42”) Screw type1 x 5pcs TYPE1 TYPE2 Screw type2 x 5pcs Place the display face down on a protective surface. Afterwards attach the neck piece onto the display and screw in the 5 screws to secure the neck. then insert the neck onto the bottom stand and secure the parts by inserting the screws and tightening them with the screwdriver provied. Note: Attaching the stand requires two people.
Mounting ViewSonic display to the wall The display can be used in a free standing position or wall-mounted. Before installing the product to the wall, please consider the following guidelines: • Read the Important Safety Instructions, at the start of this manual. • Do not install in a moist or wet environment. This equipment is intended for indoor use. • Do not install near heat source, or strong magnetic fields. • Use only ViewSonic approved wall-mounting brackets to support the display weight.
Wall Mount Kit Specifications (VESA) When attaching to other building materials, please contact your nearest dealer. A C B D Product Family inch VESA Spec. (A x B) Standard Screw (C x D) Quantity display 42 200 x 200 mm M6 x L20 4 display 32 200 x 100 mm M6 x L20 4 A 400 400 B C D Product Family inch VESA Spec. (A x B) Standard Screw (C x D) Quantity display 64.
FRONT View & SIDE View of the Product 1 2 3 4 5 (CDE3200-L/CDE4200-L) 76 8 5 4 3 2 1 (CDE6500-L) 76 Item 1 Volume Icon Description VOL + Increase the volume. Move to the right or adjust the setting on the OSD menu. VOL - Decrease the volume. Move to the left or adjust the setting on the OSD menu. Move upward to scroll through menu options. Move downward to scroll through menu options. Menu MENU Turn the on-screen display (OSD) menu on / off. 4 Input INPUT Select the input source.
Rear View of the Product 1 HDMI1 REMOTE CONTROL OUT HDMI2 2 HDMI3 6 7 Item SPDIF OUT RS232 PC/VGA VIDEO IN AUDIO IN PC/VGA IN 4 3 5 USB EARPHONE OUT AUDIO IN 8 R L Y 9 Pb Pr 10 Description 1 HDMI input Connect to the HDMI output of A/V devices. 2 SPDIF Optical output Connect to the SPDIF input of A/V device. 3 RS232 signal input Reserved for the service technician’s use. 4 USB Connect to USB devices, such as USB flash drive. 5 Earphone Jack Connect to earphones.
Connecting the Display HD Cable Box/HD Satellite Box You can also enjoy high-definition programming by subscribing to a high-definition cable service or a highdefinition satellite service. For the optimum picture quality, be sure to connect this device to your display via the HDMI or component video (with audio) input on the rear side of your display.
HDMI Timing Reference Chart No.
AV Connection Rear side of the display HD cable box / HD satellite box COMPONENT VIDEO OUT LINE OUT R Pr Y DVI-HDTV OUT IN AUDIO L Pb VIDEO HDMI OUT OUT CATV / Satellite antenna cable AV cable AV cable Programming your Cable or Satellite Box remote Refer to the user manual from your service provider to determine the setting. If it requires: • 3 digits, please try “566”, “565”, “556”, or “688”. It usually works with DISHNetwork. • 4 digits, please try “0054”. It usually works with Cox.
PC Timing Reference Chart No. 1 VGA Timing Panel FullHD (1920 x 1080) Support Mode Resolution H sync (kHz) V sync (Hz) Pixel clock (MHz) Polarity Support IBM VGA 720 x 400 31.47 70.09 28.32 N/P V 2 VESA DMT 640 x 480 31.5 59.94 25.175 N/N V 3 VESA DMT 800 x 600 37.88 60.32 40 P/P V 4 VESA DMT 1024 x 768 48.36 60 65 N/N V 5 VESA DMT 1280 x 768 47.77 59.8 79.5 N/P V 6 VESA DMT 1280 x 800 49.7 59.81 83.5 N/P NA 7 VESA DMT 1280 x 1024 63.98 60.
Using the Display Features Remote Control and Display Controls Inserting Remote Control Batteries 1. Remove the battery cover by pulling then lifting the knob on the cover. 2. Insert the batteries, corresponding to the (+) and (-) markings on the battery compartment. 3. Reattach the battery cover. CAUTION • Only use the specified AAA batteries. • Do not mix new and old batteries. This may result in creaking or leakage, which may pose a risk of fire or lead to personal injury.
Touch keys located at the front side of the display operate the same as these buttons on the remote control. Button Description 1 POWER Press this button to turn the power on from standby mode. Press it again to return to standby mode. 2 TV This function is not available for this model. (Only for TV) Press to display the current state of the display. 3 INFO HDMI 1080p 60Hz Aug-18 15:02 Sat 4 0~9, - number buttons Press the respective button to input a character or number.
Operation Turning the Display On and Off Press on the remote control. You can also use the key on the front side of the panel. * If there is no input signal within 10 minutes, the display will be turned off automatically. Adjusting the Volume Press VOL +/- to adjust volume. To turn off the volume, press MUTE. To restore volume, press MUTE again, or press VOL +/- directly.
Selecting the Input Source To select the input sources connected to the display: 1. Press SOURCE on the remote control. 2. Press or to select the desired input source. 3. To confirm the selection, press ENTER. Source Select AV YPbPr HDMI 1 HDMI 2 HDMI 3 PC USB Using the Parent Controls With PARENT CONTROL, you can block display and movie programming based on Movie ratings. Password is required to access the PARENTAL CONTROL menu. The default is “0000”. Changing Password To change a new password: 1.
Blocking Selected Input Source To block the selected input source: 1. Press MENU to display the OSD main menu. 2. Press or to select PARENTAL menu, then press ENTER to enter the menu. 3. Enter the password. 4. Press or to select Source Lock, then press ENTER to enter its submenu. 5. Press or to select the input source that you want to block. 6. Press ENTER to confirm. icon indicates the selected input source has A been blocked. 7. Press EXIT to exit the menu.
Customizing PC Display Connect the PC and your display using the VGA cable. See “Personal Computer” on page 10. 1. Press SOURCE to display the Source Select PICTURE menu. 2. Press or to select PC, then press ENTER to confirm the setting. 3. Press MENU to display the OSD main menu. 4. Press or to select PICTURE menu, then press ENTER to enter the menu. 5. Press or to select PC Settings, then press PC SETTINGS ENTER to enter its submenu. 6.
Playing Music 1. Press or to select Music, then press ENTER. If there are several folders, press or to select the desired folder, then press ENTER to view the subfolder content. 2. Press or to select a song, then press ENTER to play. An automatic playback begins from the selected song. 3. During the playback, do the following: • To pause the playback, press or to select icon, then press ENTER. Press or to select icon, then press ENTER to resume.
Customizing Slide Show Settings 1. Press or to select Media Setting, then press ENTER. 2. Press or to select the menu item, and press or to adjust the setting. Menu item Slideshow Interval 5S Slideshow Effect Random Slideshow Repeat Off Slide Mode Order Background Music On Music Play Mode Order Music Play Repeat Off Music Auto Play Off Description Slideshow Interval Set the interval time between each slide displays (3 S / 5 S / 10 S / 30 S / 1 Min / 30 Min).
Picture Menu Menu item PICTURE Picture Settings Screen Size Wide Apply a preset picture mode optimized for different viewing conditions (Standard / Movie / User / Power Saving / Dynamic). * If Picture Settings is set to User, you can adjust the following settings: • Brightness: Adjust the brightness setting. • Contrast: Adjust the difference between the light and dark levels in the picture. • Saturation: Adjust the color detail of images. • Hue: Adjust the picture hue.
Sound Menu Menu item SOUND Sound Settings Analog Sound Stereo Apply a preset audio option optimized for different sounding conditions (Standard / Soft / User / Dynamic). * If Sound Settings is set to User, you can adjust the following settings: • Bass: Adjust the bass level to your preference. • Treble: Adjust the treble level to your preference. • Balance: Adjust the sound balance between the left and right speakers. Analog Sound Select the analog audio mode (Mono / SAP / Stereo).
Setup Menu Menu item SETUP Closed Caption Menu Language English Set Closed Caption (CC) settings. • Caption Display: Enable/Disable the caption display. • Analog Caption Type: Set the analog CC display type. Menu Language Select the on-screen menu language. Clock Set the time settings. • Setup Time: Set the current date and time. • Day of Week: Display the day of the week. • Daylight Saving Time: Set to turn on/off daylight saving. • Time Format: Select the time format.
Hospitality Menu 1. Press MENU and 9, 9, 3 button on the remote controller to display the Hospitality menu. 2. Press or to select the menu item, then press or to adjust or select the setting. When selecting a menu item with a submenu ( > > ), press or ENTER to enter its submenu. 3. Press MENU to return to the previous menu or press EXIT to exit the menu.
Other Information Troubleshooting Please contact ViewSonic service team directly if you have questions, service needs, or require technical assistance related on the use of your display. Contact ViewSonic Service Team at: http://www.ViewSonic.com Or call our service team: United States 1-800-688-6688 Canada 1-866-463-4775 Europe +44 (0) 207 382 8250 Problem Possible Solution No power • Make sure the AC power cord is properly connected to the wall outlet.
Problem Possible Solution Unit cannot be operated • External influences such as lightning or static electricity may cause improper operation. In this case, operate the unit after first turning on the power of the display and the AV System, or unplug the AC cord for 1 to 2 minutes, then replug again. Power is cut off suddenly • Make sure the sleep timer is turned off. • Make sure the PC or video signal cable is connected properly. • The internal temperature of the unit has increased.
Specifications Model (LED Backlight) Input signal Compatibility CDE4200-L CDE3200-L Screen Size 42-inch FHD 60Hz 32-inch FHD 60Hz Aspect Ratio 16:9 RGB 1 RGB analog (0.7/1.0 Vp-p, 75 ohms) Separate Sync, fh: 31.47-63.98 kHz, fv:59.8-70.
Model (LED Backlight) Input signal Compatibility CDE6500-L Screen Size 64.5-inch FHD 60Hz Aspect Ratio 16:9 RGB 1 RGB analog (0.7/1.0 Vp-p, 75 ohms) Separate Sync, fh: 31.47-63.98 kHz, fv:59.8-70.
RS232 Protocol 1. Introduction This document describes the hardware interface spec and software protocols of RS232 interface communication between Viewsonic Commercial Display and PC or other control unit with RS232 protocol. The protocol divide into three sections: • Set-Function • Get-Function • Remote control pass-through mode ※ In below document, “PC” will represents all the control units that can sent or receive the RS232 protocol command. 2. Description 2.
3. Protocol 3.1 Set-Function Listing The PC can control the display for specific actions. The Set-Function command allows you to control the display behavior in a remote sit through the RS232 port. The Set-Function packet format consists of 9 bytes. Set-Function description: Length: Total Byte of Message excluding “CR” ID: Identification for each of display If we want to set all settings, ID can use “99” to achieve, and it will not have Reply command on this function.
Example2: Set Brightness as 176 for TV-02 and this command is NOT valid.
Number 8 s @ 40 000~009 Key Pad 8 s A 41 000: UP 001: DOWN 002: LEFT 003: RIGHT 004: ENTER 005: INPUT 006: MENU/EXIT Remote Control 8 s B 42 000: Disable 001: Enable 002: Pass through Disable: RCU has no effect on HDTV. Enabled: RCU controls the HDTV. This is the power up default on the HDTV. Pass through: RCU has no effect on HDTV and all RCU command codes are transmitted to FC via the RS232 port. Restore default 8 s ~ 7E 000 Resets HDTV to factory setting Note: 1.
3.2 Get-Function Listing The PC can interrogate the display for specific information. The Get-Function packet format consists of 9 bytes which is similar to the Set-Function packet structure. Note that the “Value” byte is always = 00.
Reply (Hex Format) Name Length ID Hex 0x38 0x30 0x35 Command Type Command 0x72 0x62 Value1 Value2 Value3 CR 0x30 0x36 0x37 0x0D Example2: Get Brightness from TV-05 , but the Brightness command ID is error and it is NOT in the command table.
3.3 Remote Control Pass-through mode When PC sets the display to Remote Control Pass through mode, the display shall send a 7 bytes packet (followed by “CR”) in response to RCU button activation. Note, that in this mode the RCU shall have no effect on the display function. For example: “Volume+” will not change the volume in the but only sends “Volume+” code to PC over the RS232 port.
18 SLEEP 19 MENU 1A UP 1B DOWN 1C LEFT 1D RIGHT 1E OK (ENTER) 1F EXIT 20 21 22 23 24 25 26 27 28 29 2A 2B 2C 2D 2E 2F Note: 1. This IR-pass-through code is different with RCU key code. 2. Special control sequence for POWER key under IR-pass through mode. 2-1. When display is OFF and receives the POWER code: The display will turn on itself, then forward the POWER code to the host via RS232. 2-2.
Customer Support For technical support or product service, see the table below or contact your reseller. NOTE: You will need the product serial number. Use with other Wall-Mount kit may cause instability and possibly result in injury. To find the perfect mount for CDE6500-L/CDE4200-L/CDE3200-L, please browse www.viewsonic.com or call our service team: United States 1-800-688-6688, Canada 1-866-463-4775, Europe +44 (0) 207 382 8250.
Limited Warranty ViewSonic® LCD Commercial Display What the warranty covers: ViewSonic warrants its products to be free from defects in material and workmanship, under normal use, during the warranty period. If a product proves to be defective in material or workmanship during the warranty period, ViewSonic will, at its sole option, repair or replace the product with a like product. Replacement product or parts may include remanufactured or refurbished parts or components.
Limitation of implied warranties: There are no warranties, express or implied, which extend beyond the description contained herein including the implied warranty of merchantability and fitness for a particular purpose. Exclusion of damages: ViewSonic’s liability is limited to the cost of repair or replacement of the product. ViewSonic shall not be liable for: 1.
Mexico Limited Warranty ViewSonic® LCD Commercial Display What the warranty covers: ViewSonic warrants its products to be free from defects in material and workmanship, under normal use, during the warranty period. If a product proves to be defective in material or workmanship during the warranty period, ViewSonic will, at its sole option, repair or replace the product with a like product. Replacement product or parts may include remanufactured or refurbished parts or components.
Contact Information for Sales & Authorized Service (Centro Autorizado de Servicio) within Mexico: Name, address, of manufacturer and importers: México, Av. de la Palma #8 Piso 2 Despacho 203, Corporativo Interpalmas, Col. San Fernando Huixquilucan, Estado de México Tel: (55) 3605-1099 http://www.viewsonic.com/la/soporte/index.htm NÚMERO GRATIS DE ASISTENCIA TÉCNICA PARA TODO MÉXICO: 001.866.823.2004 Hermosillo: Distribuciones y Servicios Computacionales SA de CV. Calle Juarez 284 local 2 Col. Bugambilias C.