CDP4237-L CDP4737-L CDP5537-L User Guide IMPORTANT: Please read this User Guide to obtain important information on installing and using your product in a safe manner, as well as registering your product for future service.
Compliance Information For U.S.A. This device complies with part 15 of FCC Rules. Operation is subject to the following two conditions: (1) this device may not cause harmful interference, and (2) this device must accept any interference received, including interference that may cause undesired operation. This equipment has been tested and found to comply with the limits for a Class B digital device, pursuant to part 15 of the FCC Rules.
Important Safety Instructions 1. Read these instructions completely before using the equipment. 2. Keep these instructions in a safe place. 3. Heed all warnings. 4. Follow all instructions. 5. 'R QRW XVH WKLV HTXLSPHQW QHDU ZDWHU :DUQLQJ 7R UHGXFH WKH ULVN RI ¿UH RU HOHFWULF VKRFN GR QRW H[SRVH this apparatus to rain or moisture. 6. Do not block any ventilation openings. Install the equipment in accordance with the manufacturer’s instructions. 7.
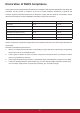
Declaration of RoHS Compliance This product has been designed and manufactured in compliance with Directive 2002/95/EC of the European Parliament and the Council on restriction of the use of certain hazardous substances in electrical and electronic equipment (RoHS Directive) and is deemed to comply with the maximum concentration values issued by the European Technical Adaptation Committee (TAC) as shown below: Substance Proposed Maximum Concentration Actual Concentration Lead (Pb) 0,1% < 0,1% Mercury
Copyright Information Copyright © ViewSonic® Corporation, 2012. All rights reserved. ViewSonic®, the three birds logo, OnView®, ViewMatch™, and ViewMeter® are registered trademarks of ViewSonic® Corporation. ENERGY STAR® is a registered trademark of the U.S. Environmental Protection Agency (EPA).
CONTENTS 4 5 LICENSES ASSEMBLING AND PREPARING 22 ENTERTAINMENT 22 - Connecting to a wired network 23 - Network Status 24 - Connecting USB storage devices 25 - Browsing files 5 Accessories 26 - Viewing movies 6 Optional Accessories 30 - Viewing photos 7 Parts and buttons 33 - Listening to music 8 Using the Mounting Cable Tie 36 - DivX® VOD Guide 8 Connecting the Speakers 37 - Using PIP/PBP 9 Connecting the stand 9 Using the Kensington security system 10 Portrait Layout
56 TROUBLESHOOTING 59 SPECIFICATIONS 67 IR CODES 68 CONTROLLING THE MULTIPLE PRODUCT 68 Connecting the cable 68 RS-232C Configurations 68 Communication Parameter 3
LICENSES Supported licenses may differ by model. For more information of the licenses, visit www.ViewSonic.com. HDMI, the HDMI logo and High-Definition Multimedia Interface are trademarks or registered trademarks of HDMI Licensing LLC. ABOUT DIVX VIDEO: DivX is a digital video format created by DivX, LLC, a subsidiary of Rovi Corporation. This is an official DivX Certified device that plays DivX video. Visit divx.com for more information and software tools to convert your files into DivX videos.
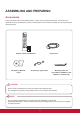
ASSEMBLING AND PREPARING Accessories Check your product box for the following items. If there are any missing accessories, contact the local dealer where you purchased your product. The illustrations in this manual may differ from the actual product and accessories. POWER ENERGY MONITOR INPUT OFF ON SAVING X [ ^ .
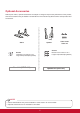
Optional Accessories Without prior notice, optional accessories are subject to change to improve the performance of the product, and new accessories may be added. The illustrations in this manual may differ from the actual product and accessories. Stand Speaker Cable holder /Cable Tie Screws Screws Diameter 4.0 mm x Pitch 0.7 mm x Length 8 mm(Included Spring Washer) : Diameter 4.0 mm x Pitch 0.
Parts and buttons Screen Buttons Screen Marks IR Receiver / Power Indicator y Lighting On: Turned on y Lighting Off: Turned off MEZ63829306(REV00) Connection panel Screen Marks Description INPUT Changes the input source. MENU Accesses the main menus, or saves your input and exits the menus. Adjust the up and down. Adjusts the volume level. AUTO/SET Displays the current signal and mode. Press this button to adjust the screen automatically (available only in RGB mode) Turns the power on or off.
Using the Mounting Cable Tie Connecting the Speakers - Applicable only to CDP4237-L and CDP4737-L models. 1 Connect an input signal cable to use before - Only on some models. installing the speakers. First, connect the input signal cable to be used. Insert the cable tie into the bottom hole on the back as shown in the figure to organize cables. 2 Mount the speaker by using a screw as shown in the following. Then connect the speaker cable.
Connecting the stand Using the Kensington security system - Only on some models. The Kensington security system connector is located at the back of the Monitor. For more information of installation and using, refer to the manual supplied with the Kensington security system or visit http://www.kensington.com . 1 Place a soft cloth on the table and put the product with the screen facing downward. Connect the stand as shown in the following picture.
Portrait Layout - Only on some models. When installing in a Portrait Layout, rotate the monitor clockwise 90 degrees (when facing the screen).
Mounting on a wall CAUTION For proper ventilation, allow a clearance of 10 cm on each side and from the wall. Detailed installation instructions are available from your dealer, see the optional Tilt Wall Mounting Bracket Installation and Setup Guide. Disconnect the power before installing or y moving the monitor. Otherwise electric shock may occur. If you install the Monitor on a ceiling or y slanted wall, it may fall and result in severe injury.
REMOTE CONTROL The descriptions in this manual are based on the buttons of the remote control. Please read this manual carefully and use the Monitor correctly. To replace batteries, open the battery cover, replace batteries (1.5 V AAA) matching and ends to the label inside the compartment, and close the battery cover. To remove the batteries, perform the installation actions in reverse. CAUTION Do not mix old and new batteries, as this y may damage the remote control.
MENU (See p.39) Accesses the main menus or saves your input and exit menus. AUTO Automatically adjusts picture position and minimizes image instability.(RGB input only) Navigation buttons Scrolls through menus or options. NESS MENU OK Selects menus or options and confirms your input. BACK Allows the user to move back one step. E MUTE AUTO OK BACK TILE ID ON OFF EXIT EXIT Clears all on-screen displays and returns to Monitor viewing from any menu. TILE Selects the TILE Mode.
USING THE MONITOR Connecting to a PC CAUTION Your Monitor supports the Plug & Play* feature. y Connect the signal input cable and tighten it by turning the screws clockwise. y D o n o t p r e s s t h e screen with your finger for a long time as this may result in temporary distortion on the screen. Avoid displaying a fixed image on the screen y for a long period of time to prevent image burn. Use a screensaver if possible.
RGB connection DVI-D connection Transmits the analog video signal from your PC to the Monitor. Connect the PC and the Monitor set with the 15 pin signal cable as shown the following illustrations. Select RGB input source on the monitor. Transmits the digital video signal from your PC to the Monitor. Connect the PC and the Monitor set with the DVI cable as shown the following illustrations. Select DVI-D input source on the monitor.
HDMI connection Display Port connection Transmits the digital video and audio signals from your PC to the Monitor. Connect the PC and the Monitor with the HDMI cable as shown in the following illustrations. Select HDMI input source. Transmits the digital video and audio signals from your PC to the Monitor. Connect the PC and the Monitor with the Display Port cable as shown in the following illustrations. Select Display Port input source.
Adjusting the screen Customizing image options Selecting an image mode Customize basic and advanced options of each image mode for the best screen performance. Display images in its optimized settings by selecting one of the preset image modes. 1 Press MENU to access the main menus. 1 Press MENU to access the main menus. 2 Press the Navigation buttons to scroll to PICTURE and press OK. 3 Press the Navigation buttons to scroll to Picture Mode and press OK.
Customizing PC display options Adjusting the sound Customize options of each image mode for the best image quality. This function works in the following mode: y RGB[PC] mode. Selecting an sound mode 1 Press MENU to access the main menus. 1 Press MENU to access the main menus. 2 Press the Navigation buttons to scroll to 2 Press the Navigation buttons to scroll to This Monitor has 5 preset sound modes to compliment different types of video content. AUDIO and press OK. PICTURE and press OK.
Customizing sound options You may customize options of each sound mode for the best sound quality. 1 Press MENU to access the main menus. 2 Press the Navigation buttons to scroll to AUDIO and press OK. Using additional options Adjusting aspect ratio Resize the image to view the image at its optimal size by pressing ARC while you are watching content. 3 Press the Navigation buttons to scroll to Sound Mode and press OK.
- 16:9 : This selection will allow you to adjust the picture horizontally, in linear proportion, to fill the entire screen(useful for viewing 4:3 formatted DVDs). - 4:3 : This selection will allow you to view a picture with an original 4:3 aspect ratio, black bars will appear on both the left and right of the screen. - Just Scan : This Selection will allow you view the picture of best quality without loss of original picture in high resolution image.
Using the input list Selecting an input source 1 Press INPUT to access the input source list. - The connected device displays on each input source. 2 Press the Navigation buttons to scroll to one of the input sources and press OK. Input source Description AV(CVBS) Watch video from a VCR or other external devices.
ENTERTAINMENT Connecting to a wired network (Depending on model) To set up the network seetings: (Even if your display has already connected automatically, running setup again will not harm anything), 1 Press MENU to access the main menus. Connect the display to a local area network (LAN) via the LAN port as shown on the following illustration and set up the network settings. This monitor only supports a wired network connection.
NOTE y If you want to access the Internet directly on your display, the internet connection should always be on. y If you cannot access the Internet, check the network conditions from a PC on your network. y When you use Network Setting, check the LAN cable or check if DHCP in the router is turned on. y If you do not complete the network settings, the network may not work properly. required when using a wired connection to this display.
Tips for using USB storage devices Connecting USB storage devices y Only a USB storage device is recognizable. y If the USB storage device is connected through a USB hub, the device is not recognizable. y A USB storage device using an automatic recognition programme may not be recognized. y A USB storage device which uses its own driver may not be recognized. y The recognition speed of a USB storage device may depend on each device.
y If the USB HDD does not have an external power source, the USB device may not be detected. So be sure to connect the external power source. - Please use a power adaptor for an external power source. We do not guarantee an USB cable for an external power source. y If your USB memory device has multiple partitions, or if you use a USB multi-card reader, you can use up to 4 partitions or USB memory devices.
Supported File Formats Type Movie Supported file format DAT,MPG,MPEG,VOB,AVI,DIVX,MP4,MKV,TS,T RP,TP,ASF,WMV,FLV) Movie(*.mpg/*.mpeg/*dat/*.ts/*.trp/*.tp/*.vob/*. mp4/*.mov/*.mkv/*.divx/*.avi/*.asf/*.wmv/*.flv/*. avi(motion-jpeg)/*. Viewing movies Play video files on display. Your display shows all of the video files saved in a USB storage device. mp4(motion-jpeg)/*.mkv(motion-jpeg))supporting file Video format : DivX3.11, DivX4.12, DivX5.x, DivX6, Xvid1.00, Xvid1.01, Xvid1.02, Xvid1.03, Xvid1.
6 Control playback by using the following buttons. Page 1/1 Movie List USB1 USB Drive 001 002 005 006 003 Move To Photo list Page 1/1 Drive1 Change Numbers 004 Play Page Change Mark 01:02:30 / 02:30:25 Option Exit Mark Mode Hide Exit Page 1/1 Movie List Mark Mode Page 1/1 Drive1 USB1 USB Drive Button 001 002 005 003 004 051. Apple_ ......
When you are watching the movie by Movie y List function, you can adjust an image by Energy Saving key on the remote control. User setup for each image mode does not operate. Tips for using playing video files y Some user-created subtitles may not work properly. y Some special characters are not supported in subtitles. y HTML tags are not supported in subtitles. y Subtitles in languages other than the supported languages are not available.
When you select the Set Video Play,, Code Page Latin1 1 Press the Navigation buttons to scroll to show Support Language English, Spanish, French, German, Italian, Swedish, Finnish, the Picture Size, Audio Language, Subtitle Language or Repeat. Dutch, Portuguese, Danish, Romanian, Norwegian, Albanian, Gaelic, 2 Press the Navigation buttons to scroll to make Welsh, Irish, Catalan,Valencian Bosnian, Polish, Croatian, Czech, Latin2 appropriate adjustments.
When you select the Set Video,, Page 1/1 Photo List USB1 USB Drive 1 Press the Navigation buttons to scroll to make appropriate adjustments. 001 002 010 Page 1/1 Drive1 011 003 004 005 006 012 013 014 015 When you select the Set Audio,, Move View Change Numbers To Music List 007 008 009 Page Change Mark Exit Mark Mode 1 Press the Navigation buttons to scroll to show Page 1/1 the Sound Mode, Clear Voice II or Balance.
Using photo options ENERGY SAVING Use the following options while viewing photos. Option Press the ENERGY SAVING button repeatedly to change the brightness of your screen. y Slide Speed: Selects a slideshow speed (Fast, Medium, Slow). y TransitionEffect: Set the view mode of the slideshow. y BGM: Selects a music folder for the background music. NOTE y You cannot change the music folder while the background music is playing.
When you select the Set Photo View, 1 Press the Navigation buttons to scroll to select Slide Speed,Transition Effect or BGM. 2 Press the Navigation buttons to scroll to make appropriate adjustments. Transition Effect Option Option Description Sliding Pushes the current slide out of view as it plays to the next slide. Stairs Pushes the current slide in a staircase shape as it plays to the next slide.
When you select the Set Video, Listening to music 1 Press the Navigation buttons to scroll to make appropriate adjustments. 1 Press the Navigation buttons to scroll to My Media and press OK. 2 Press the Navigation buttons to scroll to Music When you select the Set Audio, 1 Press the Navigation buttons to scroll to show List and press OK. 3 Press the Navigation buttons to scroll to a folder the Sound Mode, Clear Voice II or Balance.
Tips for playing music files 6 Control playback by using the following buttons. This unit doesn't support the ID3 Tag y embedded MP3 files. Page 1/1 Music List 3 file(s) Marked 004. - B04.mp3 00:00 Drive1 005. - B05.mp3 00:00 Page 1/1 006. - B06.mp3 00:00 007. - B07.mp3 00:00 005. - B05.mp3 02:30 / 03:25 Option Play with Photo Button NOTE 008. - B08.mp3 00:00 Hide Exit y Non-supported files are displayed the preview image by icon only .
Music options 1 Press MENU to access the Pop-Up menus. NOTE 2 Press the Navigation buttons to scroll to Set Au- y If there is the AutoPlay folder in the USB device and its files are in supported formats, they can be played back automatically when the USB device is connected to the monitor. dio Play. or Set Audio. and press OK. NOTE y Option values changed in Movie List does not affect Photo List and Music List.
DivX® VOD Guide DivX® VOD Registration NOTE In order to play purchased or rented DivX® VOD contents, you should register your device with 10 digit DivX registration code from your device at www.divx.com/vod. y While you are checking the registration code, some buttons may not work. y If you use the DivX registration code of another device, you cannot play the rented or purchased DivX file. Make sure to use the DivX registration code assigned to your TV.
DivX® VOD Deregistration Using PIP/PBP You should deregister your device with 8 digit DivX deregistration code from your device at www.divx. com/vod. Videos or pictures stored on the USB device can be displayed on a single monitor by dividing them into the main and subscreens. (See p.49) 1 Press MENU to access the main menus. 2 Press the Navigation buttons to scroll to MY MEDIA and press OK. 1 Press the MENU button to move to OPTION 3 Press the Blue button. and press OK.
4 Select a file you want and then press OK. 6 For sound select either Main or Sub. You must to select the output sound before running the PIP or PBP function. Page 1/1 Movie List Page 1/1 Drive1 USB1 USB Drive 001 002 005 006 003 004 051. Apple_ ... 02:30:25 Select the sound path. Main Move Change Numbers To Photo list Play Page Change Sub Mark Exit Mark Mode 7 The sub screen is displayed on the main screen. 5 Select the PIP or PBP icon from the play list.
CUSTOMIZING SETTINGS Accessing main menus ARC P PSM BRIGHT A NESS G E 1 Press MENU to access the main menus. 2 MUTE MENU Press the Navigation buttons to scroll to one of the following menus and press OK. AUTO OK BACK TILE EXIT ID 3 Press the Navigation buttons to scroll to the setting or option you want ON OFF and press OK. 4 When you are finished, press EXIT. When you return to the previous menu, press BACK. PICTURE (See p.40) Adjusts the image size, quality, or effect.
PICTURE settings PICTURE OK Aspect Ratio 1 Press MENU to access the main menus. 2 Move Energy Saving Press the Navigation buttons to scroll to PICTURE and press OK. Picture Mode Screen 3 Press the Navigation buttons to scroll to the setting or option you want and press OK. - To return to the previous level, press BACK. 4 When you are finished, press EXIT. When you return to the previous menu, press BACK.
Setting SCREEN (In RGB Mode Only) Description Customizes the PC display options in RGB mode. Option Resolution Selects a proper resolution. See “Customizing PC display options”. Auto Config. Adjusts the screen position, clock, and phase automatically. The displayed image may be unstable for a few seconds while the configuration is in progress. Position/Size/ Phase Adjusts the options when the picture is not clear, especially when characters are shaky. Run Auto Config. before adjusting these.
Advanced Control Setting Description Dynamic Contrast (Off/High/Medium/Low) Adjusts the contrast to keep it at the best level according to the brightness of the screen. The picture is improved by making bright parts brighter and dark parts darker. (This function can be used only under AV(CVBS) and Component.) Dynamic Color (Off/High/Low) Adjusts screen Colors so that they look livelier, richer and clearer.
AUDIO settings AUDIO Move OK Clear Voice II 1 Press MENU to access the main menus. Balance 2 Press the Navigation buttons to scroll to AUDIO and press Sound Mode Digital Audio Input OK. Speaker 3 Press the Navigation buttons to scroll to the setting or option you want and press OK. - To return to the previous level, press BACK. 4 When you are finished, press EXIT. When you return to the previous menu, press BACK.
TIME settings TIME Move OK Clock 1 Press MENU to access the main menus. Off Time 2 Press the Navigation buttons to scroll to TIME and press On Time Sleep Timer OK. Power On Delay 3 Press the Navigation buttons to scroll to the setting or option Auto Off Automatic Standby you want and press OK. - To return to the previous level, press BACK. 4 When you are finished, press EXIT. When you return to the previous menu, press BACK.
OPTION settings OPTION Move OK Language 1 Press MENU to access the main menus. Power Indicator 2 Press the Navigation buttons to scroll to OPTION and press OK. ISM Method DPM Select Fail Over Factory Reset 3 Press the Navigation buttons to scroll to the setting or option Set ID you want and press OK. Tile Mode - To return to the previous level, press BACK. Key Lock PIP/PBP Product/Service Info. 4 When you are finished, press EXIT.
Setting Tile Mode Description Tile Mode To use this function - Must be displayed with various other products. - Must be in a function that can be connected to RGB Cable by distributor and RS-232C. Tile mode and choose Tile alignment and set the ID of the current product to set location. * Only after pressing the SET button the adjustments made to the settings will be saved. - Tile mode : column x row ( c = 1, 2, 3, 4, 5 r = 1, 2, 3, 4, 5) - 5 x 5 available.
Setting Description Key Lock Key input does not work. This prevents invalid key input. Product/Service Info. Displays the model name, software version, serial number, IP address, MAC address and home page. Portrait mode Rotate OSD clockwise ( 270°, 90°) Option Rotate OSD clockwise 270°. 90° Rotate OSD clockwise 90°.
Tile Mode Tile Mode - Natural mode This monitor can be tiled with additional monitors to create a large tiled display. Off When the Tile Mode option is disabled When active, the part of the image that would normally be displayed in the gap between the monitors is omitted.
PIP/PBP NOTE Displays videos or photos stored in the USB device on a single monitor by dividing it into the main and sub screens. (See p.37) y The subscreen is only supported when using the USB device. Sub USB Mode *PIP(Picture In Picture): Displays the Sub screen in the main screen. *PBP(Picture By Picture): Displays the Sub screen next to the main screen.
NETWORK settings NETWORK Network Setting 1 Press MENU to access the main menus. Network Status 2 Press the Navigation buttons to scroll to NETWORK and press OK. 3 Press the Navigation buttons to scroll to the setting or option you want and press OK. - To return to the previous level, press BACK. 4 When you are finished, press EXIT. When you return to the previous menu, press BACK.
MAKING CONNECTIONS Connect various external devices to the ports on the Monitor’s back panel. 1 Find an external device you want to connect to your Monitor shown on the following illustration. 2 Check the connection type of the external device. 3 Go to the appropriate illustration and check the connection details. HD Receiver HDMI - See p.52 Component - See p.52 AV(CVBS) - See p.53 DVD HDMI - See p.52 Component - See p.52 AV(CVBS) - See p.53 VCR AV(CVBS) - See p.53 Component - See p.
Connecting to a HD receiver, DVD, Camcorder, Camera, Gaming Device or VCR player Connect a HD receiver, DVD, or VCR player to the Monitor and select an appropriate input mode. Component connection Transmits the analog video and audio signals from an external device to the Monitor. Connect the external device and the Monitor with the 15 pin signal to RCA cable as shown on the following illustration. To display images by using progressive scan, make sure to use the component cable.
AV(CVBS) connection Connecting to a USB Transmits the analog video and audio signals from an external device to the Monitor. Connect the external device and the Monitor with the 15 pin signal to RCA cable as shown on the following illustration. Connect a USB storage device such as s USB flash memory, external hard drive, MP3 player or a USB memory card reader to the Monitor and access the USB menu to use various multimedia files.
Connecting to the LAN NOTE Using LAN establishes communication y between your PC and the monitor and enables to use the OSD menus on the PC as well as on the monitor. LAN connection A Connect PC to Monitor directly. LAN PC Monitor B Using a router(Switch) LAN Switch Monitor PC C Using the Internet.
Daisy Chain Monitors Use this function to share the RGB video signal with other monitors without having to use a separate signal splitter box.
TROUBLESHOOTING No image is displayed Problem Resolution Is the product power cord connected? y See if the power cord is properly connected to the outlet. Is the power indicator light on? y y y y Power is on, power indicator is blue but the screen appears extremely dark. The power indicator amber? Does the 'Out of range' message appear? Does the 'Check signal cable' message appear? See if the power switch is turned on. May need service. Adjust brightness and contrast again.
'Key Lock On' message appears. Problem The 'Key Lock On' message appears when pressing the Menu button. Resolution The Lock function prevents the OSD settings from being changed inadvertently. To release the lock, go to Menu and Option and disable the Key Lock option. The screen image looks abnormal. Problem Is the screen position wrong? Resolution y D-Sub analog signal - Press the "AUTO" button in the remote control to automatically select the optimal screen status that fits into the current mode.
The audio function does not work. Problem Resolution Sound is too dull. y y y y Sound is too low. y Adjust the volume. No sound? See if the audio cable is connected properly. Adjust the volume. See if the sound is set properly. Adjust the Clear Voice ll, Treble and Bass appropriately. Screen color is abnormal. Problem Resolution Screen has poor color resolution y Set the number of colors to more than 24 bits (true color) Select (16 colors).
SPECIFICATIONS CDP4237-L LCD Panel Screen Type Video Signal Pixel Pitch Max. Resolution 1067.31 mm Wide (42 inch) TFT (Thin Film Transistor) LCD (Liquid Crystal Display) Panel. Visible diagonal size : 1067.31 mm 0.4845 mm (H) x 0.4845 mm (V) RGB : 1920 X 1080 @60 Hz HDMI,DVI-D, Display Port : 1920 X 1080 @60 Hz - It may not be supported depending on the OS or video card type.
Dimensions (Width x Height x Depth) / Weight 991.7 mm x 584.3 mm x 37.5 mm / 12.6 kg 991.7 mm x 659.2 mm x 298.3 mm / 14 kg 991.7 mm x 584.3 mm x 75.7 mm / 13.4 kg 991.7 mm x 659.2 mm x 298.3 mm / 14.8 kg * Applicable only for models that support the speakers Audio RMS Audio Output Input Sensitivity Speaker Impedance 10 W + 10 W (R + L) 0.7 Vrms Product specifications shown above may be changed without prior notice due to upgrade of product functions.
CDP4737-L LCD Panel Screen Type Video Signal Pixel Pitch Max. Resolution 1192.78 mm Wide (47 inch) TFT (Thin Film Transistor) LCD (Liquid Crystal Display) Panel. Visible diagonal size : 1192.78 mm 0.5414 mm (H) x 0.5414 mm (V) RGB : 1920 X 1080 @60 Hz HDMI,DVI-D, Display Port : 1920 X 1080 @60 Hz - It may not be supported depending on the OS or video card type.
Dimensions (Width x Height x Depth) / Weight 1102.0 mm x 646.4 mm x 37.4 mm / 17.5 kg 1102.0 mm x 720.9 mm x 298.3 mm / 18.9 kg 1102.0 mm x 646.4 mm x 74.1 mm / 18.3 kg 1102.0 mm x 720.9 mm x 298.3 mm / 19.7 kg * Applicable only for models that support the speakers Audio RMS Audio Output Input Sensitivity Speaker Impedance 10 W + 10 W (R + L) 0.7 Vrms Product specifications shown above may be changed without prior notice due to upgrade of product functions.
CDP5537-L LCD Panel Screen Type Video Signal Pixel Pitch Max. Resolution 1387.80 mm Wide (55 inch) TFT (Thin Film Transistor) LCD (Liquid Crystal Display) Panel. Visible diagonal size : 1387.80 mm 0.630 mm(H) x 0.630 mm(V) RGB : 1920 X 1080 @60 Hz HDMI,DVI-D, Display Port : 1920 X 1080 @60 Hz - It may not be supported depending on the OS or video card type.
Dimensions (Width x Height x Depth) / Weight 1281.6 mm x 752.4 mm x 37.8 mm / 21.8 kg 1281.6 mm x 825.7 mm x 298.3 mm /23.2 kg 1281.6 mm x 752.4 mm x 79.1 mm / 22.5 kg 1281.6 mm x 825.7 mm x 298.3 mm / 23.9 kg * Applicable only for models that support the speakers Audio RMS Audio Output Input Sensitivity Speaker Impedance 10 W + 10 W (R + L) 0.7 Vrms Product specifications shown above may be changed without prior notice due to upgrade of product functions.
Dimensions The illustrations in this manual may differ from the actual product and accessories. Please see the "Mounting on a wall" section for sizes of screws. ( See p.11 ) (Unit : mm) 42 inch 47 inch 55 inch A 991.7 1102.0 1281.6 B 298.3 298.3 298.3 C 37.5 37.5 37.8 D 76.1 76.1 80.0 E 584.3 646.4 752.4 F 659.2 720.9 825.7 G 726.0 824.2 950.0 H 27.6 28.0 33.5 I 27.6 28.0 33.5 J 27.6 28.0 33.5 K 102.4 102.5 106.8 L 140.3 140.3 136.4 M 295.9 351.0 440.
DTV Mode RGB (PC) supported mode Resolution Horizontal Vertical Frequency(kHz) Frequency(Hz) 640 x 350 31.469 Resolution Component HDMI,Display Port (DTV) 70.8 480i o x 576i o x 720 x 400 31.468 70.8 640 x 480 31.469 59.94 480p o o 576p o o 640 x 480 37.5 75 800 x 600 37.879 60.317 800 x 600 46.875 75 832 x 624 49.725 74.55 1024 x 768 48.363 60 1024 x 768 60.123 75.029 1280 x 720 44.772 59.855 1366 x 768 47.7 60 1280 x 1024 63.981 60.02 1280 x 1024 79.
IR CODES Code (Hexa) Function Note R/C BUTTON 95 ON/OFF 08 R/C BUTTON 0B R/C BUTTON C4 R/C BUTTON (Discrete IR Code) C5 R/C BUTTON (Discrete IR Code) 43 R/C BUTTON 40 Up R/C BUTTON 41 Down R/C BUTTON 07 Left R/C BUTTON 06 Right R/C BUTTON 44 R/C BUTTON 28 R/C BUTTON 5B R/C BUTTON R/C BUTTON 4D 02 Volume R/C BUTTON 03 Volume R/C BUTTON 09 R/C BUTTON E0 ( UP) E1 ( Down) R/C BUTTON R/C BUTTON to R/C BUTTON 10 to 19 Number Key 72 Red Key R/C BUTTON 71 Green
CONTROLLING THE MULTIPLE PRODUCT Use this method to connect several products to a single PC. You can control several products at a y time by connecting them to a single PC. In the Option menu, Set ID must be between 1 and 99 without being duplicated. y Connecting the cable Connect the RS-232C cable as shown in the picture. The RS-232C protocol is used for communication between the PC and product. You can turn the y product on/off, select an input source or adjust the OSD menu from your PC.
Customer Support For technical support or product service, see the table below or contact your reseller. NOTE: You will need the product serial number. Country/Region Website T = Telephone F = FAX Email Australia/New Zealand www.viewsonic.com.au AUS= 1800 880 818 NZ= 0800 008 822 service@au.viewsonic.com Canada www.viewsonic.com T (Toll-Free)= 1-866-463-4775 T (Toll)= 1-424-233-2533 F= 1-909-468-3757 service.ca@viewsonic.com Europe www.viewsoniceurope.com www.viewsoniceurope.
Limited Warranty VIEWSONIC® LCD Commercial Display What the warranty covers: ViewSonic warrants its products to be free from defects in material and workmanship, under normal use, during the warranty period. If a product proves to be defective in material or workmanship during the warranty period, ViewSonic will, at its sole option, repair or replace the product with a like product. Replacement product or parts may include remanufactured or refurbished parts or components.
Exclusion of damages: ViewSonic’s liability is limited to the cost of repair or replacement of the product. ViewSonic shall not be liable for: 1. Damage to other property caused by any defects in the product, damages based upon inconvenience, ORVV RI XVH RI WKH SURGXFW ORVV RI WLPH ORVV RI SUR¿WV ORVV RI EXVLQHVV RSSRUWXQLW\ ORVV RI JRRGZLOO interference with business relationships, or other commercial loss, even if advised of the possibility of such damages. 2.
Mexico Limited Warranty VIEWSONIC® LCD Commercial Display What the warranty covers: ViewSonic warrants its products to be free from defects in material and workmanship, under normal use, during the warranty period. If a product proves to be defective in material or workmanship during the warranty period, ViewSonic will, at its sole option, repair or replace the product with a like product. Replacement product or parts may include remanufactured or refurbished parts or components.
Contact Information for Sales & Authorized Service (Centro Autorizado de Servicio) within Mexico: Name, address, of manufacturer and importers: México, Av. de la Palma #8 Piso 2 Despacho 203, Corporativo Interpalmas, Col. San Fernando Huixquilucan, Estado de México Tel: (55) 3605-1099 http://www.viewsonic.com/la/soporte/index.htm NÚMERO GRATIS DE ASISTENCIA TÉCNICA PARA TODO MÉXICO: 001.866.823.2004 Hermosillo: Villahermosa: Distribuciones y Servicios Computacionales SA de CV.