® ViewSonic VG730m LCD Display IMPORTANT: Please read this User Guide to obtain important information on installing and using your product in a safe manner, as well as registering your product for future service. Warranty information contained in this User Guide will describe your limited coverage from ViewSonic Corporation, which is also found on our web site at http:// www.viewsonic.com in English, or in specific languages using the Regional selection box in the upper right corner of our website.
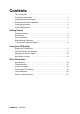
Contents TCO Information .......................................................................................... i Compliance Information.............................................................................. 1 Important Safety Instructions...................................................................... 2 Declaration of RoHS Compliance............................................................... 3 Copyright Information .......................................................................
TCO Information Congratulations! The display you have just purchased carries the TCO’03 Displays label. This means that your display is designed, manufactured and tested according to some of the strictest quality and environmental requirements in the world. This makes for a high performance product, designed with the user in focus that also minimizes the impact on our natural environment.
Compliance Information For U.S.A. This device complies with part 15 of FCC Rules. Operation is subject to the following two conditions: (1) this device may not cause harmful interference, and (2) this device must accept any interference received, including interference that may cause undesired operation. This equipment has been tested and found to comply with the limits for a Class B digital device, pursuant to part 15 of the FCC Rules.
Important Safety Instructions 1. Read these instructions completely before using the equipment. 2. Keep these instructions in a safe place. 3. Heed all warnings. 4. Follow all instructions. 5. Do not use this equipment near water. Warning: To reduce the risk of fire or electric shock, do not expose this apparatus to rain or moisture. 6. Clean with a soft, dry cloth. If further cleaning is required, see “Cleaning the Display” in this guide for further instructions. 7.
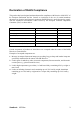
Declaration of RoHS Compliance This product has been designed and manufactured in compliance with Directive 2002/95/EC of the European Parliament and the Council on restriction of the use of certain hazardous substances in electrical and electronic equipment (RoHS Directive) and is deemed to comply with the maximum concentration values issued by the European Technical Adaptation Committee (TAC) as shown below: Substance Proposed Maximum Concentration Actual Concentration Lead (Pb) 0.1% < 0.
Copyright Information Copyright © ViewSonic® Corporation, 2008. All rights reserved. Macintosh and Power Macintosh are registered trademarks of Apple Inc. Microsoft, Windows, Windows NT, and the Windows logo are registered trademarks of Microsoft Corporation in the United States and other countries. ViewSonic, the three birds logo, OnView, ViewMatch, and ViewMeter are registered trademarks of ViewSonic Corporation. VESA is a registered trademark of the Video Electronics Standards Association.
Getting Started Congratulations on your purchase of a ViewSonic® LCD display. Important! Save the original box and all packing material for future shipping needs. NOTE: The word “Windows” in this user guide refers to the following Microsoft operating systems: Windows ‘95, Windows NT, Windows ‘98, Windows 2000, Windows Me (Millennium), Windows XP, and Windows Vista.
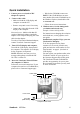
Quick Installation 1. Connect power cord (and AC/DC adapter if required) • Wait for the CD-ROM to auto-start. NOTE: If the CD-ROM does not autostart: double-click on the CD-ROM icon in the Windows Explorer, then double-click on viewsonic.exe. 2. Connect video cable • Make sure both the LCD display and computer are turned OFF • Remove rear panel covers if necessary • Connect the video cable from the LCD display to the computer Macintosh users: Models older than G3 require a Macintosh adapter.
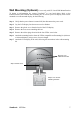
Wall Mounting (Optional) For use only with UL Listed Wall Mount Bracket To obtain a wall-mounting kit, contact ViewSonic® or your local dealer. Refer to the instructions that come with the base mounting kit. To convert your LCD display from a deskmounted to a wall-mounted display, do the following: Step 1. Verify that the power button is turned Off, then disconnect the power cord. Step 2. Lay the LCD display face down on a towel or blanket. Step 3. Remove the plastic cover from the back of the LCD display.
To Raise and Lower the display You can easily raise and lower the display panel (the head) manually. As you face the front of the display, take hold of each side of the head and pull up or down. The panel should move easily.
Using the LCD Display Setting the Timing Mode Setting the timing mode is important for maximizing the quality of the screen image and minimizing eye strain. The timing mode consists of the resolution (example 1280 x 1024) and refresh rate (or vertical frequency; example 60 Hz). After setting the timing mode, use the OSD (On-screen Display) controls to adjust the screen image. For the best picture quality set your LCD display timing mode to: VESA 1280 x 1024 @ 60Hz. To set the Timing Mode: 1.
Adjusting the Screen Image Use the buttons on the front control panel to display and adjust the OSD controls which display on the screen. The OSD controls are explained at the top of the next page and are defined in “Main Menu Controls” on page 12. Main Menu with OSD controls Front Control Panel shown below in detail Standby Power On/Off Power light Blue = ON Orange = Power Saving Audio Mute button turns the sound off Displays the Main Menu or exits the control screen and saves adjustments.
Do the following to adjust the display setting: 1. To display the Main Menu, press button [1]. NOTE: All OSD menus and adjustment screens disappear automatically after about 15 seconds. This is adjustable through the OSD timeout setting in the setup menu. 2. To select a control to adjust, pressSorTto scroll up or down in the Main Menu. 3. After the desired control is selected, press button [2]. A control screen like the one shown below appears.
Main Menu Controls Adjust the menu items shown below by using the up S and down T buttons. Control Explanation Auto Image Adjust sizes and centers the screen image automatically. Contrast adjusts the difference between the image background (black level) and the foreground (white level). Brightness adjusts background black level of the screen image. Input Select toggles between inputs if you have more than one computer connected to the LCD Display.
Control Explanation 7500K-Adds blue to the screen image for cooler white (used in most office settings with fluorescent lighting). 6500K-Adds red to the screen image for warmer white and richer red. 5400K-Adds green to the screen image for a darker color. User Color Individual adjustments for red (R), green (G), and blue (B). 1. To select color (R, G or B) press button [2]. 2. To adjust selected color, pressSandT.
Control Explanation H./V. Position (Horizontal/Vertical Position) moves the screen image left or right and up or down. Fine Tune sharpens the focus by aligning text and/or graphics with pixel boundaries. NOTE: Try Auto Image Adjust first. Sharpness adjusts the clarity and focus of the screen image. Setup Menu displays the menu shown below: Language Select allows the user to choose the language used in the menus and control screens. Resolution Notice allows the user to enable or disable this notice.
Control Explanation OSD Position allows the user to move the OSD menus and control screens. OSD Time Out sets the length of time the OSD screen is displayed. For example, with a “15 second” setting, if a control is not pushed within 15 seconds, the display screen disappears. OSD Background allows the user to turn the OSD background On or Off.
Other Information Specifications LCD Type 17” (full 17" viewable diagonal area), TFT (Thin Film Transistor), SXGA, 0.264 mm pixel pitch Input Signal Color Filter RGB vertical stripe Glass Surface Anti-Glare Video RGB analog (0.7/1.
Troubleshooting No power • Make sure power button (or switch) is ON. • Make sure A/C power cord is securely connected to the LCD display. • Plug another electrical device (like a radio) into the power outlet to verify that the outlet is supplying proper voltage. Power is ON but no screen image • Make sure the video cable supplied with the LCD display is tightly secured to the video output port on the back of the computer.
Customer Support For technical support or product service, see the table below or contact your reseller. NOTE: You will need the product serial number. Country/Region Website T = Telephone F = FAX Email Australia/New Zealand www.viewsonic.com.au AUS= 1800 880 818 NZ= 0800 008 822 service@au.viewsonic.com Canada www.viewsonic.com T (Toll-Free)= 1-866-463-4775 T (Toll)= 1-424-233-2533 service.ca@viewsonic.com F= 1-909-468-1202 Europe/Middle East/ Baltic countries/North Africa www.viewsoniceurope.
Cleaning the LCD Display • MAKE SURE THE LCD DISPLAY IS TURNED OFF. • NEVER SPRAY OR POUR ANY LIQUID DIRECTLY ONTO THE SCREEN OR CASE. To clean the screen: 1. Wipe the screen with a clean, soft, lint-free cloth. This removes dust and other particles. 2. If the screen still not clean, apply a small amount of non-ammonia, non-alcohol based glass cleaner onto a clean, soft, lint-free cloth, and wipe the screen. To clean the case: 1. Use a soft, dry cloth. 2.
Limited Warranty VIEWSONIC® LCD DISPLAY What the warranty covers: ViewSonic warrants its products to be free from defects in material and workmanship, under normal use, during the warranty period. If a product proves to be defective in material or workmanship during the warranty period, ViewSonic will, at its sole option, repair or replace the product with a like product. Replacement product or parts may include remanufactured or refurbished parts or components.
Exclusion of damages: ViewSonic's liability is limited to the cost of repair or replacement of the product. ViewSonic shall not be liable for: 1. Damage to other property caused by any defects in the product, damages based upon inconvenience, loss of use of the product, loss of time, loss of profits, loss of business opportunity, loss of goodwill, interference with business relationships, or other commercial loss, even if advised of the possibility of such damages. 2.
Mexico Limited Warranty VIEWSONIC® DISPLAY PRODUCTS What the warranty covers: ViewSonic warrants its products to be free from defects in material and workmanship, under normal use, during the warranty period. If a product proves to be defective in material or workmanship during the warranty period, ViewSonic will, at its sole option, repair or replace the product with a like product. Replacement product or parts may include remanufactured or refurbished parts or components & accessories.
Contact Information for Sales & Authorized Service (Centro Autorizado de Servicio) within Mexico: Name, address, of manufacturer and importers: México, Av. de la Palma #8 Piso 2 Despacho 203, Corporativo Interpalmas, Col. San Fernando Huixquilucan, Estado de México Tel: (55) 3605-1099 http://www.viewsonic.com/la/soporte/index.htm NÚMERO GRATIS DE ASISTENCIA TÉCNICA PARA TODO MÉXICO: 001.866.823.2004 Hermosillo: Villahermosa: Distribuciones y Servicios Computacionales SA de CV.