ViewSonic ® DPF8-CAM Digital Photo Frame - User Guide - Guide de l’utilisateur - Bedienungsanleitung - Guía del usuario - Guida dell’utente - Guia do usuário - Kullanιcι kιlavuzu - Gebruikshandleiding - Pyководство пользователя - 使用手冊 (繁體) - 使用手册 (简体) - 사용자 안내서 IMPORTANT: Please read this User Guide to obtain important information on installing and using your product in a safe manner, as well as registering your product for future service.
Compliance Information FCC Statement This device complies with part 15 of FCC Rules. Operation is subject to the following two conditions: (1) this device may not cause harmful interference, and (2) this device must accept any interference received, including interference that may cause undesired operation. This equipment has been tested and found to comply with the limits for a Class B digital device, pursuant to part 15 of the FCC Rules.
Important Safety Instructions 1. Read these instructions completely before using the equipment. 2. Keep these instructions in a safe place. 3. Heed all warnings. 4. Follow all instructions. 5. Do not use this equipment near water. Warning: To reduce the risk of fire or electric shock, do not expose this apparatus to rain or moisture. 6. Clean with a soft, dry cloth. 7. o not block any ventilation openings. Install the unit in accordance with the manufacturer’s D instructions. 8.
Declaration of RoHS Compliance This product has been designed and manufactured in compliance with Directive 2002/95/EC of the European Parliament and the Council on restriction of the use of certain hazardous substances in electrical and electronic equipment (RoHS Directive) and is deemed to comply with the maximum concentration values issued by the European Technical Adaptation Committee (TAC) as shown below: Proposed Maximum Concentration Actual Concentration Lead (Pb) 0.1% < 0.1% Mercury (Hg) 0.
Copyright Information Copyright © ViewSonic® Corporation, 2011. All rights reserved. ViewSonic, the three birds logo, OnView, ViewMatch, and ViewMeter are registered trademarks of ViewSonic Corporation. Disclaimer: ViewSonic Corporation shall not be liable for technical or editorial errors or omissions contained herein; nor for incidental or consequential damages resulting from furnishing this material, or the performance or use of this product.
Table of Contents Getting Started................................................................. 2 Package Content................................................................................... 2 Product Features................................................................................... 2 Photo frame Overview........................................................................... 3 How to set up the stand.........................................................................
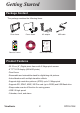
Getting Started Package Content The package contains the following items: Photo frame Frame Stand AC adapter Remote Control CD Quick Start Guide USB cable Product Features - 20.
Photo frame Overview Infrared receiver for Remote Control LCD Panel Slideshow / OK button Camera button (use this button to take a photo) (use this button to play/pause slideshow) Lens Power indicator Power switch Crop control COPY button USB drive connector DELETE button Speaker and Ventilatory holes EXIT button Menu Navigation MENU button (Up button Down button Left button Right button) DC power jack/USB connector for PC SD/SDHC/MMC/ MS Pro card slot Prop * * Follow the diagram on the left to
How to set up the stand 1 2 Photo Frame Stand 1) Align the mark on the stand with the mark on the back of the photo frame. Then gently place the ring of the stand on top of the lens to attach the stand. 2) Gently rotate the stand clockwise as indicated until the mark is aligned with the mark. 3) Unfold the stand on the table by following the steps in the illustrations: 4) Place the photo frame on a flat surface such as a table.
Connecting to AC power Connect one end of the accessory power cable to the photo frame, and then connect the power adapter to a power socket. Note: Always use the accessory power cable only. Powering on/off your photo frame To power on the photo frame, turn the power switch to the ON position. When power is turned on, the power indicator will light up. To power off the photo frame, turn the power switch to the OFF position.
Operations and Functions Best Capture Environment Light source Photo When capturing an old photo into the photo frame, the photo should be well lit as indicated. The light source should come from above and behind the handler to produce the best result. Setting language 1) Press the MENU button ( 2) Move the Menu Navigation ( press ) to bring up the main menu. ) up/down/left/right to choose Setting and to confirm.
Recapturing old photos ● LCD indicators in preview mode Power indicator ( : AC power) Image resolution Memory device ( : SD/SDHC/MMC/MS Pro, : USB device, no indicator : internal memory) Remaining shots ● Select camera resolution: You can take the photos in two resolutions: 3 or 5 Mega-pixel. The default resolution is 5 Mega-pixel. To change to lower resolution for keeping picture size small, press MENU button ( ) on the reverse and use the Menu Navigation ) to select Setting.
● How to Save or Cancel the pictures? After the photo is taken by the camera, the photo frame automatically enters Playback mode. Yellow frame ( ) indicates the picture size ready to be saved in the photo frame. The camera is programed to automatically detect the picture size shown in yellow frame. However, sometimes adjustment is needed. Use the Menu Navigation ( ) on the back side to move up or down to select Save, Cancel, or Adjust function. A.
Playing back your files This product is a photo frame to playback photos (JPEG) taken by your digital camera. To see your photos in action, only a few simple steps are needed: 1) Save your favorite photos onto a memory card or a USB drive. (You may need to use your computer and a card reader for this operation.) 2) Insert the card into the photo frame or plug the USB drive to the photo frame. 3) Power on the photo frame. 4) Wait for the slideshow to automatically start.
In index mode, you can: ● View a photo in full screen. Use the Menu Navigation ( ) (up/down/left/right) to move the highlight box. The pages can be scrolled up or down as well. When the desired photo is selected, press to confirm. Note that this operation will switch the mode to slideshow. ● Copy a photo from your memory card to the internal memory and vice versa. Use the Menu Navigation ( ) (up/down/left/right) to select the desired file and press the COPY button ( ). The YES/NO window will show up.
Setting Date /Time / Alarm When you power on your photo frame for the first time, you are recommended to adjust the time and language settings.To set date/time, you can press the MENU button ( ) to go to the main menu. Move the Menu Navigation ( left/right to choose Date/Time and press to confirm.
Main Menu The main menu provides several options for you to fine-tune this product’s functions. The following table gives details on main menu. How to... Action Bring up the main menu Press the MENU button ( Move the highlight bar Use the Menu Navigation ( Enter sub-menu / Confirm an item Press Exit menu / Go back to slideshow display Press the EXIT button ( ). ) (up/down/left/right). (the Slideshow/OK button). ).
Advanced Setting Use the Menu Navigation ( ) on the back side to move Up/Down/Left/Right to select the item and press ) to confirm the setting. Slideshow button ( Language: Set the language to be used for “On Screen Display”. Camera resolution: Set the photo resolution in 3 Mega-pixel or 5 Mega-pixel. Sleep mode: Set the auto-power-off function. Off/30min/1hr/2hr/4hr/8hr Screen setting: Set the screen Brightness/Contrast (-4 to +4). Slideshow speed: Set the speed for slideshow playback.
Appendix Troubleshooting Problem Cause Solution Power indicator is not lit. Power is off or power indicator is broken. Check whether the power supply (AC adapter) is well connected and the socket works normally. The order of image files is not what I wanted. The order of files is sorted by file name.Numbers have higher priority than alphabets. Rename the files. Note: Since there are many brands of memory cards, please test the compatibility on the spot when you purchase the memory cards.
Specifications Item Panel Photo Capture Photo Storage Interface Date / Time Power Operating Condition Storage Condition ViewSonic Specification Panel Size 20.32 cm(8’’) TFT LCD Panel Resolution 800x600 RGB Image Sensor 5 mega-pixel CMOS (2592x1944) Resolution Best mode (5 Mega-pixel) / Fine mode (3 Mega-pixel) Lens Fixed lens (Focus range: 19 to 23 cm) Digitalize old photos Supports 9x13cm (3.5’’ x 5’’) and 10x15cm (4’’ x 6’’) photos Photo Format JPEG Max.
Customer Support For technical support or product service, see the table below or contact your reseller. Note : You will need the product serial number. Website T = Telephone F = FAX Email www.viewsonic.com.au AUS= 1800 880 818 NZ= 0800 008 822 service@au.viewsonic.com Canada www.viewsonic.com T (Toll-Free)= 1-866-463-4775 T (Toll)= 1-424-233-2533 service.ca@viewsonic.com F= 1-909-468-3757 Europe www.viewsoniceurope.com www.viewsoniceurope.com/uk/support/call-desk/ Hong Kong www.hk.viewsonic.
Limited Warranty ViewSonic® Digital Photo Frame What the warranty covers: ViewSonic warrants its products to be free from defects in material and workmanship, under normal use, during the warranty period. If a product proves to be defective in material or workmanship during the warranty period, ViewSonic will, at its sole option, repair or replace the product with a like product. Replacement product or parts may include remanufactured or refurbished parts or components.
Limitation of implied warranties: There are no warranties, express or implied, which extend beyond the description contained herein including the implied warranty of merchantability and fitness for a particular purpose. Exclusion of damages: ViewSonic’s liability is limited to the cost of repair or replacement of the product. ViewSonic shall not be liable for: 1.
Mexico Limited Warranty ViewSonic® Digital Photo Frame What the warranty covers: ViewSonic warrants its products to be free from defects in material and workmanship, under normal use, during the warranty period. If a product proves to be defective in material or workmanship during the warranty period, ViewSonic will, at its sole option, repair or replace the product with a like product. Replacement product or parts may include remanufactured or refurbished parts or components.
Contact Information for Sales & Authorized Service (Centro Autorizado de Servicio) within Mexico: Name, address, of manufacturer and importers: México, Av. de la Palma #8 Piso 2 Despacho 203, Corporativo Interpalmas, Col. San Fernando Huixquilucan, Estado de México Tel: (55) 3605-1099 http://www.viewsonic.com/la/soporte/index.htm NÚMERO GRATIS DE ASISTENCIA TÉCNICA PARA TODO MÉXICO: 001.866.823.2004 Hermosillo: Distribuciones y Servicios Computacionales SA de CV. Calle Juarez 284 local 2 Col. Bugambilias C.