ViewSonic ® E50/E50B CRT Monitor - User Guide - Guide de l’utilisateur - Guía del usuario - Guia do usuário ViewSonic ® Model No.
Contents Compliance Information ................................................................................. 1 Important Safety Instructions .......................................................................... 2 Declaration of RoHS Compliance ................................................................... 3 Copyright Information ...................................................................................... 4 Product Registration ........................................................
Compliance Information FCC Statement This device complies with part 15 of FCC Rules. Operation is subject to the following two conditions: (1) this device may not cause harmful interference, and (2) this device must accept any interference received, including interference that may cause undesired operation. This equipment has been tested and found to comply with the limits for a Class B digital device, pursuant to part 15 of the FCC Rules.
Important Safety Instructions 1. Read these instructions completely before using the equipment. 2. Keep these instructions in a safe place. 3. Heed all warnings. 4. Follow all instructions. 5. Do not use this equipment near water. Warning: To reduce the risk of fire or electric shock, do not expose this apparatus to rain or moisture. 6. Clean with a soft, dry cloth. If further cleaning is required, see “Cleaning the Display” in this guide for further instructions. 7.
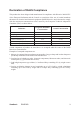
Declaration of RoHS Compliance This product has been designed and manufactured in compliance with Directive 2002/95/EC of the European Parliament and the Council on restriction of the use of certain hazardous substances in electrical and electronic equipment (RoHS Directive) and is deemed to comply with the maximum concentration values issued by the European Technical Adaptation Committee (TAC) as shown below: Proposed Maximum Concentration Actual Concentration Lead (Pb) 0.1% < 0.1% Mercury (Hg) 0.
Copyright Information Copyright © ViewSonic® Corporation, 2007. All rights reserved. Macintosh and Power Macintosh are registered trademarks of Apple Computer, Inc. Microsoft, Windows, Windows NT, and the Windows logo are registered trademarks of Microsoft Corporation in the United States and other countries. ViewSonic ®, the three birds logo, OnView, ViewMatch, and ViewMeter are registered trademarks of ViewSonic Corporation. VESA is a registered trademark of the Video Electronics Standards Association.
Getting Started Congratulations on your purchase of a ViewSonic® color monitor. Important! Save the original box and all packing material for future shipping needs. Note : The word “Windows” in this user guide refers to the following Microsoft operating systems: Windows 95, Windows NT, Windows 98, Windows 2000, Windows ME (Millennium), and Windows XP.
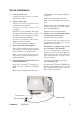
Quick Installation 1. Connect power cord CD-ROM drive, see “Customer Support” on page 14. Connect the power cord to a properly grounded AC outlet. 2. Wait for the CD-ROM to auto-start. Note : If the CD-ROM does not autostart: Connect video cable • Make sure both the monitor and computer are turned OFF. double-click on the CD-ROM icon in Windows Explorer, and then doubleclick on viewsonic.exe. • Con ne ct t he v ideo cable t o t he computer.
Using the Monitor Setting the Timing Mode Setting the timing mode is important for maximizing the quality of the screen image and minimizing eye strain. The timing mode consists of the resolution (example 800 x 600) and refresh rate (or vertical frequency; example 85 Hz). After setting the timing mode, use the OSD (On Screen Display) controls to adjust the screen image. For the best picture quality set your monitor timing mode to: VESA 800 x 600 @ 85 Hz. To set the Timing Mode: 1.
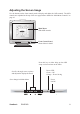
Adjusting the Screen Image Use the buttons on the front control panel to display and adjust the OSD controls. The OSD controls are explained at the top of the next page and are defined in “Main Menu Controls” on page 10.
Do the following to adjust the screen image: 1. To display the Main Menu, press button “MENU”. 2. To select a control you want to adjust, press the arrow buttons on the front control panel of your monitor and scroll through the choices. When the control you want is highlighted, press button “MENU”. 3. To adjust the selected control, such as CONTRAST in the sample above, press the arrow buttons. 4. To save the control setting and Exit the menu press button “EXIT” twice.
Main Menu Controls Adjust the menu items shown below by using the up and down buttons. CONTRAST BRIGHTNESS H- CENTER H- SIZE V- CENTER Adjust the picture’s horizontal size. Adjust the vertical position of the picture. ZOOM Adjust the picture’s horizontal and vertical size simultaneously. PINCUSHION Adjust the pincushion and barrel. TRAPEZOID Adjust the picture’s trapezoid distortion. GRAM ROTATION COLOR TEMPERATURE USER COLOR (Red / Blue) ViewSonic Adjust the horizontal position of the picture.
DEGAUSS If color impurity occurs when moving or swiveling the monitor, press the Shuttle Knob and degauss to fix the picture condition. MOIRE REDUCE Moire is the result of interference between the phosphor layout and the video signal. In some cases, you may find the moire very noticeable. Press the Shuttle Knob to enter in the moire reduce setting. Please adjust the level to the optimum condition. Note: Too high of a setting will cause the picture to shake.
Other Information Specifications CRT Type Dot Pitch Phosphor Glass surface O 15” (13.8” viewable diagonal area). 90 deflection, 29.1 mm Neck 0.24 mm horizontal, 0.14 mm vertical, and 0.28 mm diagonal dot pitch RGB, P 22 medium short persistence TM~57 %, anti-glare, anti-reflection and anti-statistic Input Signal Video Sync RGB Analog (0.7/1.0 Vp-p, 75 Ohms) fH:30-54 kHz, fv:50-120 Hz Separate Sync., Composite Sync.
Troubleshooting No power • Make sure power button (or switch) is ON. • Make sure A/C power cord is securely connected to the back of the monitor and to a power outlet. • Plug another electrical device (like a radio) into the power outlet to verify that the outlet is supplying proper voltage. Power is ON but no screen image • Make sure the video cable supplied with the monitor is tightly secured to the video output port on the back of the computer.
Customer Support For technical support or product service, see the table below or contact your reseller. Note : You will need the product serial number. Country/ Region Web Site T=Telephone F=Fax E-mail United States www.viewsonic.com T= 800 688 6688 F= 909 468 1202 service.us@viewsonic.com Canada www.viewsonic.com T= 866 463 4775 F= 909 468 5814 service.ca@viewsonic.com Latin America (Mexico/ Chile) www.viewsonic.com/la/ T= 866 323 8056 F= 909 444 5655 soporte@viewsonic.
Cleaning the Monitor • Make sure the monitor is turned off. • Never spray or pour any liquid directly onto the screen or case. To clean the screen : 1. Wipe the screen with a clean, soft, lint-free cloth. This removes dust and other particles. 2. If further cleaning is required not clean, apply a small amount of non-ammonia, nonalcohol based glass cleaner onto a clean, soft, lint-free cloth, and wipe the screen. To clean the case : 1. Use a soft, dry cloth. 2.
Limited Warranty VIEWSONIC® CRT MONITOR What the warranty covers: ViewSonic warrants its products to be free from defects in material and workmanship, under normal use, during the warranty period. If a product proves to be defective in material or workmanship during the warranty period, ViewSonic will, at its sole option, repair or replace the product with a like product. Replacement product or parts may include remanufactured or refurbished parts or components.
ViewSonic ®