EP46/EP52/EP55 Series Multimedia Digital Poster User Guide Model No.
Compliance Information NOTE: This section addresses all connected requirements and statements regarding regulations. Confirmed corresponding applications shall refer to nameplate labels and relevant markings on unit. FCC Statement This device complies with Part 15 of the FCC Rules. Operation is subject to the following two conditions: (1) this device may not cause harmful interference, and (2) this device must accept any interference received, including interference that may cause undesired operation.
CE Conformity for European Countries The device complies with the EMC Directive 2004/108/EC and Low Voltage Directive 2006/95/EC. Following information is only for EU-member states: The mark shown to the right is in compliance with the Waste Electrical and Electronic Equipment Directive 2002/96/EC (WEEE). The mark indicates the requirement NOT to dispose of the equipment as unsorted municipal waste, but use the return and collection systems according to local law.
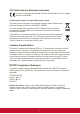
Certifications EP4602 EP4602T EP4610 EP4610T EP4646 EP4646T ● ● ● ● ● ● ● ● ● ● ● ● EP5202 EP5502 EP5502T EP5555 EP5555T ● ● ● ● ● ● ● ● ● ● ● ● ● Certifications ● ● iii
Declaration of RoHS2 Compliance This product has been designed and manufactured in compliance with Directive 2011/65/EU of the European Parliament and the Council on restriction of the use of certain hazardous substances in electrical and electronic equipment (RoHS2 Directive) and is deemed to comply with the maximum concentration values issued by the European Technical Adaptation Committee (TAC) as shown below: Substance Proposed Maximum Concentration Actual Concentration Lead (Pb) 0,1% < 0,1% Mercur
Safety Precautions FOR OPTIMUM PERFORMANCE, PLEASE NOTE THE FOLLOWING WHEN SETTING UP AND USING THE LCD COLOR MONITOR: • DO NOT REMOVE MONITOR BACK COVER. There are no user serviceable parts inside and opening or removing covers may expose you to dangerous shock hazards or other risks. Refer all servicing to qualified service personnel. • Do not spill any liquids into the cabinet or use your monitor near water.
CAUTION: Immediately unplug your monitor from the wall outlet and refer servicing to qualified service personnel under the following conditions: • When the power supply cord or plug is damaged. • If liquid has been spilled, or objects have fallen into the monitor. • If the monitor has been exposed to rain or water. • If the monitor has been dropped or the cabinet damaged. • If the monitor does not operate normally by following operating instructions.
Contents Compliance Information FCC Statement..................................................................................... i For Canada.......................................................................................... i CE Conformity for European Countries................................................ii Industry Canada Notice........................................................................ii R&TTE Compliance Statement............................................................
4. RS232 Commands 5. Specifications Other Information Customer Support............................................................................. 19 Limited Warranty...............................................................................
Copyright Information Copyright © ViewSonic® Corporation, 2013. All rights reserved. ViewSonic©, the three birds logo, OnView, ViewMatch, and ViewMeter are registered trademarks of ViewSonic Corporation. ENERGY STAR® is a registered trademark of the U.S. Environmental Protection Agency (EPA). As an ENERGY STAR® partner, ViewSonic Corporation has determined that this product meetsthe ENERGY STAR® guidelines for energy efficiency.
Product Registration To meet your future needs, and to receive any additional product information as it becomes available, please register your product on the Internet at: www.viewsonic.com. The ViewSonic® Wizard CD-ROM also provides an opportunity for you to print the registration form, which you may mail or fax to ViewSonic.
Congratulations on your purchase of ViewSonic ePoster. Please carefully read and follow all instructions in the manual before first use. The apparatus shall not be exposed to dripping or splashing and objects filled with liquids, such as vases, shall not be placed on the apparatus. CAUTION: 1. D anger of explosion if battery is incorrectly replaced. Replace only with the same or equivalent type. 2.
1.3 Attention about CF, SD, USB usage 1. SD and CF card can’t be used at the same me. 2. When there is a SD card in the machine, the media files will be imported from flash disk to the SD card automatically if there is a flash disk plugged in. 3. The p roduct will read the media file on the flash disk, if there is no CF or SD card. 4. SD card is the best choice if playing video file. 5. The video file code rate should be below 20M bit rate. 6. SD card is recommended for playing HD program. 1.
1.5 Internal media player support format 1. File format Regular play Video Codec Mpeg1,2 Container MPG, MPEG MPEG2 –TS H264-TS MPEG2 –PS MPEG2, H.264 MPEG2 MPEG4 Xvid 1.00, Xvid 1.01, Xvid 1.02, AVI, MP4 Xvid 1.03, Xvid 1.10-beta1/2 H.264 H.264, MPEG1,2,4 MKV Seamless play Video Codec Container Mpeg1, 2 MPG, MPEG MPEG2, H.264 H264-TS Photo Container jpeg .jpg Supported audio coded format Audio WMA, MP3, M4A(AAC) 2. Support video files include: MPEG2, H.264 file. DO NOT support DIVX6.
1.6 Filter Replacement 1. Open access door. 2. Remove filter cover. 3. Clean or replace filter. 4. Install filter cover. 5. Close access door. Note: 1. I nspect the fan filters every 3 months. 2. Use water to clean the filter. 3. If the filter broken, please replace it.
2. Interface definition 2.1 Product features Function CVBS port: Composite signal input. VGA port: VGA signal input. ** VGA Audio: VGA audio input. YPbPr: Component signal input. ** HDMI port: HDMI signal input. Memory Card: SD (Class 6, up to 32GB) USB port: USB flash disk input. (for upload content) RS232: RS232 Control , see Chapter 4. LAN: Ethernet port for Network Media Player content update.
3. Remote control and menu setup 3.
3.2 Replace remote control battery 1. Open the battery cover. 2. Take out the battery box in the right direction as shown in the picture below. 3. Remove the used battery. 4. Insert the new battery in the right way. 5. Put back the cover. 3.3 Menu operation Main Menu includes the following sub-menu: Input Source, System, Display, Clock Setup, ON/OFF Time Setup, Volume Setup. Press SETUP to enter Main Menu, press ↑↓ to select the right item, press PLAY to confirm selection.
Input Source: The default input is card reading system, press ↑↓ to select the right input, press PLAY to confirm selection. Input Source Storage YPbPr HDMI AV VGA Return Main Menu System: Input Source Language: Clock: Clock mode: Encrypt: Auto play system: Seamless play: Photo time: Restore default: ENGLISH OFF --:-- OFF 10s Return Language: 简体中文, ENGLISH, 繁體中文. Show time: On/off, the default mode is off.
Function Mode: Programs can be played repeatedly according to pre-setup me. Press ←→ bu on to select item and press ↑↓ to set up parameter. Auto play system Auto Play Configuration Play Port 1 Storage Start Time Port Off 0:00 Storage Off 0:00 Storage Off 0:00 Storage Off 0:00 Storage Return Function Mode Time Set 0:00 End Time 0:0 0:0 0:0 0:0 Time mode: It will play according to programmed schedule. There are 4 time sessions to set up.
PC Setting: only applicable with VGA port. Auto Adjust: adjust automatically according to the input signal. Horizontal Pos. / Vertical Pos.: adjust the position. Clock: adjust the clock. Phase: adjust the phase. Clock Setup: Press ←→ button to select desired items and press ↑↓ setup parameter. ON/OFF Time Setup: It can be set to two modes: Uniform Mode, Week Mode. Uniform Mode: Set it for the whole one week, for example, turn it on at 8 am, and turn it off at 10 Pm.
There are three on/off modes: Normally On, Always Off, On/off setup Normally on: the player keeps turning on once power is connected. Always off: the player will turn off after two minutes if there is no operation. On/Off time setup: 3 groups of On/off setup provided in the menu. On/Off Time Setup On/Off Mode Uniform Mode Everyday On/Off Mode Normally on Active On Time Range 1 Off 0:00 Range 2 Off 0:00 Range 3 Off 0:00 Return Main Menu Off Time 0:00 0:00 0:00 Uniform mode: Factory default is On.
Volume Setup: Press VOL+, VOL- to adjust volume or press ←→ button to select. VOLUME SETUP DEFAULT VOLUME Range 1 Range 2 Range 3 Confirm Return Main Menu 30 Off Off Off Press PLAY to set up volume of each range, press ↑↓ to select the right item. Choose Return to exit. See below drawing.
4.
5.
Network Connectivity and I/O Ports Ethernet: RJ45 Port (reserve for media player) USB storage host x3 (Type A) (reserve for media player) RS232 Port x1 (Control Power) Digital Poster Features High definition photo and music playback Reserve space for installing any kind of player Local storage Attached 4GB SD card as memory Accessories Documentation CD Quick start guide Remote control & Key Black labels (to cover holes after removing handles) Allen key x 1 (to remove handles) Power supply 100~240V
Certifications EP5502T 802mm x 1950mm x 450mm / 31.57” x 76.77” x 17.72” Net weight: 247.57 lbs / 112.3 kg , Gross weight: 291.01lbs /132 kg EP5555 830 x 1950mm x 465mm / 32.67” x 76.77” x 18.3” Net weight: 304.23 lbs /138kg , Gross weight: 330.69lbs /150 kg EP5555T 830 x 1950mm x 465mm / 32.67” x 76.77” x 18.3” Net weight: 308.64 lbs /140 kg , Gross weight: 335.
Other Information Customer Support For technical support or product service, see the table below or contact your reseller. NOTE: You will need the product serial number. Country/Region Website T = Telephone F = FAX Email Australia New Zealand www.viewsonic.com.au AUS= 1800 880 818 NZ= 0800 008 822 service@au.viewsonic.com Canada www.viewsonic.com T (Toll-Free)= 1-866-463-4775 T (Toll)= 1-424-233-2533 F= 1-909-468-3757 service.ca@viewsonic.com Europe www.viewsoniceurope.com www.viewsoniceurope.
Limited Warranty ViewSonic® Multimedia Digital Poster What the warranty covers: ViewSonic warrants its products to be free from defects in material and workmanship, under normal use, during the warranty period. If a product proves to be defective in material or workmanship during the warranty period, ViewSonic will, at its sole option, repair or replace the product with a like product. Replacement product or parts may include remanufactured or refurbished parts or components.
Limitation of implied warranties: There are no warranties, express or implied, which extend beyond the description contained herein including the implied warranty of merchantability and fitness for a particular purpose. Exclusion of damages: ViewSonic’s liability is limited to the cost of repair or replacement of the product. ViewSonic shall not be liable for: 1.